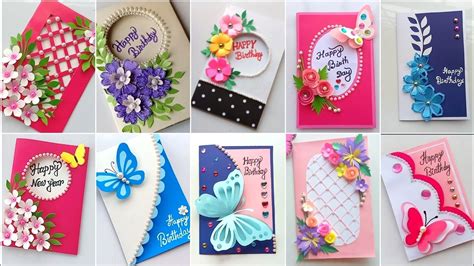
The holiday season, and indeed many special occasions throughout the year, often bring a surge in demand for personalized greeting cards. For those looking to create unique and professional-looking cards, Adobe Photoshop offers a powerful and versatile platform. This guide will walk you through the essential steps of designing greeting card templates in Photoshop, from initial setup to adding intricate details, ensuring you can craft everything from birthday wishes to holiday greetings with ease. We will explore various techniques, drawing from different approaches to provide a robust understanding for both beginners and seasoned designers.
Setting the Foundation: Document Setup and Bleed
Before diving into creative elements, establishing the correct document parameters is crucial. The size of your canvas will depend on your intended printing method. For standard photo and press-printed products, common sizes like 5x7 inches are suitable. Alternatively, you can opt for purpose-built press-printed greeting cards, which often have specific dimensions.
To begin, create a new document in Photoshop. If you plan to have your cards professionally printed, it's advisable to select dimensions suitable for printing, such as A4 size found under the Print tab. Once your document is created, it's time to set up your workspace for optimal efficiency. Navigate to the top right corner of your screen and select "Essentials" from the Workspace dropdown menu. This will arrange your panels in a user-friendly layout.
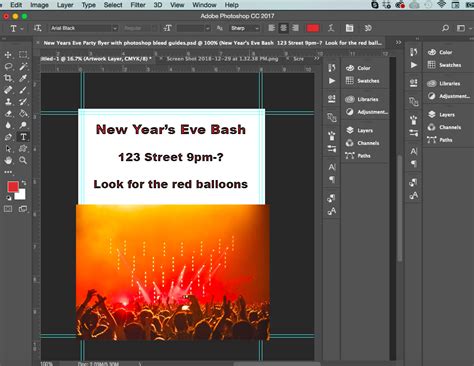
A critical step for professional printing is adding a "bleed." A bleed provides printers with extra margin to account for any slight movements or inconsistencies during the printing process. To add a bleed, press Command-R to open your Rulers. Then, go to Image > Canvas Size. In the "New Size" section, increase both the Width and Height by 0.3 cm. This small but significant addition ensures that your design extends to the very edge of the printed card without any unwanted white borders.
Incorporating Design Elements: Papers, Shapes, and Images
With your document properly set up, you can begin layering your design. A common starting point is to download attractive digital papers. These can serve as backgrounds or foundational textures for your card.
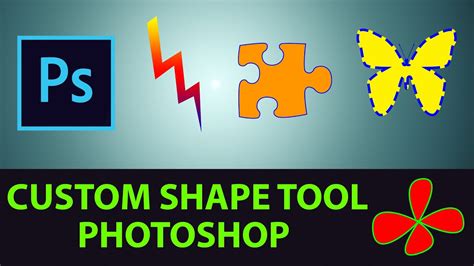
For more structured design elements, Photoshop's custom shapes tool is invaluable. Select the "Custom Shape Tool" and drag a desired shape onto your template. This can be used to create frames, decorative borders, or even specific areas for text or images.
Integrating personal photographs or custom artwork is often a key component of greeting cards. To do this, drag your image file onto your Photoshop template. In the "Layers" palette, ensure that your image layer is positioned above the custom shape layer you created. To make the image conform to the shape, create a clipping mask. In Photoshop, this is achieved by pressing Command/Ctrl+G. This powerful feature allows you to precisely clip an image within a defined shape, creating a polished and integrated look.
Typography and Decorative Touches
The heart of any greeting card lies in its message. Photoshop offers extensive typographic capabilities to bring your words to life. You can either type directly onto your paper or create specific shapes to house your greetings, similar to how you would integrate an image within a custom shape.
When choosing fonts, consider the overall style of your card. For a handmade or whimsical feel, fonts like "Chamberline" and "Doodle" have been noted to work well, especially when paired with a trending color scheme sourced from sites like Coolors.
To add your text, select the "Horizontal Type Tool" (T). Create a new layer for each distinct text element (e.g., "Happy," "Birthday") to maintain flexibility and organization. Write your chosen words, adjusting font size and color to match your design.
To enhance the typography, you can add decorative elements. For instance, using the "Brush Tool" (B), you can create "squiggles" or outlines around your text. This can be done by creating a new layer named something like "Typography Decor," selecting a suitable brush size (e.g., 20 pt), and drawing around your words.
For a more elaborate design, consider creating graphical elements like "bunting" or "confetti." This involves creating separate layers for outlines and fills of these elements. For confetti, you can use the brush tool at a smaller size (e.g., 10 pt) to draw individual confetti shapes across the card. Remember to create distinct layers for confetti outlines and fills if you intend to color them differently or leave them as outlines.
Create a Bold 3D Text Effect — Photoshop Tutorial
Advanced Template Design: Smart Objects and Panel Layouts
For those who frequently create greeting cards or want a highly reusable design, understanding advanced template techniques is beneficial. A standard 8.5x11 inch sheet can be folded into quarters to create a basic greeting card. The key is to visualize this flat sheet as being divided into four panels: the front, the back, and the two inside panels.
To manage these panels effectively, you can use guides to divide your canvas into four equal sections (2 rows x 2 columns). Photoshop can assist with this by allowing you to create guides. Additionally, you can create "crop marks" on a separate layer. These short lines indicate where the paper should be trimmed after printing, which is particularly useful if your printer doesn't print to the absolute edge of the page. Keeping crop marks on their own layer allows you to easily hide or show them as needed.
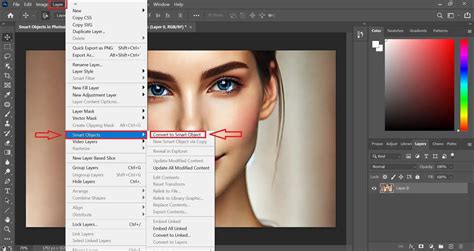
A highly efficient method for managing these panels is by using "Smart Objects." Each panel-front, back, inside, and inside message-can be converted into a Smart Object. This is done by selecting the layer(s) representing a panel, right-clicking in the Layers panel, and choosing "Convert to Smart Object." You can then duplicate these Smart Objects (New Smart Object via Copy) so that each panel can contain independent content.
When you need to edit a specific panel, simply double-click its Smart Object. It will open as a new document. You can then design this panel as you would any standard document, incorporating images, text, and graphics. You can even leverage free resources from Adobe Stock. Once you've finished designing within the Smart Object document, save it. The changes will automatically update in your main greeting card template.
This Smart Object approach allows for significant flexibility. For instance, if a panel needs to be upside down when folded, you can rotate the Smart Object accordingly.
Saving and Exporting Your Template
Once you have meticulously designed your greeting card, saving it correctly is paramount for future use and production. For a reusable design, save your file as a Photoshop Document (.PSD). This preserves all your layers, smart objects, and settings, allowing you to easily revisit and modify the template at any time.
To create a template file that won't be accidentally overwritten, you can save it with a .PSDT extension. Simply go to File > Save As, and when naming your file, manually add a "t" to the end of the .PSD extension.
When you are ready to print or share your finished greeting card design, you will need to export it in a suitable format. Go to File > Export As and choose the desired file format, such as JPEG for general sharing or PDF for professional printing. Ensure that your export settings, particularly resolution and color mode (typically CMYK for print), are appropriate for your intended use.
Paper Considerations for the Final Product
The choice of paper significantly impacts the final appearance and feel of your greeting card. For a handmade doodle style, a textured and rough paper, such as handmade paper, can complement the design beautifully.
Paper thickness is another important factor. Greeting cards are typically printed on thicker paper, with a GSM (Grams per Square Meter) ranging from 230 to 300. While you can use paper as thin as 180 GSM, anything lower might result in a card that feels flimsy, akin to paper torn from a diary.
Ultimately, selecting the right paper is as crucial as the design itself. If you are unsure, it's always a good idea to experiment by printing your design on a few different paper types. This allows you to see which paper best conveys the intended message and aesthetic of your card.
Versatility of Photoshop Greeting Card Templates
The process outlined here for creating a birthday card template can be readily adapted for a wide array of occasions. Once you have established a foundational template, you can quickly customize it for various events:
- Valentine's Day: Design a beautiful Valentine's Day greeting card using a pre-made Photoshop Greeting Card Template.
- New Year's: Ring in the New Year with your very own professionally designed greeting card template for Photoshop.
- General Birthdays: Utilize multi-purpose templates for birthdays, easily editable to suit individual tastes.
- Ramadan: Celebrate Ramadan with a beautiful Photoshop Card Template for Ramadan, often offered with multiple design options.
- Christmas: If you're after a greeting card format for the holiday season, consider creating your own using a Christmas greeting card template for Photoshop.
Beyond these examples, the possibilities are endless. You can design thank you cards, wedding invitations, or any other celebratory message. The ability to create your own greeting card templates in Photoshop empowers you to produce unique, personalized, and professional-quality cards for every occasion, saving time and creative energy with each subsequent design.
By mastering these techniques, you can transform Photoshop from a mere image editor into a powerful tool for crafting heartfelt and visually stunning greeting cards, ready to be shared and cherished.