Photoshop is the industry standard when it comes to photo editing and manipulation, offering a versatile array of tools to create images with transparent layers, transparent backgrounds, and blend layers seamlessly. This guide will walk you through various methods to achieve transparency in your Photoshop projects, from simple background removal to intricate layer masking, ensuring your images are ready for any design application.
Understanding Transparency in Digital Imaging
Transparency in digital images refers to the ability of certain areas of an image to be see-through, allowing whatever is beneath them to show through. This is fundamental in graphic design, web development, and multimedia to create layered compositions, logos that can be placed on any background, and product mockups. The checkerboard pattern commonly seen in Photoshop represents transparent areas, indicating that no pixels are present in that space.
By default, when you open an image in Photoshop, it does not have a transparent background. However, there are times when you may need a transparent background, such as when designing a logo or preparing an image for web use. Photoshop offers several ways to achieve this, catering to both novice users and experienced professionals.
Creating a New Document with a Transparent Background
The simplest way to begin a project with transparency is to create a new document with a transparent background from the outset.
- Start a New Project: Navigate to "File" > "New" in the top menu.
- Set Dimensions: You can choose from preset sizes or enter custom dimensions for your document.
- Transparent Background: When you create a new Photoshop file, it asks you to enter the dimensions for your document. Crucially, the background content option should be set to "Transparent."
- Create Document: Click the "Create" button. You will see a checkerboard pattern as the background. When you create shapes, draw, or import images, they will be placed on this transparent background.
This method ensures that any element you add to this new document will inherently have a transparent canvas to work with.
Making Existing Image Backgrounds Transparent
Often, you'll have an existing image, perhaps a JPEG with a solid background, that you need to make transparent. Photoshop provides multiple tools and techniques to accomplish this.
Method 1: Utilizing the "Remove Background" Quick Action (Photoshop 2024 and later)
For users with recent versions of Photoshop, the "Remove Background" feature offers a remarkably quick and often effective solution.
- Open Image: Open your image file in Photoshop.
- Access Contextual Task Bar: If you don’t see the Contextual Task Bar, go to "Window" > "Contextual Task Bar" from the menu at the top of the application window. Ensure it's checked.
- Remove Background: With your image layer selected, click the "Remove Background" button that appears in the Contextual Task Bar. Photoshop will attempt to automatically discern the subject from the background and mask the background from view. You will see the checkerboard pattern in the masked areas.
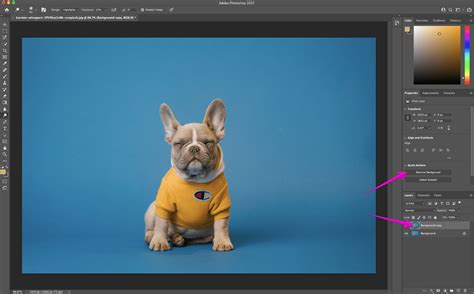
This action doesn't permanently delete pixels but rather creates a layer mask, which is a non-destructive way to hide parts of a layer.
Method 2: Using Selection Tools and Layer Masks
This is a more traditional and versatile approach, offering greater control over the selection process.
Unlock Background Layer (if necessary): By default, when you open a JPEG, the layer is named "Background" and is locked. To edit it, double-click the "Background" layer in the Layers panel and click "OK" to convert it to a regular layer (often named "Layer 0").
Select Your Subject or Background:
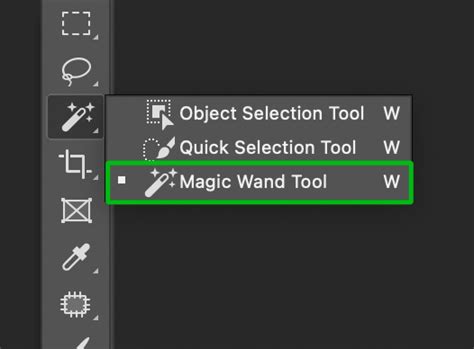
- Magic Wand Tool (W): Excellent for selecting areas with similar colors. Click on the background color you want to remove. Adjust the "Tolerance" in the options bar to control how closely colors must match. The "Contiguous" option limits selection to adjacent areas.
- Quick Selection Tool (W): Works like a brush. Paint over the area you want to select. Photoshop analyzes color and texture to identify edges. To deselect unwanted areas, hold down the "Alt" (Option on Mac) key while dragging.
- Object Selection Tool (W): Uses AI to automatically detect and select entire objects within your image. You can draw a rectangle or lasso around the object you want to select.
- Lasso Tools (L): Offers manual control for irregular selections. The Polygonal Lasso tool creates straight-edged selections, while the standard Lasso tool allows freehand tracing. The Magnetic Lasso tool attempts to automatically snap to edges as you trace.
- Pen Tool (P): Provides unparalleled precision for complex selections. You create paths by placing anchor points and adjusting curve handles. This tool is ideal for sharp, defined edges.
- Select Subject: This AI-powered option attempts to automatically detect and select the main subject of your image.
- Color Range: Go to "Select" > "Color Range…". Use the eyedropper tool to click on the white background. Adjust the "Fuzziness" to control the range of colors selected. This is particularly effective for solid, uniform backgrounds.
Refine Your Selection: Once you have an initial selection, you'll likely need to refine it.
- Select and Mask Workspace: This workspace (accessible via "Select" > "Select and Mask…") offers a powerful suite of tools for refining selections, especially for challenging areas like hair or fur. Tools like the "Refine Edge Brush" are invaluable here. You can adjust settings like "Smooth," "Feather," and "Contrast" to perfect the edges.
- Brush Tool (B) and Eraser Tool (E): Within the "Select and Mask" workspace or when working with layer masks directly, these tools allow you to manually add to or subtract from your selection by painting. Use a black brush to hide (make transparent) and a white brush to reveal.
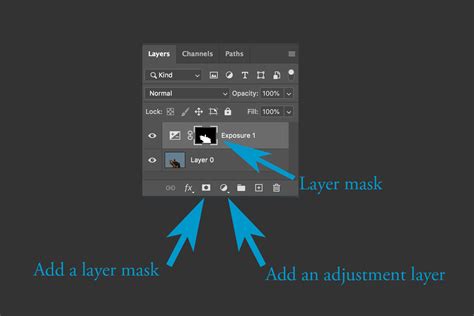
Create a Layer Mask: With your subject or background correctly selected, you can create a layer mask.
- If you selected the background you want to remove, click the "Add layer mask" icon (a rectangle with a circle inside) at the bottom of the Layers panel. This will hide the selected background.
- If you selected the subject you want to keep, click the "Add layer mask" icon. The selected subject will remain visible, and the rest will be masked.
- Alternatively, you can press the "Delete" key (Backspace on Mac) if you have selected the background you want to remove and are not using a mask (this is a destructive edit).
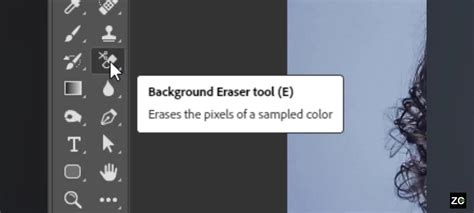
Method 3: Using the Background Eraser Tool
The Background Eraser tool is designed to erase pixels based on color similarity.
Select the Tool: Choose the Background Eraser tool from the toolbar.
Set Options: In the options bar at the top, you can set the "Sampling" method (e.g., "Once" or "Continuous") and the "Limits" (e.g., "Discontiguous" to erase all pixels of the sampled color, or "Find Edges" for more precise edge detection). Set the "Tolerance" - a lower tolerance erases colors very similar to the sampled color, while a higher tolerance erases a broader range.
Erase: Click and drag the tool over the white areas you want to remove. The tool samples the color under the crosshair and erases matching pixels as you move.
This tool can be effective for simpler images but may require careful adjustment of settings for complex backgrounds.
Method 4: Adjusting Opacity and Blending Modes
While not directly for removing a background, understanding layer opacity is crucial for creating partial transparency.
- Layers Panel: Ensure your Layers panel is visible (Window > Layers).
- Opacity Slider: Select the layer you want to make transparent. In the upper-right corner of the Layers panel, you'll find a "Opacity" drop-down menu. Use the slider bar to lower the opacity. At 0% opacity, the layer is completely invisible.
- Blending Modes: Next to the "Opacity" drop-down menu is the "Normal" blending mode. Selecting different blending modes alters how the layer's transparency interacts with the layers below it, creating various visual effects.
Blending Modes - Photoshop for Beginners | Lesson 5
Saving Your Transparent Image
Once you have achieved the desired transparency, saving the file correctly is paramount to preserve it.
File Format Support: You must save your image in a file format that supports transparency.
- PNG (Portable Network Graphics): This is the most recommended format for web graphics and images requiring transparency. PNG supports alpha transparency, meaning pixels can have varying levels of opacity, preventing "halos" or pixelation. PNG-24 offers the highest quality.
- GIF (Graphics Interchange Format): Supports transparency, but it's limited to 1-bit transparency (a pixel is either fully transparent or fully opaque). It's best suited for simple graphics with limited colors or animations.
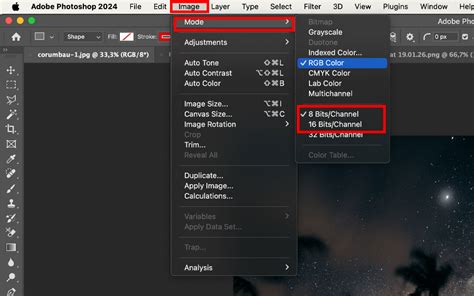
- JPEG (Joint Photographic Experts Group): Does NOT support transparency. Any transparent areas will be filled with a solid color (usually white) when saved as a JPEG.
Saving Options:
- Export As (Recommended for PNG-24): Go to "File" > "Export" > "Export As…" (or use the shortcut Shift+Alt+Ctrl+W on Windows, Shift+Option+Command+W on Mac). In the dialog box:
- Set the "Format" to "PNG."
- Ensure the "Transparency" box is checked.
- Avoid checking "Smaller File (8-bit)" as this converts to PNG-8.
- Adjust "Image Size" if needed for web optimization.
- Click "Export."
- Save for Web (Legacy): For older Photoshop versions, use "File" > "Save for Web (Legacy)…". Select "PNG-24" from the "Preset" dropdown menu and ensure "Transparency" is enabled.
- Export As (Recommended for PNG-24): Go to "File" > "Export" > "Export As…" (or use the shortcut Shift+Alt+Ctrl+W on Windows, Shift+Option+Command+W on Mac). In the dialog box:
Saving as PSD: If you want to retain all layers and editing capabilities for future modifications, save your file as a Photoshop Document (.PSD) using "File" > "Save As…". This preserves the transparency and layer structure.
Advanced Techniques for Transparency
For more complex scenarios or specific effects, Photoshop offers advanced methods:
Using Layer Masks with Adjustment Layers
This method allows for non-destructive creation of transparency based on image luminosity.
- Duplicate Layer: Duplicate your original layer to preserve it.
- Desaturate: Add a "Hue/Saturation" adjustment layer and turn down the saturation to make the image black and white (greyscale).
- Invert and Adjust Curves: Add an "Invert" adjustment layer, followed by a "Curves" adjustment layer. Tweak the Curves until areas you want to be solid are white, and areas you want to be transparent are black.
- Copy and Paste into Mask: Select all (Ctrl+A / Cmd+A) and copy the combined greyscale result (Ctrl+Shift+C / Cmd+Shift+C).
- Create Layer Mask: Create a layer mask on your original layer.
- Edit Mask: Alt-click (Option-click on Mac) the layer mask icon to enter its direct edit mode. Paste the copied greyscale image into the mask.
- Exit Mask Edit: Click back on your original layer thumbnail to exit mask edit mode and hide your adjustment layers.
Partial Transparency in Text and Shapes
For text or shapes, you can achieve partial transparency through "Fill Opacity" or by using brushes with varying opacity.
- Text: Right-click the text layer and choose "Blending Options." Adjust the "Fill Opacity" slider.
- Shapes/Brushes: Use the Eraser tool with a reduced opacity setting, or paint with a brush tool on a layer mask with varying opacity.
Common Misconceptions and Tips
- GIF vs. PNG: While both support transparency, PNG is generally superior for web use due to its alpha transparency capabilities. GIFs are limited to binary transparency.
- JPEG and Transparency: JPEGs do not support transparency. If you need transparency, you must save in a format like PNG.
- "Removing" vs. "Masking": Many Photoshop tools "mask" areas rather than delete them. This is non-destructive, meaning you can always reveal masked areas later by editing the layer mask.
- Saving for Web: Always consider file size for web performance. Optimize images by adjusting dimensions and compression settings when exporting.
- Bulk Actions: For processing multiple images, consider using Photoshop's scripting features ("File" > "Scripts" > "Browse…") to automate the transparency process.
Mastering transparency in Photoshop is a valuable skill that opens up a world of creative possibilities. By understanding the tools and techniques available, you can efficiently create professional-looking images with transparent backgrounds for any purpose.