A photo collage is a creative way to combine multiple pictures into one cohesive and visually appealing image. Photo collages are a fantastic way to compile and showcase cherished memories, offering a powerful medium for storytelling and a great way to express your personal style and creativity. Whether you're looking to organize your camera roll from weekend adventures or create a polished visual portfolio, understanding how to create effective photo grids is key. This tutorial will guide you through the process, from understanding the basics to advanced customization, using various tools and techniques.
Understanding Photo Grids: The Fundamentals
Photo grids are a versatile feature in many photo editing applications, designed for creating organized, polished collages with minimal effort. They offer a structured approach to combining multiple images, making them ideal for those seeking quick, professional results without the complexities of freestyle layouts.
What Are Photo Grids?
At their core, photo grids are pre-defined layouts that divide a canvas into multiple, uniformly sized or intentionally varied sections, each designed to hold a single image. This structure ensures a clean and balanced presentation of your photographs.
When to Use Photo Grids
Photo grids are particularly useful when you have a collection of photos that tell a story, represent different aspects of an event, or simply need a coherent way to be displayed together. They are perfect for:
- Showcasing Events: Compile photos from a birthday party, wedding, or vacation to give a comprehensive overview.
- Before & After Comparisons: Ideal for documenting progress in fitness, home renovations, or creative projects.
- Product Showcases: Businesses can use grids to display multiple product angles or variations.
- Mood Boards and Inspiration: Designers and artists can gather thematic images to create visual inspiration boards.
- Social Media Content: Create visually appealing posts for platforms like Instagram, Facebook, or Pinterest.
Grids vs. Freestyle Collages
While freestyle collages offer complete creative freedom, photo grids provide a more structured and often quicker path to a polished outcome.
- Grids: Offer automatic alignment, consistent spacing, and a professional, organized look. They are excellent for beginners or when time is a constraint.
- Freestyle Collages: Allow for overlapping images, varied sizes, and complete control over placement. This offers maximum creative expression but requires more time and design intuition.
Choosing a grid is often preferred for its efficiency and the immediate sense of order it brings to a collection of images.
Creating a Photo Grid: Step-by-Step
The process of creating a photo grid can vary slightly depending on the software or app you use, but the core steps remain consistent. We'll explore general steps and then delve into specific tool examples.
Step 1: Open the Grid Feature
Most photo editing applications and online tools will have a dedicated "Grid" or "Collage" option. When you launch your chosen platform, look for an option like "Create New," "Start a Project," or a specific "Grid" button.
Step 2: Add Your Photos and Videos
Once you've selected a grid layout, you'll be prompted to upload or select the photos and videos you wish to include. Many platforms allow you to mix photos and videos within the same grid.
Step 3: Arrange and Swap
After adding your media, you can usually drag and drop individual photos into different grid cells. Most tools also offer a "Swap" function, allowing you to easily exchange the positions of two photos. Some advanced software allows you to adjust individual photo positions within their cell, zoom in or out, and even rotate them.
Step 4: Save and Share Your Collage
Once you're satisfied with the arrangement and look of your collage, you'll save it. Options typically include saving to your device (camera roll) or sharing directly to social media platforms. High-resolution output ensures your collages look crisp and professional.
Choosing the Right Grid Layout
The variety of grid layouts available caters to different needs and aesthetic preferences. Understanding these options can help you select the most effective layout for your project.
Equal Grid Layouts
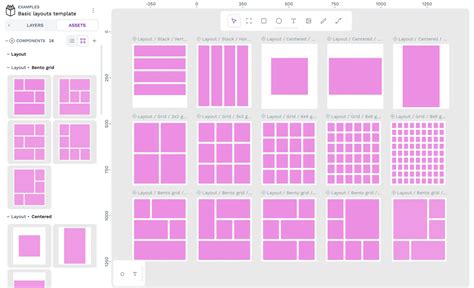
These layouts divide the canvas into a series of identical squares or rectangles. They are the most common and straightforward type of grid.
- 2x2 Grid (4 photos): Perfect for showcasing four key moments, making before/after comparisons, or telling a simple, sequential story.
- 3x3 Grid (9 photos): Ideal for monthly recaps, covering different aspects of an event, or creating an aesthetic "photo dump" for social media.
- 4x4 Grid and Larger: Best suited for extensive event documentation, creating mood boards, or when you have a large number of images to display cohesively.
Fun & Themed Grid Layouts
Beyond standard grids, some applications offer more creative and asymmetrical layouts. These might feature larger central frames with smaller surrounding ones, or interlocking shapes, adding visual interest.
Platform & Purpose-Specific Recommendations
- For Instagram Feed Posts: Opt for portrait-sized grids that fit the standard Instagram post dimensions (e.g., 1080x1350 pixels).
- For Instagram Stories: Use vertical grids that fill the screen (e.g., 1080x1920 pixels).
- For Facebook Covers: Utilize wide, landscape-oriented templates specifically designed for Facebook's cover photo dimensions.
Customizing Your Photo Grids
While templates provide a foundation, customization is where you can truly make your collage your own.
Customize Your Grid
Many tools allow you to adjust the spacing between grid cells, change the border thickness, and even round the corners of your photos for a softer look. Some offer advanced options to create custom grid dimensions by specifying the exact number of rows and columns.
Add Filters, Overlays & Magic Effects
Enhance your photos with a variety of filters and effects available within the app. These can unify the look of your collage, add a specific mood, or simply make individual photos pop. Use filters wisely to enhance your photos but avoid overdoing them, which can make the collage look amateurish.
Add Text and Stickers
Personalize your collage further with text, stickers, and other decorative elements. You can add captions, dates, titles, or fun embellishments to convey more information or add personality.
Advanced Techniques: Photoshop and Lightroom
For those seeking more control and professional-level results, software like Adobe Photoshop and Lightroom offer powerful tools for creating custom photo grids.
Creating Grids in Photoshop
Photoshop's grid system, combined with shapes and clipping masks, provides immense flexibility.
- New Document: Start by creating a new document with your desired dimensions (File > New).
- New Guide Layout: Go to View > New Guide Layout. Use the Columns and Rows sections to define your grid. Ensure the "Preview" box is checked to see the guides as you create them.
- Rectangle Tool: Select the Rectangle tool. Ensure it's set to "Shape" mode (not "Path" or "Pixels") and has no stroke, with a fill color chosen.
- Create Shapes: Draw shapes to fill each grid cell. For efficiency, create one shape, then use the Move tool (V) while holding the Alt (Windows) or Option (Mac) key to duplicate and drag it into position for other cells. Ensure "Snap" is checked (View > Snap) for precise alignment.
- Add Borders (Optional): To add borders to the outside of your grid photos, use Layer Styles. Select a shape layer, go to Layer > Layer Style > Stroke, and set the size and color. You can then copy this layer style to all other shape layers.
- Clipping Masks: Open your desired photos. Drag and drop a photo onto the canvas. With the image layer selected, hold Alt/Option and hover between the image layer and the shape layer below it. Click when the cursor changes to a small square with a downward arrow. This creates a clipping mask, confining the image to the shape. Repeat for all cells.
Custom Photo Collages in Lightroom
While Lightroom is primarily for photo editing and management, it can be used in conjunction with its Print module to create grid-like layouts.
- Print Module: Navigate to the Print module.
- Page Setup: Choose your desired paper size and orientation.
- Layout Settings: Select a grid layout from the "Page Grid" options. You can adjust the number of rows and columns, cell spacing, and margins.
- Image Placement: Drag and drop photos from your Lightroom library onto the grid cells. You can zoom, pan, and adjust individual photos within their cells.
- Export: Once satisfied, you can print the layout directly or export it as a JPEG or TIFF file.
Using Dedicated Collage Maker Apps
For a more streamlined and user-friendly experience, numerous apps and online tools are specifically designed for creating photo collages.
PhotoGrid
PhotoGrid is known for its intuitive interface and a wide variety of free collage templates.
- Select Template: Browse PhotoGridâs extensive collection of templates and choose one that fits your taste or occasion.
- Upload Photos: Select the photos you want to include from your device.
- Customize: Adjust layouts, add filters, effects, text, and stickers to personalize your collage.
- High-Resolution Output: Save your collage in high resolution for a professional finish.
PicCollage
PicCollage offers a straightforward process for creating photo grids.
- Open Grid Feature: Tap "Grid" from the main menu.
- Add Photos/Videos: Select your desired images and videos.
- Arrange and Swap: Easily rearrange photos by dragging and dropping or use the swap function.
- Save and Share: Your grid collage will save to your camera roll, ready to be shared.
PicCollage also allows you to switch between different grid patterns even after adding photos, offering flexibility.
Canva
Canva is a powerful, free web-based design application that excels at creating custom photo grids.
- Create a Design: Go to Canva.com, click "Create a design," and choose "Custom dimensions." Enter your desired size in inches or pixels.
- Upload Photos: Upload your images from your computer.
- Add Grid Elements: From the "Elements" tab, search for "grid" and select a grid layout. You can also search for "lines" to create custom grid divisions.
- Fill Frames: Drag and drop your uploaded photos into the grid cells. Double-click a photo within a cell to adjust its position or zoom.
- Add Text and Graphics: Use Canva's extensive library of fonts, text styles, and graphic elements to further enhance your collage.
- Download: Save your creation as a JPG or PNG.

Canva's "Custom grid layout" offers full control, allowing you to specify the exact number of rows and columns and the aspect ratio.
TurboCollage
TurboCollage is a dedicated software for creating collages, especially useful for handling a large number of photos.
- Choose Pattern: Launch TurboCollage and select a pattern such as "Picture Grid," "Regular Pile," or "Picture Grid (Unequal)."
- Set Size and Layout: Choose your output size and orientation. For "Picture Grid," specify the number of rows and columns.
- Add Pictures: Use the "+/Add Pictures" button to upload your photos. TurboCollage will automatically arrange them.
- Customize: Adjust spacing, colors, shadows, and individual photo positions. Tools like "Spreadout" can scatter photos for a dynamic look.
- Export: Save your collage as a JPG.
TurboCollage is particularly adept at creating large collages with 100 or more pictures, handling high-resolution images efficiently. It also supports unique patterns like "Photohive" for hexagon, circle, or diamond-shaped collages.
Make a 100 Photo Pile in 60 Seconds | TurboCollage
Tips for Creating Stunning Photo Grids
- Theme Consistency: Whether it's a specific event, a color scheme, or a stylistic choice, try to maintain a consistent theme across your photos for a cohesive collage.
- High-Quality Images: Start with well-lit, in-focus photos. The quality of your source images directly impacts the final collage.
- Balance and Flow: Arrange photos to create a visual flow. Alternate between close-ups and wider shots, or busy images and those with more negative space.
- Use Whitespace Effectively: Don't be afraid to leave some empty space. It can help draw attention to key images and prevent the collage from looking cluttered.
- Consider Your Audience: Who is this collage for? Tailor the style, tone, and content to your intended viewers.
- Experiment with Layouts: Don't be afraid to try different grid structures or custom arrangements to find what best suits your photos.
- Review and Refine: After assembling your collage, step back and review it. Make small adjustments to improve composition, alignment, and overall impact.
By utilizing the tools and techniques outlined in this tutorial, you can transform your collection of individual photos into captivating, well-organized, and visually stunning photo grid collages that effectively tell your story and preserve your memories.