When you're working with an image and need to alter the text within it, Photopea, a powerful free online editor, offers a versatile suite of tools. This guide will walk you through the process of not only changing existing text but also adding new text with various styles and fonts, ensuring your designs are polished and professional.
Preparing Your Image for Editing
The first step in any Photopea endeavor is to open your image. Navigate to File - Open and select the image file from your computer. Photopea supports a wide range of formats, including JPG and PNG, making it compatible with most of your visual assets.
Removing Existing Text: Tackling Different Backgrounds
Before you can introduce new text, you might need to remove any existing text. The method for removal depends on the complexity of the background.
Simple, Solid-Color Backgrounds
For images with a straightforward, uniform background, the Brush tool provides a quick solution.
- Select the Brush Tool: Locate the Brush tool in the toolbar.
- Sample Background Color: Hold down the
Altkey on your keyboard. Your cursor will change to an eyedropper. Click on the background area near the text you wish to remove. This action samples the color and sets it as yourForegroundcolor, the primary color for painting. - Adjust Brush Size: To expedite the process, you can increase the brush size via the menu at the top of the interface.
- Paint Over Text: Release the
Altkey and carefully paint over the text. The sampled background color will cover and effectively erase the text.
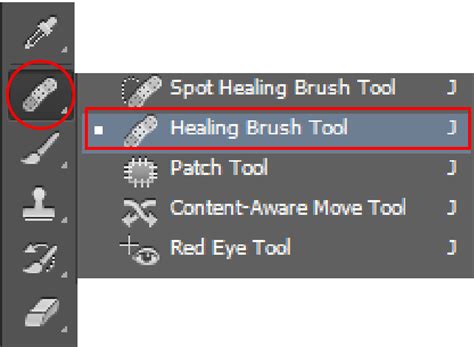
Complex Backgrounds (e.g., Grass, Sand)
When the background behind the text is intricate, such as textures like grass or sand, painting with a solid color will be too noticeable. In such cases, the Healing Brush tool is your best option.
- Select the Healing Brush Tool: Find the Healing Brush tool in the toolbar.
- Define Source of Cloning: Similar to the Brush tool, hold down the
Altkey. Click on an area of the background that closely matches the texture and color surrounding the text you want to remove. This defines the source from which the tool will sample. - Paint Over Text: Release the
Altkey and paint over the text. The Healing Brush tool will intelligently blend the sampled background texture and color over the text, making the removal appear more seamless and natural.
Adding New Text: A Versatile Toolset
Once the old text is gone, or if you're adding text to a new image, Photopea's Type tool is your gateway to incorporating new text elements.
Basic Text Insertion
- Select the Type Tool: In the toolbar, choose the
Typetool (or press theTkey). - Click and Type: Click anywhere on your image where you want the text to appear. A cursor will appear, and you can begin typing. The text will be visible on your screen as you type.
Understanding Text Types: Point vs. Paragraph
Photopea distinguishes between two primary types of text input, each serving different purposes:
- Point Text: This is the default mode when you simply click on the canvas and start typing. It's ideal for short phrases, titles, or single words. The text flows from the starting point.
- Paragraph Text: To create a block of text that wraps within a defined area, you need to use the paragraph text feature. Select the Type tool, then click and drag to draw a rectangle on your canvas. Any text you type will be confined within this rectangular boundary, automatically wrapping to the next line as needed. This is excellent for longer passages of text.
Vertical Text
For designs that require text to be oriented vertically, Photopea offers a dedicated option:
- Access Vertical Type Tool: With the Type tool selected, click and hold the icon, or look for an option to switch to the
Vertical Type Tool. Alternatively, you can often use a keyboard shortcut likeShift + Tto cycle through the text tool options. - Click and Type: Once the Vertical Type Tool is active, click on your canvas and begin typing. The characters will appear stacked vertically.
Text on a Curve or Path
Creating text that follows a specific shape, such as a curve or a closed path, involves a two-step process:
- Create the Path: First, you need to define the path or curve you want your text to follow. This can be done using Photopea's
Pentool or shape tools. - Apply Text to Path: Select the Type tool. Hover your cursor over the outline of your created path. The cursor's appearance will usually change to indicate that it's ready to apply text to the path. Click on the path, and then begin typing. The text will conform to the shape of the curve.
- Text within a Closed Path: If you have a closed path (like a circle or a custom shape) and click inside the path with the Type tool, the text will be confined within that enclosed area, reflowing as needed.
Editing and Styling Your Text
Once your text is in place, Photopea provides extensive options for modification and styling.
Selecting and Modifying Text
- Selecting Text: To edit existing text, you first need to select its layer in the
Layerspanel on the right side of the screen. Alternatively, you can select theTypetool and click directly on the text you wish to edit. Once the text layer is active, you can select specific parts of the text by clicking and dragging over it with the Type tool, similar to how you would in a standard word processor. - Confirming or Canceling Changes: After making edits or adjustments to your text, you'll typically see buttons or options to
Confirmyour changes orCancelthem. It's important to finalize your text edits before switching to other tools.
Font, Size, and Color
The most fundamental text styling options are readily available in the top bar when a text layer is selected and the Type tool is active:
- Font: This dropdown menu allows you to choose from the vast library of fonts available in Photopea.
- Size: Adjust the font size numerically or by selecting from common presets.
- Color: Click on the color swatch to open a color picker and select the desired color for your text.
Advanced Text Styling
Beyond the basics, Photopea offers a wealth of parameters to fine-tune your text's appearance. These are often categorized into:
- Character Style: These settings affect individual characters or selected text, including font, size, leading (line spacing), kerning (space between specific pairs of characters), tracking (overall letter spacing), and more.
- Paragraph Style: These settings apply to entire paragraphs, controlling alignment (left, right, center, justified), indentation, line spacing, and hyphenation.
You can access these advanced options through dedicated panels or menus, often found by clicking on an "options" button associated with the Type tool or within the Window menu.
Typography Text Manipulation - Photopea Tutorial
Adjusting Paragraph Text Box Size
When working with paragraph text, you can dynamically alter the bounding box that contains it. With the Type tool selected, simply click and drag the corners of the text box. This action resizes the container, causing the text to reflow within the new boundaries. If the text tool is not selected, manipulating the corners might instead resize the text itself, so ensure the Type tool is active for box resizing.
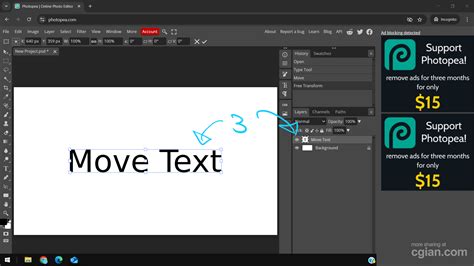
Aligning Text with Objects
Proper alignment is crucial for a professional layout. If your text and other objects on the canvas are not aligned as desired:
- Select Layers: In the
Layerspanel, select both the text layer and the object layer you wish to align it with. You can select multiple layers by holding downCtrl(orCmdon Mac) while clicking on them. - Activate Move Tool: Select the
Movetool from the toolbox on the left (it looks like a pointer or arrow), or use the shortcutV. - Use Alignment Options: With both layers selected and the Move tool active, alignment options will appear in the top bar. These allow you to align the selected layers to the top, bottom, left, right, center, or distribute them evenly. The alignment is typically relative to the selection's bounding box or the canvas.
Utilizing Photopea's Font Library and Custom Fonts
Photopea comes equipped with a substantial library of royalty-free fonts, offering a diverse range of styles for your projects. However, you're not limited to these built-in options.
Installing Custom Fonts
If you have downloaded fonts from the internet (typically in .TTF or .OTF formats) and wish to use them in Photopea, the process is straightforward and consistent across Windows and macOS:
- Upload Font:
- Via File Menu: You can open font files just like any other image file. Go to
File - Open, navigate to your font file, and select it. Photopea will process the font. - Drag and Drop: A simpler method is to drag your font file directly from your computer's file explorer and drop it into the Photopea editing window.
- Via File Menu: You can open font files just like any other image file. Go to
Once uploaded, the custom font will become available in the font dropdown menu within the Type tool's options.
Advanced Text Functionality and Considerations
The text tool in Photopea is exceptionally functional and scalable, making it a cornerstone for various design tasks.
Bidirectional Text and Punctuation
Photopea supports the complexities of bidirectional text (like Arabic or Hebrew) and the correct handling of punctuation within these contexts. This ensures that text written in languages with different reading directions is displayed accurately.
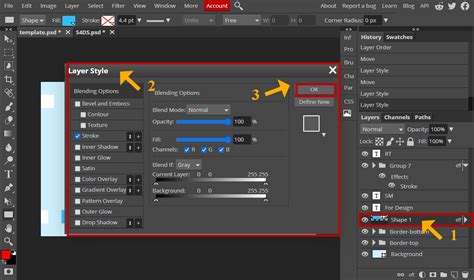
Layer Styles
Beyond basic font changes, Photopea allows you to apply sophisticated Layer Styles to your text. These non-destructive effects can add depth and visual flair:
- Drop Shadow: Creates a shadow behind the text, giving it a sense of depth.
- Stroke: Adds an outline around the text characters.
- Gradient Overlay: Fills the text with a gradient instead of a solid color.
- Inner Shadow, Inner Glow, Bevel & Emboss: These and other styles offer further control over the text's appearance, simulating lighting effects and textures.
You can find and adjust these Layer Styles by double-clicking on the text layer in the Layers panel or by selecting the layer and going to Layer - Layer Style.
In essence, Photopea's text tool is a powerful and adaptable instrument. Whether you're removing old text, adding new headlines, crafting detailed paragraphs, or experimenting with typographic effects, the editor provides the necessary features to achieve professional results without requiring dedicated desktop software. The ability to integrate custom fonts further enhances its versatility, making it a robust solution for all your text-on-image editing needs.