Creating convincing hair textures for digital models can significantly enhance realism and aesthetic appeal. This tutorial delves into the intricacies of generating and applying hair textures, focusing on techniques for roots, highlights, and tips, with an emphasis on achieving a polished, professional look. While foundational knowledge of image editing software and basic 3D modeling principles is assumed, this guide aims to provide a clear pathway for users of varying skill levels to achieve impressive results. The process involves meticulous layering, strategic color manipulation, and careful integration with 3D mesh data.
Understanding the Foundation: Diffuse Textures and Control Maps
The journey to creating detailed hair textures begins with the diffuse texture, the primary color map for the hair. Alongside this, a crucial element is the "ControlBase.dds" texture. This control map acts as a blueprint, guiding how different parts of the diffuse texture will be interpreted by the rendering engine, particularly for effects like roots and highlights.
To begin, open your diffuse texture in your chosen image editing software. Next, import the "ControlBase.dds" texture. In the layers window, select the "ControlBase" layer and set its blending mode to "Grain merge." This operation is vital for combining the information from both textures effectively. Once the layers are merged, save the resulting texture as "Control.dds." It is imperative to save this file without compression, utilizing the RGBA8 format to preserve all color and alpha channel information. This "Control.dds" file will be instrumental in defining the hair's root and tip characteristics.
Integrating Textures with 3D Models: The Milkshape Workflow
With the "Control.dds" texture prepared, the next step involves its integration with the 3D model using software like Milkshape. Import your hair mesh into Milkshape. Navigate to the "Group" tabs and select your mesh.
Following this, go to the "Materials" tab. Here, you will create a new material by clicking the "New" button, and then assign it to your mesh by clicking "Assign." This establishes the material slot where your custom texture will be applied.
The "Control" texture, as prepared in the previous step, is now ready for application. However, the process of defining roots and tips requires a more nuanced approach, often involving the manipulation of individual color channels within the control texture. If the initial "Control.dds" does not yield the desired root and tip effects, you may need to add or delete these elements as necessary.
Refining Roots and Tips: Channel Manipulation in Image Editors
To fine-tune the roots and tips, you'll need to separate the layers you've combined. This can be achieved by using the "Edit/Undo" function or by pressing "Ctrl+Z" to revert to a state where individual layers are accessible. Access the "Channels" dialog by navigating to "Windows/Dockable Dialogs/Channels."
Within the Channels dialog, deselect all channels except the one you wish to edit. For instance, if you intend to work on the blue channel to define hair tips, leave only the "Blue" channel selected.
Next, utilize the "Select" tool from the Toolbox to isolate the specific area of your texture that corresponds to the hair tips. In this example, you would select the bottom portion of the image where the blue tips are located. Paste this selection. Crucially, ensure you "paste" in a way that keeps the selection active. This means the pasted area remains selected, allowing for precise placement. Move the pasted selection until it aligns correctly with the bottom of the hair textures on your model.
It's important to recognize that roots and tips often require distinct placements for different sections of the hair texture. Therefore, after pasting, you may need to refine the selection further. Select only the portion of the pasted texture that is correctly positioned, effectively discarding any excess or misplaced parts of the blue color.
If you need to remove a portion of any channel, select the unwanted area and fill it with black. This action effectively removes that part of the channel's influence. Repeat the pasting and selection process for all necessary sections of the texture, ensuring that each part of the hair mesh receives its appropriate root and tip definition.
Once you have completed the edits on the blue channel, combine the visible layers and save the texture. Return to Milkshape and refresh the textures by selecting "Edit/Refresh Textures."
The process is then repeated for other channels, such as the red channel, to define hair roots. Follow steps 9 through 15 again, this time selecting and editing the red channel. If the roots appear too long, you can adjust them by moving the texture after pasting or by scaling it appropriately.
It's common for a single texture piece to be used across multiple parts of a mesh. In such cases, each part might require unique root or tip treatments depending on its specific location on the model. This necessitates a careful, section-by-section approach to texture refinement.
Advanced Haircutting and Texture Techniques
Finalizing the Control Texture in GIMP (or similar)
Once you are satisfied with the root and tip definitions across all relevant channels, you will perform the final adjustments in an image editor like GIMP. Delete your original diffuse layer. Change the blending mode of the "ControlBase" layer back to "Normal." Save this modified "ControlBase" layer without compression, using the RGBA8 format, and ensure that mipmaps are generated. This completed texture is your final "Control" texture, ready for use.
Addressing Curvy Textures: Adapting to Non-Linear Hair
Sometimes, hair meshes and their intended styles require highlights that follow a curved path rather than a straight one. This is particularly relevant for wavy or curly hairstyles. To achieve this, you'll need to manipulate the "ControlBase" layer to create these curves.
Begin by copying a section of the "ControlBase" layer and pasting it into the center of your working image. Ensure the "Move" tool is active. Now, adjust the "Deform Radius" setting. This parameter controls the area of influence for the deformation tool. Experiment with different values to find what works best for your specific texture.
With the "Deform Radius" set, click on the image near the deformation options and begin to move the image. The goal is to warp the copied section of the texture to match the desired curve of the original hair texture. This process often involves trial and error. Use the "Move" tool in conjunction with varying "Deform Radius" values to sculpt the curve. Once you achieve a satisfactory curve, press "OK" to apply the deformation.
Finally, change the layer mode to "Merge Grain" and align this curved section with the texture underneath it. It is highly probable that the initial attempts will not look perfect. Continuous experimentation with different "Deform Radius" values and blending techniques is key to achieving the desired effect.
The Art of Hand-Painting Hair Textures: A Deeper Dive
Painting hair from scratch can be a rewarding aspect of digital art. This method offers a powerful way to retexture a hair mesh without drastically altering the original alpha channel. It's especially effective for creating "Maxis-matchy" styles, where the charm lies in hand-painted details that complement the mesh. However, this technique can also be adapted for more realistic and shiny textures, though it demands patience and practice.
It is important to note that this tutorial is not intended for absolute beginners. A basic understanding of 3D software (like Bodyshop for creating and importing project files) and your chosen image editor is assumed. Essential tools include an image program that supports layers (such as GIMP, Photoshop, or Corel Paintshop Pro) and a precise input device. While a graphics tablet is highly recommended for detail work, it is possible to achieve results with a mouse, albeit with significantly more patience.

The core principle is to paint directly onto the existing texture, using it as a guide. For optimal results, it is often beneficial to paint at a higher resolution than the original texture and then downscale. This provides greater control and leads to smoother results. While there's a limit to how large you can work before system performance becomes an issue, scaling a 512x512 texture up to 1028x1028, for example, can offer a substantial improvement in detail without overwhelming your computer.
Building Your Base Layer and Detailing Strands
Begin by creating a new raster layer in your image editor. For a base color, select a hue with high saturation and contrast, such as a deep gold or reddish-brown. This provides a rich foundation for adding highlights and lowlights. Fill this new layer with your chosen base color.
Create another new layer on top of the base color layer. Make the base color layer invisible for now, as you will use the original texture as a visual guide. Ensure your topmost painting layer is active.
When painting the initial strands, it's advisable to use a color slightly lighter and more saturated than your base color. The brush settings (size, opacity, softness) are flexible and depend on your desired style. For a hand-drawn look, a larger, chunkier brush might be suitable, while a finer brush is better for realistic, shiny textures. Opacity and softness are also personal preferences, but a more opaque, hard brush is often a good starting point.
Zoom in sufficiently to see the detail of your strokes, but maintain enough distance to complete an entire strand in one fluid movement. This is where a graphics tablet offers a significant advantage in controlling stroke length and fluidity. If using a mouse, don't hesitate to use the undo function liberally; any stroke that looks unnatural should be redone.
When painting, aim for a degree of irregularity. Even straight hair is not composed of perfectly parallel lines. Avoid creating textures that resemble ribbons or unnatural patterns. Leave small gaps where the base color can show through, adding depth and variation.
Developing Depth and Highlights
As you progress, toggle the visibility of your base layer to check how your painted strokes appear against the base color. Continue filling in sections of the hair, focusing on creating natural-looking strands.
For wavy or curly sections, the same principles apply, but you might need to add strands more carefully to build up the form of the curl. Be mindful of creating "careless curves" where the ends of strokes are clearly visible. Curls should blend seamlessly into the straighter parts of the hair. To add depth to curls, you can sometimes paint what you envision as the "underneath" layers of the curl on a separate layer, and then paint the top strands on another. This layering approach helps create a sense of three-dimensionality.
Once you have sketched out the basic chunks of hair, continue this process until the entire texture is covered. At this stage, the texture should look "chunky" and clearly identifiable as hair, but without excessive depth or shading.
Now, with the base texture visible, return to your painted hair strands layer. It's time to fill in the gaps with finer strands, highlights, and lowlights. You can either paint on the same layer or create a new one for these details. Slightly reduce your brush size and select colors that are lighter and brighter than your base color.
The goal is to accentuate and fill in the existing strokes without completely covering them. Consider creating a small palette on a blank area of your texture, sampling each color you use with the eyedropper tool for easy access.
Repeat this process, gradually increasing the lightness of your highlights. You may also want to introduce some darker shades (lowlights) to add further depth and contrast. The amount of depth you add will be quite noticeable in the final render.
For the final highlights, use the finest brush available to add subtle, random strands, particularly in areas where light would naturally catch the hair. This subtle effect can significantly enhance the realism.
Saving Your Masterpiece
Once you are satisfied with the overall texture, the most critical step is to save your file in a layer-preserving format. This ensures that you can always go back and make further adjustments if needed. This tutorial has focused on the hand-painting aspect of hair texture creation, assuming a foundational understanding of layers, masks, and custom brushes. The linework and base colors are a starting point, as much of it will be painted over.
When referencing, consider the type of lighting you want to achieve and how hair color behaves under different light conditions. Define major forms first, paying attention to the direction of light to inform the placement of shadows and highlights. Using 3D models as references can be helpful for understanding how light falls on forms, but remember to also account for cast shadows.
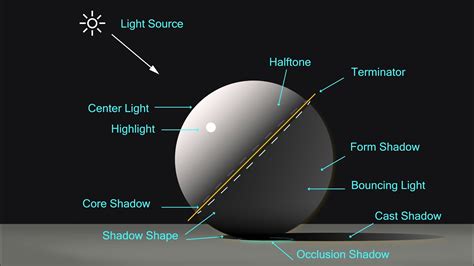
As you refine the forms, start adding detail. While hair is often treated as a single mass, showing individual strands is crucial for believability. The key is to avoid defining every single hair. Follow the defined form of the object to break up airbrush transitions, using core shadows as opportunities to showcase smaller strands.
Custom brushes can be invaluable for time-saving. For instance, a "long hair brush" can be used at a low opacity to layer shapes that simulate finer hairs, especially when the brush strokes overlap. This technique helps in cleaning up and refining the shapes generated by broader brushes. Fading out the tips of the hair and cleaning up edges are also important final touches.
By following these steps, you can create highly detailed and convincing hair textures that can be applied to a wide range of 3D models, from stylized characters to realistic avatars. The iterative process of painting, refining, and layering is key to achieving professional-quality results.