Inkscape, a powerful and versatile tool in the realm of graphic design and illustration, offers essential features for precise image manipulation. Among these, the ability to crop images stands out as a fundamental skill for any designer. This comprehensive guide will walk you through the intricate steps of how to crop in Inkscape, ensuring a thorough understanding of the process from initiation to completion.
Understanding the Inkscape Crop Process
Before delving into the practical application, it's crucial to grasp what the Inkscape crop process fundamentally involves. Inkscape crop refers to the strategic removal of unwanted portions of an image or graphic. This technique is vital for focusing on specific elements within an artwork, thereby enhancing its visual appeal and communicative power. Unlike traditional raster image editors where cropping is a destructive process that permanently removes pixels, Inkscape's primary method of "cropping" involves applying a clipping mask, which is a non-destructive technique. This means the original image data remains intact, offering flexibility for future adjustments.
Importing Your Image into Inkscape
The journey begins with launching Inkscape and importing the image you intend to crop. There are several straightforward methods to achieve this. You can go to File > Open to directly open an image file. Alternatively, File > Import provides another avenue, or you can simply drag and drop your image file into the Inkscape workspace.
When an image is imported, particularly a bitmap image like a PNG, an "png bitmap image import" window may appear. Here, you can adjust settings if necessary, but for most standard uses, leaving them as default and clicking "OK" is sufficient. If you are working with an SVG file that contains multiple elements, you can select the specific parts you want to use, copy them (right-click > Copy), and then paste them into your main document (right-click > Paste). It's often beneficial to resize the imported image to fit your project's needs at this stage. If you require more detailed guidance on resizing, a dedicated guide on how to resize an image in Inkscape can be consulted.
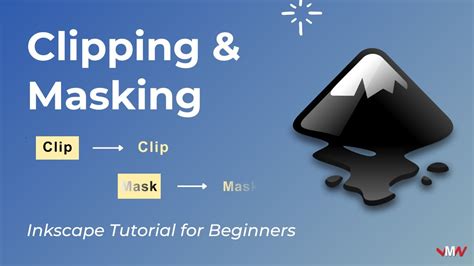
Cropping with Clipping Masks: The Primary Method
The most common and versatile method for cropping in Inkscape involves using a clipping mask. This technique allows you to use a vector shape to define the visible area of your image.
Step 1: Preparing Your Image and Shape
Begin by importing the image you wish to crop. Then, select a vector shape that aligns with your design requirements. This shape will act as the boundary for your crop. You can use basic shapes like rectangles and circles directly from the shape tools available on the left-hand toolbar, or you can draw custom paths using tools like the Bezier Curve tool.
To precisely position the shape over your image, it's helpful to temporarily adjust the shape's opacity. Open the Fill and Stroke panel (Object > Fill and Stroke). Under the "Fill" tab, you can lower the Alpha (A) value to make the shape semi-transparent, allowing you to see the image beneath. It's also advisable to remove any stroke from your shape by going to the "Stroke Paint" tab and clicking on the "X" to disable it.
Step 2: Applying the Clipping Mask
Once your shape is positioned correctly over the desired area of the image, ensure that both the shape and the image are selected. You can do this by clicking on the shape, then holding down the Shift key and clicking on the image. With both objects selected, navigate to Object > Clip > Set.
Your image should now be cropped according to the boundaries of the shape you selected. The portion of the image outside the shape will become invisible.
Step 3: Adjusting and Releasing the Clip
If you find that the crop isn't exactly as you envisioned, don't worry. The beauty of the clipping mask in Inkscape is its non-destructive nature. You can easily undo the clip and make adjustments. To release the clipping mask, go to Object > Clip > Release Clip. This will separate the image and the clipping shape, allowing you to reposition or resize either element. You can then reapply the clipping mask by selecting both objects again and going to Object > Clip > Set.
To fine-tune the clipping shape, you can select the mask itself and then activate the "Edit paths by nodes" tool (or simply double-click on the mask). This will reveal the nodes of the vector path, allowing for precise adjustments to its contours. Once you're satisfied with the mask's shape, reapply the clipping mask.
Cropping SVG Files with Clipping Masks
The clipping mask technique is equally effective for cropping SVG files. SVG files are vector-based, meaning they are composed of paths and shapes rather than pixels.
Cropping with Bezier Curves
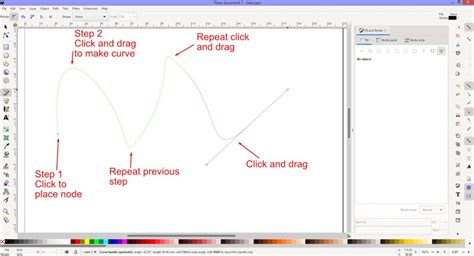
While basic shapes can be used to crop SVGs, complex designs might benefit from custom paths. The Bezier Curve tool is excellent for drawing intricate paths around specific elements of an SVG. Select the Bezier Curve tool, then click and drag your mouse to place nodes, drawing a path around the desired area. Close the path by returning to the first node. For this masking option, you don't need to add a fill to the path.
After creating your custom Bezier path, ensure it is placed above the SVG elements you want to crop. Select both the SVG and the Bezier path, then go to Object > Clip > Set. Only the parts of the SVG enclosed within the Bezier path will remain visible.
Handling Complex SVGs
Sometimes, SVG files can be complex, containing many grouped objects. If you need to crop a specific part of a complex SVG, it might be necessary to ungroup the objects (Object > Ungroup or Ctrl+Shift+G) to isolate the elements you want to work with. However, be mindful that ungrouping can sometimes alter the structure of the SVG.
Cropping Multiple Objects Together
Inkscape's clipping mask functionality extends to cropping multiple objects simultaneously. This is particularly useful for creative compositions where you want to reveal different parts of various objects within a single defined area.
To achieve this, first, create the individual shapes that will serve as your clipping boundaries for each object or area you want to crop. Place all these clipping shapes above the objects they will be masking. Crucially, before applying the clipping mask, you must group these clipping shapes together (Ctrl+G). Once grouped, select the grouped clipping shapes and the objects you wish to crop, then go to Object > Clip > Set.
It's important to note that when multiple objects are cropped together using a single clipping mask, they often function as a single, unified design afterward, and you may not be able to separate them easily.
Fitting Page Size to the Cropped Image
A common characteristic of Inkscape's clipping process is that it crops the image content but does not automatically resize the document's page to fit the newly cropped design. This can lead to empty space around your artwork, which might not be desired, especially when preparing for export.
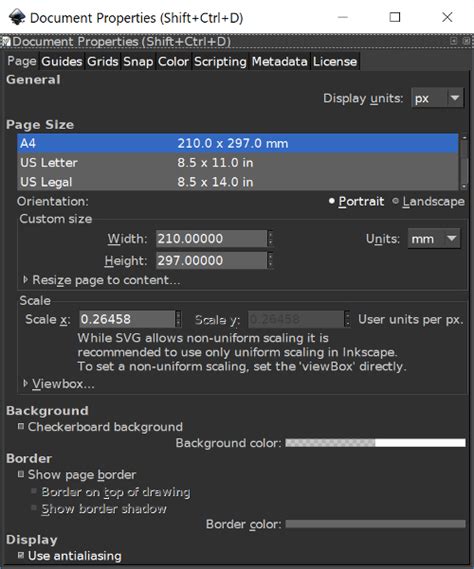
To rectify this, you need to adjust the document properties. Navigate to File > Document Properties. In the window that appears, ensure "Page" is selected. Scroll down to the "Resize page to content" options. From the dropdown menu, select "Resize page to drawing or selection." This action will automatically adjust the canvas size to precisely match the boundaries of your cropped artwork.
Alternative Cropping Techniques: Boolean Operations
While clipping masks are the primary method for non-destructive cropping, Inkscape also offers Boolean Operations for more destructive, yet sometimes necessary, manipulations of vector objects. These operations allow you to "crop" or trim vector objects by combining them in specific ways.
Path Difference for Cropping
One of the most relevant Boolean Operations for cropping is "Path Difference." This operation works by subtracting the shape of one object from another. To use this for cropping, you would typically have a vector object (like a star or a rectangle) and another shape that you want to use as a "cutter."
- Prepare your objects: Ensure you have the object you want to crop and the object that will act as the cutting shape.
- Position the cutter: Place the cutting shape over the object you want to crop, defining the area you wish to remove.
- Select both objects: Select both the object to be cropped and the cutting shape.
- Apply Path Difference: Go to
Path > Difference(or use the shortcutCtrl+-).
The result is that the area of the first object that overlapped with the second object is removed, effectively cropping the first object. It's crucial to understand that Boolean operations are destructive; they permanently alter the vector data, deleting parts of the original objects. This method is best suited for single vector objects where you intend to permanently modify their form.
Boolean Operations - Inkscape Beginners' Guide ep8
Cropping Raster Images: When Clipping Isn't Enough
When working with imported raster images (like JPEGs or TIFFs), the clipping mask method still applies. However, if your goal is to permanently remove the unwanted parts of a raster image to reduce file size or simplify the document, Inkscape's clipping mask alone won't achieve this, as it only hides the excess pixels.
In such scenarios, you have a few options:
- Use a Raster Editor: For true destructive cropping of raster images, it's often more efficient to use a dedicated raster image editor like GIMP. You can crop the image in GIMP and then import the smaller, cropped image back into Inkscape. This is a common workflow when dealing with large bitmap files.
- Trace Bitmap (with caution): In some cases, you might consider using Inkscape's "Trace Bitmap" feature (
Path > Trace Bitmap). This converts a raster image into a vector approximation. While this can sometimes result in a smaller file, it's a complex process that can significantly alter the image's appearance and is not a direct cropping solution. The effectiveness depends heavily on the original image's complexity and quality. - Exporting a Portion: If your intention is to export only a specific portion of your Inkscape document as a bitmap (e.g., a PNG), you can adjust the document size to fit your cropped content before exporting. Go to
File > Document Properties, select "Page," and then use the "Resize page to drawing or selection" option. When you then go toFile > Export Bitmap, Inkscape will export only the content within the adjusted page boundaries.
Advanced Cropping Techniques: Masking and Patterns
Beyond basic clipping, Inkscape offers more nuanced methods for image manipulation that can be considered forms of advanced cropping.
Masking with Gradients and Blurs
Masking in Inkscape operates similarly to clipping but offers greater flexibility, especially when incorporating transparency or feathered edges. The interaction of colors within the masking object is key here.
- Color Interaction: The part of a masking object with a white fill or border allows the object beneath to be fully visible. A black fill or border will completely block the object beneath. Any shade of grey in between will create a proportional level of transparency.
- Creating Feathered Edges: To achieve a feathered crop effect, you can apply a blur filter to your masking shape. Add a shape to your canvas, and then use the blur sliders in the Fill and Stroke panel, along with the Live Preview, to control the degree of feathering. The more blur applied, the softer the transition at the crop edge. This is particularly useful for creating soft-edged elements or integrating images more seamlessly into designs.
Cropping with Text
A creative variation of cropping involves using text. You can effectively "fill" text with parts of your image, creating a textual crop.
- Import your image.
- Create text: Use the Text tool to create a text box over the parts of the image you wish to keep. Adjust the text properties, font, and size as needed.
- Position the text: Move the text object so it covers the desired portion of the image.
- Apply Clipping: Select both the text object and the image, then go to
Object > Clip > Set. The image will now appear within the boundaries of your text.
Pattern Fills for Cropping
Another advanced technique involves applying a pattern to an image. While not a direct crop in the traditional sense, Inkscape can create a pattern of your image that can then be transformed and manipulated. This method is less about removing unwanted areas and more about reinterpreting the image within a patterned context.
Conclusion: Embracing Inkscape's Cropping Versatility
Inkscape provides a rich set of tools for manipulating images, with cropping being a fundamental yet highly versatile feature. Whether you're using non-destructive clipping masks with basic shapes or custom paths, employing Boolean operations for precise vector trimming, or leveraging advanced techniques like masking with gradients, Inkscape empowers you to refine your visuals with remarkable control. Understanding these methods will significantly enhance your design workflow, allowing you to focus on specific elements, create visually stunning artwork, and achieve professional results. Experiment with these different shapes and techniques to unlock the full potential of Inkscape's cropping capabilities.
For those looking to expand their digital art skills further, exploring resources like a Digital Painting Course can offer complementary knowledge. Additionally, comparing Inkscape's capabilities with other software, such as in an Inkscape vs GIMP comparison, can provide valuable insights into choosing the right tool for specific tasks.
Richard Harris is a highly experienced full-stack developer with deep expertise in both frontend and backend technologies. Over his 12-year career, he has built scalable web applications for startups, enterprises and government organisations.