Adobe Photoshop offers a robust suite of tools for seamlessly manipulating text within your design projects. Whether you need to remove existing text to replace it with new content or simply reposition existing text for better visual flow, Photoshop provides efficient methods for both. This guide delves into the intricacies of moving, removing, and replacing text, catering to a wide range of user expertise, from beginners to seasoned professionals.
Understanding Photoshop's Text Layers
Before diving into manipulation, it's crucial to understand how Photoshop handles text. When you input text using the Type Tool (represented by a 'T' icon), Photoshop creates dedicated "Text Layers." These layers are distinct from image layers and are identified by a "T" icon instead of an image thumbnail in the Layers panel. This distinction is vital because it dictates the tools and methods you can employ. Editable text layers retain their character information, allowing for straightforward edits to font, size, color, and wording.
The Power of the Move Tool
The most fundamental tool for repositioning text is the Move Tool. Activated by pressing 'V' on your keyboard, the Move Tool allows you to click and drag your text layer to any desired location on your canvas. Once your text is typed and you've committed the input (by clicking the checkmark in the options bar or pressing Esc), switch to the Move Tool. Hovering your cursor over the text will transform it into a four-directional arrow, indicating that the text is ready to be moved. This is the most intuitive way to make broad adjustments to text placement.
Precision with Free Transform
For more granular control over text placement, scaling, and rotation, the Free Transform command is indispensable. With your text layer selected, press Ctrl+T (Windows) or Cmd+T (macOS). This action conjures a bounding box around your text, complete with corner and edge handles.
- Moving: Clicking and dragging inside this bounding box allows for precise repositioning.
- Scaling: Clicking and dragging any of the corner or edge handles will resize your text. Holding Shift while scaling constrains the proportions, ensuring the text maintains its original aspect ratio.
- Rotating: To rotate text, simply move your cursor outside the bounding box until it transforms into a curved, double-headed arrow. Then, click and drag to rotate the text to your desired angle. Press Enter or Return to commit these transformations.
This method provides a visual and interactive way to fine-tune text placement, ensuring it integrates perfectly with the surrounding design elements.
How Do You WARP Layers in Photoshop?
Removing Text from Images: Content-Aware Fill
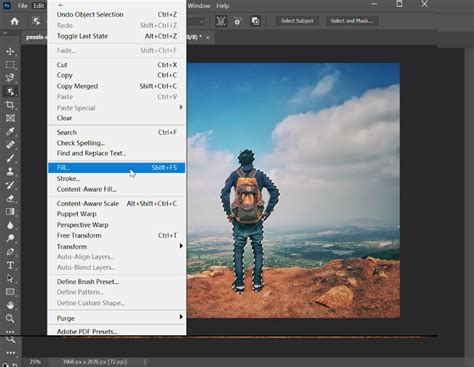
When text is not on a dedicated text layer but is instead embedded within an image - such as a watermark, a caption printed on an object, or a sign in a photograph - the approach shifts from editing text to removing an object. Photoshop's Content-Aware Fill feature is exceptionally adept at this. This powerful tool analyzes the surrounding pixels of a selected area and intelligently generates new content to seamlessly replace the selection, making it appear as if the text was never there.
Step-by-Step Text Removal with Content-Aware Fill
- Duplicate Your Layer: To preserve the original image, always start by duplicating your background layer. Click on the layer in the Layers panel and press Ctrl+J (Windows) or ⌘ Cmd+J (macOS).
- Select the Text: Utilize your preferred selection tool to meticulously select the text you wish to remove. The Quick Selection Tool or the Lasso Tool are excellent choices for achieving precise selections. For complex backgrounds, it's beneficial to zoom in (press Z to activate the Zoom Tool) for greater accuracy.
- Apply Content-Aware Fill: Navigate to the "Edit" menu and select "Content-Aware Fill." This opens a dedicated workspace where you can preview the results. The left side of the preview window shows the original image with the selected area highlighted, indicating the pixels Photoshop will sample from. The right side displays a real-time preview of how the fill will look. You can refine the sampling area by painting on the original image to exclude areas you don't want Photoshop to consider.
- Adjust Settings and Apply: Within the Content-Aware Fill workspace, you'll find various settings to fine-tune the fill. Experiment with these options to achieve the most natural-looking result. Once satisfied with the preview, click "OK" to apply the fill. Photoshop will then replace the selected text with content generated from the surrounding pixels.
Replacing Removed Text
After successfully removing text using Content-Aware Fill, you'll likely want to insert new text.
- Activate the Type Tool: Press 'T' to select the Horizontal Type Tool (or Vertical Type Tool if needed).
- Insert New Text: Click on the canvas where the original text was removed. A new Text Layer will be created. Type your desired new text.
- Match or Create New Font: You have the creative freedom to match the original font as closely as possible using the Character panel, or to select an entirely new font that complements your design.
- Position and Refine: Use the Move Tool (V) or Free Transform (Ctrl/Cmd+T) to position your new text precisely where the old text was, or in a new, strategically chosen location.
- Rasterize (Optional but Recommended for Integration): Once you are happy with the new text's placement and appearance, you may want to rasterize the text layer. Right-click on the new text layer in the Layers panel and select "Rasterize Type." This converts the text into pixels, allowing it to interact more seamlessly with the underlying image and enabling the use of painting and other pixel-based tools on it. However, note that rasterizing makes the text uneditable as text.
Advanced Text Editing and Fine-Tuning
Photoshop offers a wealth of options for refining text beyond basic placement and replacement.
Character and Paragraph Panels
The Character panel (Window > Character) and Paragraph panel (Window > Paragraph) are central to advanced text control. Here you can adjust:
- Font and Size: Select from a vast array of fonts and set precise point sizes.
- Leading (Line Spacing): Control the vertical space between lines of text.
- Kerning: Adjust the spacing between specific pairs of characters to improve visual appeal.
- Tracking: Modify the overall spacing between characters in a block of text.
- Horizontal and Vertical Scaling: Stretch or condense characters to fit specific dimensions.
- Baseline Shift: Raise or lower text relative to the baseline.
- Text Alignment: Align text to the left, right, center, or justify it within a text box.
- Vertical Alignment: Photoshop also offers options for vertical alignment within a text container.
Rotating Text Without Rasterizing (Revisited)
A common point of confusion arises when users are asked to rasterize text before rotating it, especially in older versions or when specific layer styles are applied. However, as noted by community experts, rotating editable text without rasterizing is indeed possible. The key is to ensure no other layer styles (like strokes, shadows, etc.) are applied to the text layer, as these can sometimes trigger the rasterization requirement.
The standard method remains:
- Select the text layer.
- Press Ctrl+T (Windows) or Cmd+T (macOS) to activate Free Transform.
- Move your cursor outside the bounding box until you see the rotation cursor.
- Click and drag to rotate.
- Press Enter/Return to commit.
If you encounter a situation where Photoshop insists on rasterizing, double-check for applied layer styles on that specific text layer. Removing those styles temporarily might allow for rotation while keeping the text editable.
Spelling and Language Dictionaries
Photoshop incorporates spelling check capabilities, utilizing language dictionaries. You can select text and check for errors, or even correct misspellings directly within the application. To ensure accurate checking for specific languages, you can choose the appropriate dictionary from the pop-up menu at the bottom of the Character panel. This feature is invaluable for maintaining professionalism in your designs, especially when working with multilingual content.
Blending Options
For more advanced visual integration, right-clicking on a text layer and selecting "Blending Options" opens a dialog box with numerous effects. These include drop shadows, outer glows, strokes, bevels, and more, allowing you to make your text stand out or blend subtly with the background.
Understanding Default Font Size and Leading
It's worth noting how Photoshop determines default font sizes and leading. Previously, the default font size was consistently 12 points. However, in newer versions, Photoshop calculates the default font size based on the document's resolution and the current zoom factor. This dynamic adjustment aims to provide a more contextually appropriate starting point for new text layers. Similarly, leading is often set to "Auto" by default, meaning Photoshop automatically determines the spacing between lines. These defaults can be adjusted in the Photoshop Preferences under the "Type" settings.
Conclusion
Mastering text manipulation in Photoshop is a fundamental skill that empowers designers to create polished and professional visuals. From the simple drag-and-drop of the Move Tool to the sophisticated capabilities of Content-Aware Fill and the detailed controls within the Character and Paragraph panels, Photoshop provides the flexibility to handle virtually any text-related task. By understanding the nature of text layers and employing the right tools for each scenario, you can effectively move, remove, replace, and refine text to achieve your desired design outcomes.