Adobe Photoshop, while renowned for its powerful raster image editing capabilities, can sometimes present a challenge when it comes to vector-based elements like arrows, especially when compared to dedicated vector software like Adobe Illustrator, InDesign, or Adobe XD. However, with the right approach and understanding of Photoshop's tools, creating precise and versatile arrows is entirely achievable. This guide will walk you through various methods, from leveraging custom shapes to drawing lines and even utilizing brushes, ensuring you can effectively incorporate arrows into your designs for a multitude of purposes.

The Custom Shape Tool: A Direct Approach to Arrow Design
One of the most straightforward methods for drawing arrows in Photoshop involves utilizing the Custom Shape tool. This tool provides a library of pre-designed shapes, including a variety of arrow styles, that can be quickly added to your canvas.
To begin, locate the Custom Shape tool in the Photoshop toolbar. It's often nested under the Rectangle Tool, so you might need to click and hold the Rectangle Tool icon to reveal the Custom Shape Tool. Once selected, focus on the Options bar at the top of your workspace. Here, you'll find a Shape thumbnail that, when clicked, opens a fly-out panel displaying various shape categories. Navigate through these subsets until you discover the "Arrows" set, which typically contains around 20 distinct arrow shapes.
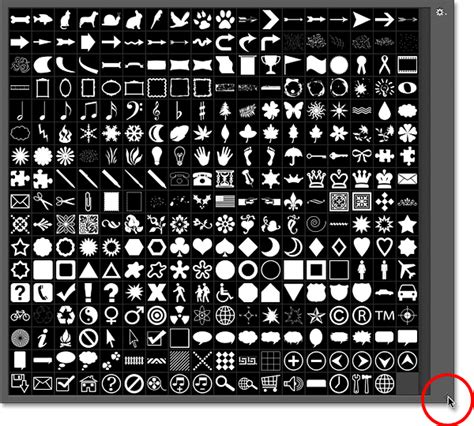
After selecting the desired arrow shape from this set, you can simply click and drag on your canvas to add it to your design. The beauty of using the Custom Shape tool is that it creates a vector shape layer, meaning you can scale, transform, and recolor the arrow non-destructively.
Customizing Your Arrow:
Once an arrow shape is added, further customization is readily available. To adjust its orientation, press Ctrl+T (Command+T on Mac) to activate the Free Transform tool. This will draw a bounding box around your arrow, allowing you to rotate, scale, or skew it precisely. Press Enter to commit these transformations.
If you find yourself frequently using a particular arrow style or a custom-modified version, Photoshop allows you to save it as a new preset. After customizing your arrow, open the Arrow Styles panel menu (usually accessible from the Options bar when the Custom Shape tool is active) and choose "New Arrow Preset". This allows you to quickly access your personalized arrow in future projects.
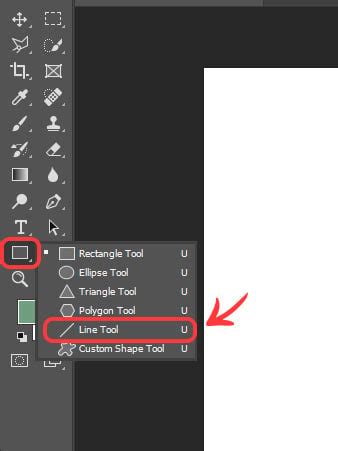
The Line Tool: Precision and Control for Straight Arrows
For creating perfectly straight arrows or for more granular control over the arrow's components, the Line Tool is an excellent choice. This tool allows you to draw straight line segments between two points, which can then be styled with strokes and arrowheads.
To access the Line Tool, click and hold the Rectangle Tool icon on the toolbar until a menu appears, then select the Line Tool. Crucially, ensure your layer is set to "Shape Layer" before you begin drawing. This will create a vector shape that can be easily edited.
Before drawing your line, it's essential to configure the arrowhead settings. In the Options bar, you will find an "Arrowheads" section. Here, you can choose to add an arrowhead to either the "Start" or "End" of your line, or both. For a one-direction arrow, simply check the "End" checkbox. You will then need to guesstimate how large an arrowhead you need and declare it in the width and length input boxes. Experiment with these values until you achieve the desired look.
The stroke of the line represents the outline of the arrow. Unless you specifically require a visible outline, you can set the stroke to 0px and make it transparent. This ensures that only the arrowhead and the line itself are visible.

You can also add multiple connected line segments with the Line tool to create a multi-angled arrow. This offers a high degree of flexibility for constructing custom arrow shapes that aren't available in the custom shape library.
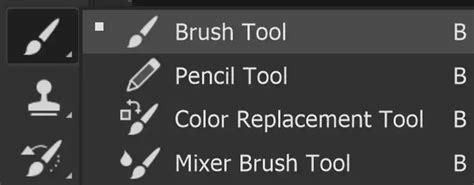
Beyond Basic Shapes: The Brush Tool for Organic Arrows
For a more artistic and hand-drawn aesthetic, the Brush Tool offers a unique approach to creating arrows. This method is particularly useful when you want to achieve a more organic or textured look.
Select the Brush Tool (B) from your toolbar. Before you start drawing, it's important to choose a brush that suits your desired style. Photoshop offers a vast array of default brushes, and you can also download or create custom brushes. For a hand-drawn arrow effect, consider using textured or artistic brushes.
Once you've selected your brush and set your desired color, simply click and drag to draw your brush stroke. You can create freehand arrow shapes by carefully guiding your mouse or stylus. While this method doesn't inherently create vector shapes, it allows for a high degree of creative expression and can be further refined with Photoshop's editing tools.
For those seeking even more specialized brush options, resources like Envato Elements offer a wealth of hand-drawn arrow brushes that can significantly speed up the process and provide professional-looking results.
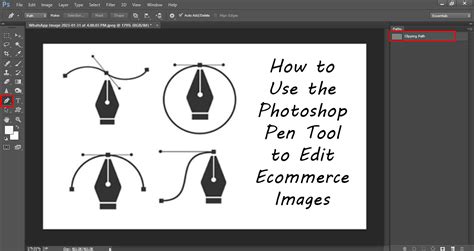
The Pen Tool: Ultimate Precision for Complex Paths
While the Line Tool is great for straight segments, the Pen Tool is the ultimate instrument for creating custom, complex arrow paths, including curved and freeform designs. This tool allows you to draw precise vector paths by placing anchor points and manipulating their control handles.
To use the Pen Tool for an arrow, you would typically create the desired path first. This could involve drawing a straight line, a curve, or a combination of both. Once the path is established, you can then apply a stroke to it.
To create a curved arrow, use the Pen tool to create the desired path. Then, you can use the Add Anchor Point Tool to add extra anchor points to refine the curve's shape. After customizing, you can open the Arrow Styles panel menu and choose "New Arrow Preset" to save your custom path as an arrow.
If you are just using lines and attaching the arrow, use the Pen tool to create the curved line. You can then add an arrowhead to the end of this path using the Line Tool's arrowhead settings or by applying a custom brush stroke that simulates an arrowhead.
Advanced Techniques and Considerations
Warping Arrows: Sometimes, an arrow needs to follow a specific contour or shape within your design. Photoshop's Warp tool can be invaluable for this. After creating your arrow (whether it's a shape layer, a line, or a brush stroke), you can select it and then choose the warp shape from the Warp Options toolbar at the top of the workspace. This allows you to bend and distort the arrow to fit your needs.
When Photoshop Isn't the Best Fit: It's worth acknowledging that for purely vector-based work, especially when intricate and scalable graphics are paramount, Photoshop is not the best software to do that. In such scenarios, it's often more efficient to create the arrow in Illustrator, which is a dedicated vector graphics editor, and then copy and paste it into Photoshop. This preserves the vector scalability and allows you to leverage Illustrator's advanced vector manipulation tools.
How to make an arrow and curved arrow in Photoshop using Line Tool
Understanding Strokes and Fills: When working with shapes, understanding the difference between fill and stroke is crucial. The fill is the internal color of the shape, while the stroke is the outline. For many arrow designs, you'll want the fill set to transparent and the stroke to have your desired color and thickness. Conversely, for solid arrow shapes, you'll set the fill color and potentially a stroke of 0px or transparent.
The Role of Annotation Tools: While not primarily for creating graphic arrows, Photoshop does offer Annotation tools in the toolbar. These are typically used for adding notes or comments to images and can sometimes be used to create simple arrow indicators, though they lack the design flexibility of the other methods discussed.
Conclusion: Empowering Your Designs with Arrows
Drawing arrows in Photoshop, while presenting its own set of nuances, is a skill that can be mastered through understanding the various tools available. Whether you opt for the simplicity of custom shapes, the precision of the line tool, the organic feel of brushes, or the intricate control of the pen tool, each method offers a unique pathway to incorporating these essential design elements into your projects. By mastering these techniques, you can effectively draw attention to key areas, guide the viewer's eye, and enhance the overall clarity and impact of your visual communications. Congratulations! Now that you know how to draw arrows in Photoshop, feel free to use these techniques in your future projects.