When you first open Adobe Lightroom, it meticulously creates a catalog. This catalog is the central hub for all information pertaining to your photographic library, storing details about your images, edits, keywords, and more. Understanding its location is crucial for various tasks, from routine tidying and migrating to new storage solutions to ensuring robust backup strategies. This guide will walk you through the process of finding, managing, and understanding your Lightroom catalog file.
Discovering Your Current Catalog's Location
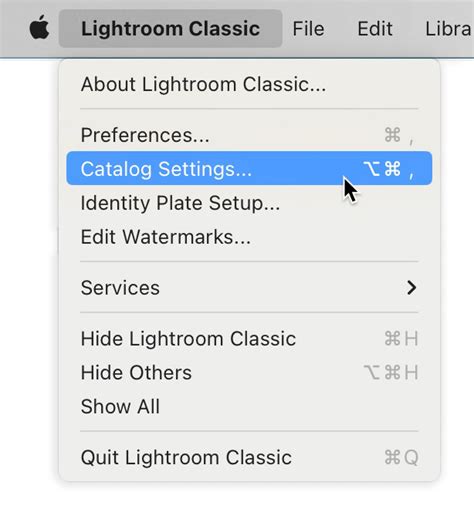
If you're unsure about the current catalog's name or where it resides on your system, the process is straightforward. Open Lightroom and navigate to the Edit menu on Windows or the Lightroom menu on macOS. From there, select Catalog Settings. Within the Catalog Settings dialog box, the General tab will prominently display the name and location of your currently open catalog. To directly access this location in your file system, simply press the Show button. This action will launch an Explorer window on Windows or a Finder window on macOS, opening directly to the folder containing your catalog file.
Understanding Associated Catalog Files and Folders
Adjacent to your primary catalog file, typically identified by the .lrcat extension, you might find additional files and folders that share the same name. These are integral components of your catalog's functionality.
One such associated item is the Smart Previews.lrdata folder or file. This is where Lightroom stores data for Smart Previews, which are smaller, optimized versions of your original images. Smart Previews are particularly useful for editing on the go or when your original files are not readily accessible, as they allow you to perform edits non-destructively without needing to access the full-resolution images.
You may also encounter a Lightroom Settings folder. This folder can contain various user-specific configurations, including your presets if you've opted to store them with the catalog. Additionally, a Backups folder is often present, housing the catalog backups that Lightroom creates automatically.
Renaming Your Lightroom Catalog
Renaming your catalog requires a few careful steps to ensure all associated files are updated correctly.
Quit Lightroom: Before making any changes, it is imperative to close Lightroom completely. This prevents any data corruption that could occur if the catalog is being accessed while you modify its files.
Locate and Rename: Using Windows Explorer or macOS Finder, navigate to the folder containing your catalog file. Rename the primary catalog file (e.g.,
Lightroom Catalog.lrcat) to your desired new name (e.g.,New Name.lrcat).Rename Associated Files: It is crucial to rename any associated files and folders to match the new catalog name. This includes:
Lightroom Catalog.lrcat-data: This file, which exists for Classic versions 11.0 and later, and only after using masking features for the first time, should be renamed toNew Name.lrcat-data.Lightroom Catalog Previews.lrdata: Rename this toNew Name Previews.lrdata.Lightroom Catalog Smart Previews.lrdata: Rename this toNew Name Smart Previews.lrdata.
If you do not rename the preview files correctly, don't panic. Lightroom will simply recreate them the next time you browse those photos. While this may involve a slight delay, it won't harm your original images or edits as long as you have the original photos.
Reopen Lightroom: When you next launch Lightroom, you will need to point it to the renamed catalog. You can do this by holding down Ctrl on Windows or Opt on Mac while opening Lightroom, which will bring up the Select Catalog dialog box, allowing you to navigate to and select your renamed catalog file. Alternatively, you can simply double-click the renamed
.lrcatfile.Set Default Catalog (Optional): To ensure Lightroom automatically opens your renamed catalog in the future, you can change the default catalog setting. Go to Preferences > General tab and select your renamed catalog as the default.
Moving Your Lightroom Catalog
Moving your catalog to a different location, whether it's to another drive or a new computer, also requires a systematic approach.
- Quit Lightroom: As with renaming, ensure Lightroom is closed before proceeding.
- Locate and Move: Using Windows Explorer or macOS Finder, locate the folder containing your catalog file and all associated
.lrdatafiles. Move the entire folder to your desired new location. It is important to move all associated files together, maintaining their proximity to the catalog file.- Important Note: If a
Mobile Downloads.lrdatafile exists within the catalog folder, do not move this file. This file is specifically for mobile downloads and should remain in its original location.
- Important Note: If a
- Reopen Lightroom: Similar to renaming, when you next launch Lightroom, you will need to direct it to the catalog's new location. Hold down Ctrl (Windows) or Opt (Mac) while opening Lightroom to access the Select Catalog dialog, or simply double-click the
.lrcatfile from its new location. - Set Default Catalog (Optional): To have Lightroom automatically open the moved catalog upon startup, adjust the default catalog setting in Preferences > General.

The Importance of Catalog Backups
Lightroom Classic offers robust catalog backup features, and it's essential to leverage them. When you exit Lightroom, it can be configured to back up your catalog automatically. This backup process includes only the catalog file itself, not your original photos. Therefore, a comprehensive backup strategy should encompass both your catalog and your image files.
Within the Backups folder, Lightroom creates a dated and time-stamped subfolder (e.g., YYYY-MM-DD HRMN) for each backup. Each backup essentially creates a new catalog file. To manage disk space, you can periodically delete or compress older backup files.
You can configure the backup frequency in the Catalog Settings dialog:
- Back up catalog the first time you exit Lightroom Classic each day.
- Back up catalog once a week.
- Back up catalog once a month.
- No backups are performed.
The Catalog Settings dialog also allows you to specify the location where your backups are saved and to check for catalog corruption before the backup is completed. Starting with the February 2025 release of Lightroom Classic (version 14.2), users can view catalog backup data and perform actions on single or multiple catalog backups together.
Understanding Catalog Structure and Non-Destructive Editing
A Lightroom catalog is fundamentally a database. When you import photos, Lightroom creates a link between the actual image file and a record within this database. All your editing work-adding keywords, adjusting exposure, removing red-eye, applying presets-is stored as metadata within this record. Crucially, Lightroom Classic never alters your original camera-captured photos. This is the essence of its non-destructive editing workflow.
This catalog-centric approach differentiates Lightroom Classic from file browsers like Adobe Bridge, which require direct access to physical files. Because Lightroom uses a catalog to track your photos, you can preview and even edit images even if their source files are not immediately accessible (e.g., on an unmounted external drive). This offers immense flexibility, allowing your photos to reside on your system drive, an external hard drive, or a network drive.
Lightroom Catalogs Explained: Everything You MUST Know
Catalog Management: Best Practices and Considerations
While Lightroom Classic offers flexibility, managing multiple catalogs or frequently moving photos can lead to complexity and potential issues with broken links between your catalog and your images. It is generally recommended to work with a single, primary catalog whenever possible. Lightroom places no upper limit on the number of photos a single catalog can contain, and its robust organizational tools-folders, collections, keywords, labels, and ratings-provide ample ways to sort, filter, and find your images.
If you need to move or rename photos (for instance, when switching to an external drive), always perform these actions from within Lightroom Classic itself. Using Windows Explorer or macOS Finder to move files can break the links in your catalog, leading to "missing photos."
When you install a newer version of Lightroom Classic, especially a major update, you will likely be prompted to upgrade your catalog. This is a normal process designed to accommodate database changes in the new version and is essential for accessing new features and performance enhancements. Lightroom Classic will create a copy of your old catalog during this process. If you encounter issues upgrading a catalog, you can open the older catalog in its previous version and export it as a new catalog, which can then be imported into the newer version.
When considering where to store your catalog, it's generally advised to keep it on a faster drive for optimal performance. Many users opt for a dedicated SSD for their Lightroom catalog, plugins, and cache files, as this can improve browsing speed and import/export times. It is also advisable to avoid storing your catalog in locations synchronized by cloud services like Microsoft OneDrive or Apple iCloud Drive, as this can lead to unintended storage consumption and potential conflicts.
The .lrcat-data File and AI Edits
Lightroom Classic stores additional information alongside your .lrcat file in a companion file with the .lrcat-data extension. This file is located in the same folder as your catalog. If this .lrcat-data file is missing or misplaced, any AI-driven edits made to your images may be permanently lost. If the .lrcat-data file is indeed missing, Lightroom Classic will prompt you to choose whether to continue or not.
Understanding Previews and Cache Management
Lightroom Classic generates various types of image previews to optimize performance. These include:
- Standard Previews: These are generated previews that can be configured to a specific size. The Standard Preview Size setting allows you to choose a preview size based on your screen resolution, ensuring smooth display.
- 1:1 Previews: These previews have the same pixel dimensions as your original photos and include sharpening and noise reduction details. They are crucial for critical review but can consume significant disk space.
- Smart Previews: As mentioned earlier, these are smaller, optimized previews that allow for editing even when original files are offline.
The Limit preview cache management option allows you to allocate a specific size for your preview cache. Once this limit is reached, Lightroom Classic will automatically purge older previews to maintain the set size, ensuring efficient disk space usage. Previews that are 30 days or newer are never automatically deleted. When the cache usage reaches 90% of the allocated limit, a notification will alert you about impending purges. The reasonable size for the preview cache will vary depending on your available disk space and how much you're willing to allocate.
Metadata Handling: XMP Sidecars
Lightroom Classic offers control over how metadata changes are saved. By default, metadata settings are saved only within the catalog. However, you can choose to save metadata changes directly to XMP sidecar files. This option makes your edits and metadata visible in other applications that support XMP. This setting also controls whether Lightroom Classic writes a new date and time to proprietary raw files when you use the Metadata > Edit Capture Time command.
Working with Multiple Computers
For users who work across multiple computers (e.g., a desktop and a laptop), the most straightforward method to use your Lightroom Classic catalog is to keep both the catalog and your photos together on an external drive. This external drive can then be connected to either computer, ensuring seamless access to your library and edits.
Catalog Upgrades and Compatibility
It's important to note that catalogs in Lightroom Classic are not backward compatible. A catalog upgraded to a newer version of Lightroom Classic cannot be opened in an older version. If you upgrade to a newer version and then decide to downgrade, Lightroom Classic may not automatically recognize the already upgraded catalog. In such scenarios, you can open the older catalog in its previous version and export it as a new catalog, which can then be imported into the newer version.
Exporting Folders as Catalogs
You can create a catalog that contains a subset of a larger catalog by selecting specific photos and exporting them as a new catalog. To export a folder as a catalog, navigate to the Folders panel in the Library module, right-click (Windows) or Control-click (macOS) on the folder you wish to export, and select the appropriate export option.
Troubleshooting Common Issues
- Lightroom Classic can't find my catalog: This often happens after moving or renaming the catalog without properly informing Lightroom. In the Select Catalog dialog box, your renamed or moved catalog should appear in the list, allowing you to select it.
- My photos are missing in the catalog: This is a common consequence of moving image files using the operating system's file explorer rather than from within Lightroom Classic. Always manage your photo files through Lightroom's interface to maintain catalog integrity.
By understanding where your Lightroom catalog is located and how to manage its associated files, you can ensure a smoother, more organized, and secure photographic workflow.