The ability to precisely control and alter the background of an image is a fundamental skill in digital photo editing, particularly when using powerful software like Adobe Photoshop. A well-executed background transformation can dramatically shift the focus of an image, drawing the viewer's eye directly to the intended subject. This capability is invaluable for a multitude of creative projects, from e-commerce product photography to artistic compositions and graphic design. Photoshop offers a robust set of tools and techniques to achieve this, allowing for both simple color swaps and more complex background manipulations.
Isolating Your Subject: The Art of Selection
The cornerstone of changing a background in Photoshop lies in accurately selecting the subject you wish to keep. This process isolates the foreground from the background, enabling targeted edits. For images with a clear distinction between subject and background, the Quick Selection Tool is an excellent starting point. By simply dragging this tool over your subject, Photoshop intelligently identifies and selects similar tones and textures.
For users of Photoshop CC 2019 and newer versions, the Select Subject tool offers an even more streamlined approach. This feature leverages Adobe Sensei, an artificial intelligence system, to analyze the entire image and automatically detect and isolate the main subject. This AI-powered tool significantly reduces the manual effort required for initial selection, providing a strong foundation for further refinement.
Refining Your Selection with Precision
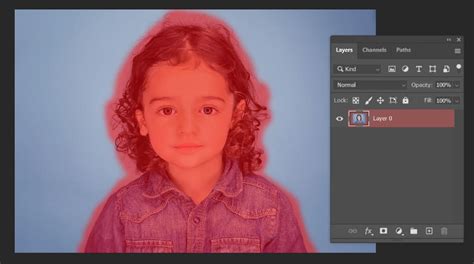
Once an initial selection is made, it's rare that it will be perfectly accurate, especially around intricate edges like hair or fur. To achieve a professional-quality result, refining the selection is crucial. A highly effective method for this is utilizing Quick Mask Mode.
To enter Quick Mask Mode, simply press the Q key on your keyboard. In this mode, the selected areas of your image will appear as a translucent red overlay. Areas not selected will be fully visible. To refine the mask, you'll use painting tools. Select the color Black to paint over areas that were not selected but should be part of your subject (or to remove areas mistakenly included). Conversely, use the color White to paint over areas that were selected but should be part of the background. Zooming in closely allows for meticulous adjustments to ensure every edge is captured correctly. After you've made your refinements, pressing the Q key again will exit Quick Mask Mode and reveal your precisely refined selection, often referred to as "marching ants."
Exploring Alternative Selection Tools
While the Quick Selection Tool and Select Subject are highly efficient, Photoshop offers a diverse array of selection tools to cater to different image types and user preferences. Experimenting with these can lead to even better results:
- Object Selection Tool: Similar to Select Subject, this tool allows you to draw a rectangle or lasso around your desired object, and Photoshop will attempt to select it.
- Magic Wand Tool: This tool selects areas of similar color with a single click. It's most effective on images with solid, distinct color backgrounds. If you see a tool that looks like a magic wand, click and briefly hold on to it. When you release the click, a drop-down of available tools should appear.
- Lasso Tools (Lasso, Polygonal Lasso, Magnetic Lasso): These tools offer manual selection capabilities. The standard Lasso allows freehand drawing, the Polygonal Lasso creates straight-edged selections, and the Magnetic Lasso attempts to snap to edges based on color contrast. The Magnetic Lasso tool can be particularly useful when you want to select a part you want to place in another photo.
Handling Selection Errors
During the selection process, it's common for the tools to select areas outside your intended subject or miss parts of it. If the Quick Selection Tool or other selection tools highlight an area outside the image that you want to exclude, you can use the "Subtract from Selection" brush option. This is typically found at the top-left of the application window when a selection tool is active. By painting with this mode, you can meticulously remove unwanted areas from your selection.
Implementing the Background Color Change
With your subject accurately selected, the next step is to apply a new background color. Photoshop's Solid Color Fill Layer is an ideal and non-destructive method for this.
Creating the Solid Color Layer
- Navigate to the Layers panel, typically found on the right side of your Photoshop workspace.
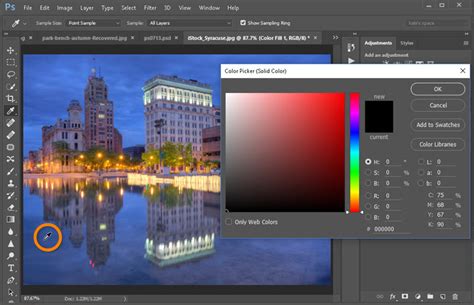
- At the bottom of the Layers panel, locate the Adjustment Layer menu (often represented by a half-filled circle icon).
- From the dropdown menu, select Solid Color.
- The Color Picker window will immediately appear. Choose any color you desire for your new background. You can always change this color later. Click OK once you've made your selection.
At this stage, your subject might appear to be filled with the selected color, obscuring its original appearance. This is because the Solid Color fill layer is currently above your image layer and not masked.
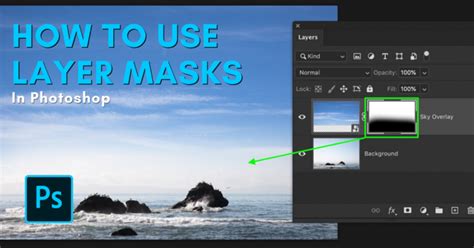
Inverting the Mask for Correct Display
To rectify this and ensure the new color acts as the background, you need to manipulate the layer mask associated with the Solid Color fill layer.
- In the Layers panel, click on the Layer Mask icon that has appeared for your Solid Color fill layer. This mask is initially white, meaning the color is fully visible.
- With the mask selected, navigate to the Properties Panel (if you don't see it, go to Window > Properties).
- Within the Properties Panel, you will find an Invert option. Click on it.
This action inverts the layer mask. What was once a white mask (revealing the color) becomes a black mask (hiding the color), and vice-versa. Since the Solid Color fill layer's mask is now inverted, the color will no longer obscure your subject. Instead, it will be confined to the areas outside your subject's selection, effectively becoming your new background.
Adjusting Blending Modes for Realism
The newly applied solid color background might appear flat and artificial. To integrate it more seamlessly with your subject and retain a sense of depth, you can utilize blending modes.
- With the Solid Color fill layer still selected in the Layers panel, locate the Blending Mode dropdown menu. This is usually set to "Normal" by default.
- Select Multiply from the dropdown list.
The Multiply blending mode darkens the image based on the color of the blend layer. This can help to reveal subtle shadows and highlights within your subject that might have been lost, creating a more natural and cohesive look. Experimenting with other blending modes can also yield interesting effects, depending on the specific image and desired outcome.
Modifying the Background Color
One of the significant advantages of using a Solid Color fill layer is its non-destructive nature, allowing for easy color adjustments at any time.
- Double-click directly on the Solid Color thumbnail in the Layers panel. This will reopen the Color Picker window.
- From here, you can select any new color you wish to try out. The background will update in real-time as you make your selection.
- Press OK when you are satisfied with the new color.
This flexibility ensures you can fine-tune the background color until it perfectly complements your subject and achieves the desired aesthetic.
Photoshop Tutorial: How to create a gradient background
Advanced Techniques and Considerations
While the Solid Color fill layer method is highly effective, especially for images with a white or easily isolatable background, Photoshop offers other avenues for background manipulation.
Transforming Any Background into White
For situations where your starting image doesn't have a clean white background, transforming it into one is a valuable precursor to the techniques described above. This often involves making a selection of your subject and then inverting the selection to target the background. You can then fill this inverted selection with white. If you want to learn how to transform any background into white, dedicated tutorials and videos are readily available.
Creating Gradient or Textured Backgrounds
Beyond solid colors, Photoshop allows for the creation of more dynamic backgrounds.
- Gradient Backgrounds: You can create a gradient background by placing a Gradient Fill layer (similar to the Solid Color fill layer) above your image layer and inverting its mask. This allows for smooth color transitions.
- Textured Backgrounds: For textured backgrounds, you can place an image of a texture (like paper, fabric, or abstract patterns) on a layer below your subject. Again, using layer masks is key to ensuring the texture only appears in the background area.
Filling a Layer with Color
A more basic method, though destructive if not done on a separate layer, is to fill a layer with color. To fill a layer with the current foreground color, you can press Alt + Backspace on Windows or Option + Delete on Mac. This is useful for quickly filling a new background layer before placing your subject on top.
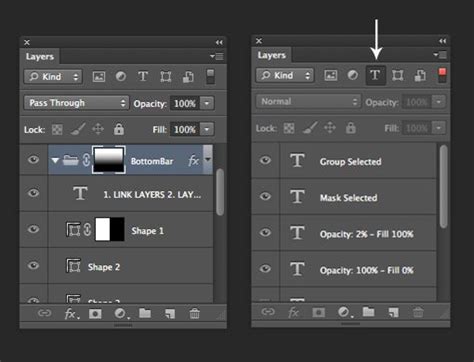
Changing the Background Color of a Group of Layers
Yes, you can change the background color of a group of layers in Photoshop. The most effective way to do this nondestructively is to:
- Create a new layer above the group of layers whose background you want to change.
- Alternatively, select this layer group and choose Layer > New > Group from Layers to create a new layer group containing your existing layers.
- Select this new group.
- Go to Layer > Layer Style > Color Overlay.
- In the Color Overlay dialog box, choose your desired color. You can drag the slider to pick your color and type in the top field to enter the layer's name, then click OK.
This applies a color overlay to the entire group, effectively changing its background appearance.
Layer Masks: The Foundation of Nondestructive Editing
The techniques discussed, particularly the use of Solid Color fill layers and their associated masks, are prime examples of nondestructive editing. This means that you are not permanently altering the original pixel data of your image. Layer masks allow you to selectively hide or reveal parts of a layer without deleting any information. This versatility makes them indispensable for tasks like changing the background color of a photo without affecting the foreground. You can always go back and edit the mask or the adjustment layer itself.
Conclusion
Mastering the art of changing background colors in Photoshop is an accessible yet powerful skill. By understanding how to make precise selections, utilize layer masks effectively, and leverage adjustment layers like Solid Color, you can significantly enhance your images. Whether you're aiming for a simple color swap, a smooth gradient, or a complex composite, Photoshop provides the tools to bring your creative vision to life. The key lies in precise selection, careful masking, and the flexibility offered by nondestructive editing techniques. Remember, practice with different images and tools will further refine your proficiency in transforming backgrounds to perfectly complement your subjects.