Layer masks are an indispensable feature within Adobe Photoshop, offering a powerful and flexible approach to image editing. They are the cornerstone of non-destructive workflows, enabling users to refine selections and precisely control the visibility of specific areas within an image. Crucially, this process does not involve the permanent alteration of original pixel data, meaning that edits can be adjusted or removed at any stage. This article will delve into the intricacies of creating and utilizing layer masks, from fundamental concepts to more advanced applications, empowering users to elevate their post-processing skills to new heights.
The Core Functionality: Hiding, Not Deleting
At its heart, the function of a layer mask is elegantly simple: it allows you to hide part of a layer. This fundamental capability provides immense control, enabling you to constrain any layer so that only a particular part of that layer affects the overall image. This is a critical distinction from destructive editing methods like erasing. Masking is not about deleting pixels; it's about concealing them. Anything that is masked can be brought back at any time, offering unparalleled flexibility and a safety net for creative exploration.
Consider the practical applications for different photographic genres. Portrait photographers might employ a layer mask on a brightness and contrast adjustment layer to selectively brighten just the face of their model, enhancing features without affecting the rest of the subject or background. Conversely, landscape photographers might use a layer mask to selectively darken the clouds in their image, adding drama and depth to the sky without altering the landscape below.
Creating Your First Layer Mask: A Step-by-Step Approach
To begin the process of creating a layer mask, you first need a layer to which the mask will be applied. For the purpose of demonstration, let's imagine we want to add an Orton effect, which typically imparts a soft glow to a scene, but often works best when confined to specific areas like the sky. To ensure the Orton effect layer only influences the sky, a layer mask is essential.
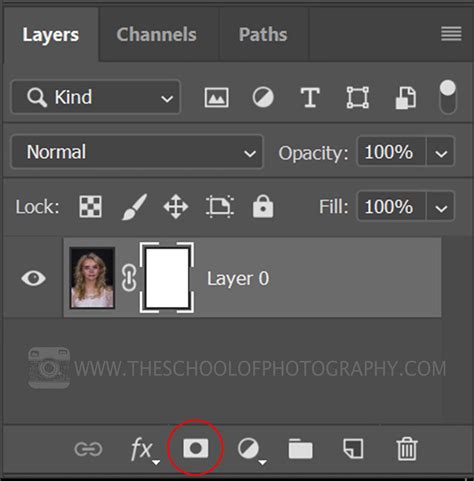
Select the Target Layer: In the Photoshop Layers panel, which is usually located in the bottom right-hand corner of your screen, identify and select the layer you wish to mask. This is the layer whose visibility you want to control.
Add the Layer Mask: With the desired layer selected, locate the "Add Layer Mask" button. This icon is typically found at the bottom of the Layers panel and resembles a rectangle with a circle cut out of its center. Clicking this button will add a layer mask to your selected layer. This mask will initially appear as a white thumbnail next to the layer's preview in the Layers panel. A white border around the layer mask thumbnail indicates that it is currently active and ready for editing.
Choose Your Tool: Select the Brush tool from the Photoshop Toolbar.
Set Your Colors: To begin painting on the mask, you'll be using black and white. Pressing the "D" key on your keyboard will quickly set your foreground and background colors to their default values: black and white, respectively. Pressing "X" allows you to rapidly switch between these two colors as your foreground and background.
Painting on the Mask:
- Black: Painting with black on a layer mask will hide the corresponding parts of the layer. This means that whatever you paint black over will become transparent, revealing the layers beneath.
- White: Painting with white on the layer mask will reveal the layer. Any areas painted white will be fully visible.
- Gray: Painting with shades of gray on a layer mask will partially hide the layer, creating semi-transparent effects. The darker the gray, the more the layer will be hidden.
Refining the Mask: When working with the Brush tool, you can adjust its opacity in the options bar at the top of the screen. Using a lower opacity, such as 10%, allows for a more gradual and natural application of the mask. With a 10% opacity, you would need to paint over an area multiple times to achieve full concealment. This technique is incredibly useful for subtle adjustments and fine-tuning mask edges.
Advanced Techniques and Workflow Enhancements
Once you have a solid grasp of creating layer masks with the brush tool, you can explore more sophisticated methods and leverage layer masks for complex manipulations.
Starting with a Black Mask: An alternative approach is to start with a black layer mask. This effectively hides the entire layer initially. You can then use white to paint in and reveal specific areas of the layer, which is particularly helpful when you only want to expose a very small portion of the effect or image.
Adjustment Layer Masks: Many adjustment layers, such as Curves, Levels, and Hue/Saturation, automatically come with a white layer mask attached when they are created. Be mindful not to mistakenly add a second layer mask on top of these.
Copying and Applying Masks: If you wish to apply the masking effects from one layer to another, you can easily copy the layer mask. Hold down the Alt key (Windows) or Option key (Mac) and drag the layer mask thumbnail from its original layer to the desired target layer.
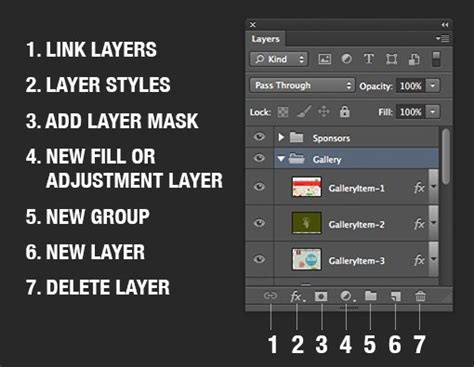
Linking and Unlinking Layers and Masks: To maintain the connection between a layer and its mask, ensuring that they move together when the layer is transformed, click the small chain icon that links them in the Layers panel. This linked state is the default. To move the layer and its mask independently, you must first unlink them by clicking this chain icon.
Masking Groups of Layers: For applying a single mask to multiple layers simultaneously, a highly efficient method is to group those layers together. Select the desired layers and press Ctrl+G (Windows) or Cmd+G (Mac) to create a group. You can then apply a layer mask to this group, and the mask will affect all the layers contained within it.
Reusing Layer Masks with Selections: To reuse a layer mask, you can create a selection from it. On a Mac, use "Command-Click" on the layer mask thumbnail; on a PC, use "Control-Click." This action loads the mask's transparency as a selection, which can then be applied elsewhere or used to create new masks.
Vector Masks for Precision: For masks that require sharp, scalable edges, consider using vector shapes. These masks are resolution-independent and can be scaled without loss of quality, making them ideal for graphic design elements or precise object selections.
Advanced Masking Techniques: Beyond basic brushwork, Photoshop offers powerful techniques for creating sophisticated masks. These include:
- Color Range Selections: Isolating areas based on specific colors.
- Luminosity Masks: Creating masks based on the tonal values (brightness and darkness) of an image.
- Selection Tools: Utilizing tools like the Marquee, Lasso, Pen Tool, and Quick Selection Tool to create initial selections that can then be converted into layer masks.
The Power of Non-Destructive Editing
The ability to apply adjustments like brightness and contrast to specific parts of an image using layer masks is a testament to their power. This granular control allows for highly targeted edits that would be cumbersome or impossible with destructive methods. For example, a portrait photographer can meticulously brighten only the eyes of a subject, or a product photographer can subtly enhance the reflectivity of a specific surface.
Layer Mask - Photoshop for Beginners | Lesson 4
Learning to effectively use layer masks in Photoshop is not just about mastering a tool; it's about adopting a fundamental principle of professional image editing. It empowers you to experiment freely, knowing that your original image remains untouched. This flexibility is crucial for complex photo composites and detailed image manipulations, where blending dozens of images to create a single, cohesive piece of art is the goal.
Mastering layer masks might initially seem daunting, but by starting with the most straightforward applications and gradually progressing to more advanced techniques, you will undoubtedly become proficient. The journey of learning Photoshop is continuous, and understanding layer masks is a significant step towards unlocking the full potential of your creative vision. For those seeking a comprehensive introduction, a beginners' Photoshop course, such as one with an instructor like Daniel Scott, can provide a structured path to quickly get up to speed with these essential tools.
The versatility of layer masks extends to everyday tasks as well. For instance, if you are working on an image that requires multiple layers of adjustments to a specific area, grouping those layers and then applying a single layer mask to the group streamlines the process significantly. This organized approach not only saves time but also enhances the overall manageability of complex projects.
Ultimately, the true value of layer masks lies in their ability to offer precise control without compromising the integrity of the source image. Whether you are a seasoned professional or an aspiring enthusiast, a deep understanding of this feature will undoubtedly elevate your image editing capabilities and allow for more sophisticated and controlled creative outcomes. The seemingly simple act of painting black or white onto a mask unlocks a universe of possibilities for image refinement and artistic expression.