The Layers panel is the cornerstone of non-destructive editing in Adobe Photoshop, providing an intuitive and powerful way to manage and manipulate image elements. It lists all the layers in an image, displaying their names and thumbnails of the content on each layer. Understanding how to open, navigate, and utilize the Layers panel is fundamental for any Photoshop user, from beginners to seasoned professionals. This guide will delve into the intricacies of the Layers panel, explaining its various functions and how to leverage them for efficient and creative image manipulation.
Accessing the Layers Panel
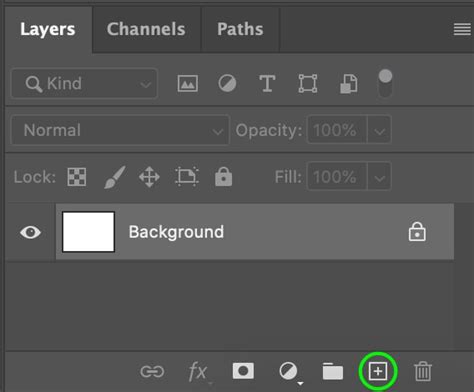
The most direct way to open the Layers panel is through the application's menu. If the panel is not visible on your workspace, navigate to the top menu bar and select Window > Layers. This action will reveal the Layers panel, which typically docks to the right side of the Photoshop interface. The Layers panel changes to display the layer information for the active file. Notice that in a new or simple document, only one layer might appear initially: the Background layer.
Understanding Layer Fundamentals
At its core, a layer is simply one image stacked on top of another. Imagine a piece of paper and painting it red. Then, take a piece of clear cellophane and paint a yellow circle, laying it over the red paper. Next, take another piece of cellophane, paint some blue type, and lay that on top of the yellow circle. This is the fundamental concept of layers. Photoshop uses the Layers panel to allow you to do this with your images. A composition with more than one layer is referred to as a composition.
The Layers panel is where you manage these stacked elements. Each layer can be independently edited, moved, and modified without affecting other layers. This non-destructive workflow is a significant advantage, allowing for flexibility and easy revisions.
The Background Layer and Its Limitations
In most new Photoshop documents, you'll encounter a "Background" layer. This layer is always locked and cannot be moved or have layer effects applied to it, indicated by a padlock icon. To gain full control over this layer and unlock its capabilities, you can double-click on its name in the Layers panel. This will either convert it into a regular layer or prompt you to rename it, effectively removing the inherent restrictions of the Background layer.
Navigating and Managing Layers
The Layers panel provides a comprehensive set of tools and indicators for managing your image's composition.
Layer Visibility and Locking
- The Eye Icon: The eye icon next to a layer name indicates that the layer is visible in the document window. Clicking this icon toggles the visibility of the layer, allowing you to hide or show specific elements of your image. This is incredibly useful for isolating parts of your design or for comparing different versions.
- The Lock Icon: The lock icon indicates that the layer is protected from certain layer changes. If a layer is locked, options above the layer list that pertain to modifying that layer become unavailable. There are specific icons next to "fill opacity" that allow you to selectively lock attributes like position, image content, or transparency, rather than locking the entire layer. Pressing the "/" key can toggle the lock for specific attributes if they are locked.
Layer Selection and Activation
To work on a specific layer, you must first select it. Clicking on a layer name in the Layers panel highlights it, indicating that it is active. Any subsequent editing actions will then be applied to this active layer.
Renaming Layers
Clear and descriptive layer names are crucial for maintaining an organized workflow, especially in complex projects. To rename a layer, simply double-click its current name in the Layers panel, type the new name, and press Enter or Return. To rename multiple layers efficiently, rename one layer, and then, without pressing Enter to apply the new name, press the Tab key to move to the layer below. This allows you to quickly cycle through and rename several layers in succession.
Creating and Deleting Layers
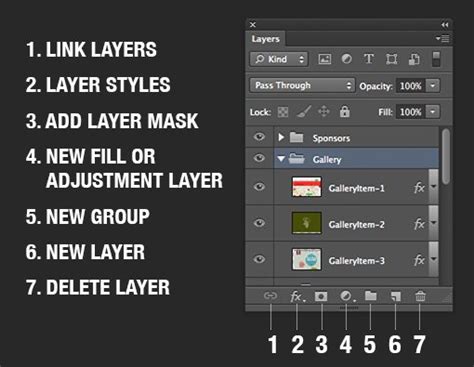
- Creating New Layers: The "Create New Layer" icon, typically a plus sign within a square, is located at the bottom of the Layers panel. Clicking this icon creates a new, empty layer above the currently selected layer. By default, new layers are added above the currently selected layer.
- Creating Layers Below: For more precise placement, you can Command-click (Mac) or Control-click (Win) the "New Layer" icon to create a new layer below the currently selected layer.
- Deleting Layers: To remove a layer, you can drag it into the "Delete Layer" icon (usually a trash can) at the bottom of the panel, or select the layer and press the Delete key on your keyboard.
Advanced Layer Manipulation Techniques
Beyond basic management, Photoshop offers sophisticated tools for manipulating layers to achieve complex visual effects.
Duplicating Layers
Duplicating layers is a common practice for creating variations or backups.
- Within the Same Document: Select the layer(s) you wish to duplicate in the Layers panel and press Command + J (Mac) or Control + J (Win). This will create an exact copy of the selected layer(s) directly above the original.
- Between Documents: To duplicate layers from one document to another, select the desired layers in the Layers panel and then drag them from one document window to another. Holding the Shift key while dragging and dropping a layer(s) between two documents will place the "dropped" layer(s) into the center of the destination document. When working with tabbed documents, use the Move tool to drag layers from the image area or the Layers panel, on top of the "destination" document's tab.
Layer Opacity and Transparency
Opacity controls the transparency of a layer. An opacity of 100% means the layer is fully opaque, while 0% means it is completely transparent.
- Adjusting Opacity: To change the Opacity of a layer(s), select the Move tool (or any tool that does not have Opacity options), and press a numeric key to add the percentage of the pressed number. For example, pressing "5" will set the opacity to 50%, and pressing "0" twice will set it to 100%.
Layer Styles and Effects
Layer Styles (also known as Layer Effects) are non-destructive effects that can be applied to layers to enhance their appearance. These include drop shadows, glows, bevels, and more. When an effect has been applied, it is often noted by a small "f" icon next to the layer name. You can click the eye icon next to each listed effect to turn it on or off. The Layer Style dialog box opens when you double-click on a layer with an effect, or you can add styles by clicking the "fx" icon at the bottom of the Layers panel.
Layer Masks and Adjustment Layers
- Add Layer Mask: A layer mask allows you to selectively reveal or conceal parts of a layer without permanently erasing pixels. This is a fundamental tool for compositing and making precise edits. The "Add Layer Mask" button is found at the bottom of the Layers panel.
- Add Adjustment Layer: Adjustment layers are the preferred method for applying image adjustments such as brightness, contrast, color balance, and more. They affect all layers underneath them unless they are "clipped" to a specific layer. To clip an adjustment layer, move your pointer on the line between the adjustment layer and the layer directly beneath it, hold down Alt/Option, and click when you see a symbol appear. This will limit the adjustment to only the layer directly underneath.

Layer Organization and Grouping
As projects grow in complexity, keeping layers organized becomes paramount.
Layer Groups
Layer Groups are an excellent organizational tool that allows you to bundle related layers into a folder. This declutters the Layers panel and allows you to manipulate multiple layers simultaneously as a single unit. You can select multiple layers and press Command/Ctrl + G to put them into a group, or create a new group by clicking the folder icon at the bottom of the Layers panel.
Special Layer Types and Features
Photoshop offers various specialized layer types that unlock advanced functionalities.
Smart Objects
A Smart Object is a special type of layer that acts as a container. It can hold multiple layers, vector data from Illustrator, raw files, video, 3D objects, and many other types of assets. This allows for non-destructive scaling, transformations, and filtering, as the original data is preserved.
Video and 3D Layers
Newer versions of Photoshop include support for Video Layers and 3D Layers, features that were once exclusive to Photoshop Extended.
- Video Layers: These indicate that there is video content on the layer, enabling Photoshop to be used as a basic video editor for working with video, animated slideshows, and motion graphics.
- 3D Layers: Photoshop is capable of importing and working with 3D objects, and it also supports 3D printing workflows.
Photoshop Tutorial - DISCOVER the Layers Panel
Enhancing Workflow Efficiency
Several features within the Layers panel are designed to streamline your editing process.
Zooming to Layer Content
To maximize the use of the canvas and make editing easier, Option-click (Mac) or Alt-click (Win) on a layer will zoom to the contents of that layer, fitting it to the screen. This also applies to Layer Groups: Option-click (Mac) or Alt-click (Win) on a Layer Group will zoom to fit the group's content on the screen. Note that if multiple layers are selected, Option-click (Mac) or Alt-click (Win) on a layer will first deselect other layers.
Linking Layers
Linking layers together enables commands applied to one layer to also be applied to linked layers, where applicable. For increased efficiency, you can assign a custom keyboard shortcut to Link/Unlink Layers by navigating to Edit > Keyboard Shortcuts, and in "Shortcuts For," selecting "Panels, Menus." The rules for linking layers are a bit complex because layers can only belong to one link set at a time. To unlink a single layer from a link set, simply select the layer and click the link icon.
Blend Modes
Blend Modes determine how the pixels of a selected layer interact with the pixels of the layers underneath it. Changing blend modes is a powerful technique for compositing and creating special effects. You can cycle through all the blending modes by selecting the Move tool ("V" key) and pressing Shift + "+". For an in-depth exploration, consider an ultimate guide to layer blending modes in Photoshop.
Customizing Layer Thumbnail Size
To change the size of layer thumbnails, go to the Layers panel fly-out menu and choose "Panel Options." Choosing a larger size makes it easier to see the contents of each layer, while a smaller size allows you to view more layers in a complicated document.
The Revolutionary Impact of Layers
Layers totally revolutionized Photoshop. For the first time, users could perform complex compositions easily without needing to be a channels guru. Before layers, if a client wanted to make changes to a composition, or even change a font, it could be a significant challenge. The concept of layers, while taking some time to master, is not overly difficult once you understand how they work. They provide an unparalleled level of control and flexibility, making intricate image manipulation accessible and manageable.
By understanding and effectively utilizing the Layers panel, you unlock the full potential of Adobe Photoshop, transforming your creative process and elevating the quality of your digital artwork.