Understanding and correctly setting the Dots Per Inch (DPI) for your images in Adobe Photoshop is a critical skill for anyone looking to achieve high-quality prints, especially for large-format projects like posters. While Photoshop offers a robust suite of tools for image manipulation, navigating its resolution settings can sometimes lead to confusion. This guide will demystify DPI, explain its relationship with Pixels Per Inch (PPI), and provide a clear path to setting up your images for impactful printed output, ensuring your poster-sized visions become a reality without compromising quality.
What Exactly is DPI and Why Does It Matter for Printing?
DPI, or Dots Per Inch, is a fundamental concept in print production. It quantifies the number of individual ink dots a printer can lay down within a linear inch of a physical surface, such as paper. The relationship between DPI and print quality is paramount; a higher DPI setting means more ink dots are packed into each inch, resulting in finer detail, sharper lines, and smoother tonal transitions. This is what makes an image look crisp and high-quality on paper. For instance, an image with a resolution of 300 DPI signifies that every inch of the printed output contains 300 dots of ink.

Conversely, lower DPI settings may suffice for materials that do not require fine detail, such as flyers or drafts. However, for professional printing, especially on a large scale like a poster, achieving the correct DPI is essential for avoiding a pixelated or grainy appearance. Photographers and graphic designers typically use 300 DPI as a benchmark for printing high-quality images, as most humans can perceive detail at this resolution.
Understanding the Difference: DPI vs. PPI
While often used interchangeably, DPI and PPI (Pixels Per Inch) refer to slightly different aspects of image resolution. PPI pertains to the pixel density of a digital image, indicating how many pixels are contained within a linear inch of the digital file itself. This metric is relevant for how images are rendered on digital displays and affects clarity on screens.
DPI, on the other hand, applies specifically to printed images, dictating the physical density of ink dots laid down by a printer. In practice, and particularly within Photoshop, both terms ultimately impact the image's resolution and print quality. When you're preparing an image for print, you're concerned with how many pixels will be translated into printed dots per inch. The conversion between PPI and DPI is usually a 1:1 ratio in terms of how Photoshop handles it. For example, if an image is 10 inches wide by 10 inches high at 300 DPI, its pixel dimensions need to be 3000 pixels by 3000 pixels (10 inches * 300 pixels/inch = 3000 pixels).
Navigating Photoshop's Image Size Dialog for DPI Control
When you encounter an image with a lower DPI, such as 100 DPI, and need to prepare it for a large print like a poster, the desire is to increase the DPI without altering the physical dimensions of the intended print. This is where understanding Photoshop's "Image Size" dialog box is crucial.
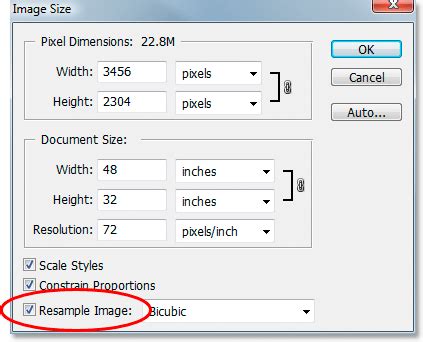
To access this, open your image in Photoshop and navigate to Image > Image Size. You will see fields for "Width," "Height," and "Resolution." Below these, you'll find a checkbox labeled "Resample Image."
The Crucial Role of "Resample Image"
The "Resample Image" option is the key to controlling how Photoshop handles changes in resolution.
When "Resample Image" is checked: If you uncheck "Resample Image" and then change the resolution from 100 DPI to 300 DPI, Photoshop will attempt to fit those 100 DPI pixels into a smaller physical space. This means the "document size" (which directly relates to the print size) will decrease. Conversely, if you check "Resample Image," Photoshop will add new pixels to the image to maintain the original dimensions while increasing the DPI. This process, known as upsampling, involves Photoshop's algorithms interpolating or "guessing" what new pixel data should be created. While Photoshop's upscaling technology has improved, it cannot create detail that wasn't originally present. Therefore, upsampling a low-resolution image to a very high DPI for a large print might result in a softened image with less sharpness than desired.
When "Resample Image" is unchecked: If you uncheck "Resample Image" and then change the resolution from 100 DPI to 300 DPI, Photoshop will alter the "document size" (the physical dimensions of your print) to accommodate the new DPI while keeping the total number of pixels the same. For example, if you have an image that is 1000 pixels wide and you set it to 100 DPI, the print size would be 10 inches (1000 pixels / 100 DPI). If you then uncheck "Resample" and change it to 300 DPI, the print size would shrink to approximately 3.33 inches (1000 pixels / 300 DPI), because the same number of pixels are now being condensed into a smaller physical space. This is what happened when you observed the document size decreasing.
Preserving Poster Size While Increasing DPI: The Challenge
The core of your question is how to increase DPI from 100 to 300 without changing the poster size. When you have an image with 100 DPI and want to print it as a poster at 300 DPI, and you do not want to change the physical dimensions of the poster, you are facing a common challenge.
If you uncheck "Resample Image" and change the DPI to 300, the document size (poster size) will decrease because Photoshop is maintaining the original pixel count and fitting more dots into each inch. If you check "Resample Image" and change the DPI to 300, Photoshop will add pixels to maintain the original document size. However, the quality of these newly generated pixels is an extrapolation, not original data.
The fundamental limitation here is that DPI is a conversion factor. It's more akin to "meters per second" than a fixed measurement like "10 meters." You cannot magically create detail that isn't there. If you want a 300 DPI print at a specific large size, you need a source image with a sufficient number of pixels. For example, if your desired poster size is 36 inches by 70 inches, to achieve 300 DPI, you would need a source image with pixel dimensions of (300 * 36) x (300 * 70) = 10,800 x 21,000 pixels.
Strategies for Optimizing Low-DPI Images for Large Prints
Given these constraints, here are the best approaches when you have a lower-resolution image intended for a large print:
Assess the Viewing Distance: The required DPI often depends on how far away the viewer will be. For large-format prints like posters, which are typically viewed from a distance, a lower DPI might be acceptable without a significant compromise in perceived quality. While 300 DPI is a standard for high-quality prints viewed up close, a poster viewed from several feet away might look perfectly acceptable at 150 DPI or even 100 DPI, especially if the original image quality is good. You might be able to print at 100 DPI and achieve a satisfactory result for a poster.
Use Photoshop's "Preserve Details" Upscaling: If you absolutely must increase the DPI and maintain the print size, you will need to resample.
- Open your image in Photoshop.
- Go to
Image > Image Size. - Ensure "Resample Image" is checked.
- Set your desired DPI (e.g., 300 DPI).
- In the "Resample" dropdown menu, choose "Preserve Details (enlargement)". This algorithm is designed to introduce fewer artifacts when increasing pixel count.
- Adjust the "Width" and "Height" to your desired poster dimensions.
- Click "OK."This process will add pixels, and while it can yield better results than older methods, it's still an interpolation.
Consider Specialized Upscaling Software: For significant enlargements, dedicated AI-powered upscaling software can often produce superior results to Photoshop's built-in tools. Programs like Topaz Gigapixel AI are specifically designed to intelligently add pixels and enhance detail during enlargement, often with very good results, even upscaling images by 6x or more. These tools can be particularly useful when you've had to crop an image significantly, resulting in a lower initial resolution.
Create a New Document at the Desired Resolution: A common workaround is to create a new document with the desired dimensions and DPI from the outset.
- Go to
File > New. - Set the "Width" and "Height" to your desired poster dimensions (e.g., 36 inches by 70 inches).
- Set the "Resolution" to your target DPI (e.g., 300 DPI).
- Ensure the "Color Mode" is set appropriately for print (usually CMYK).
- Click "Create."
- Then, drag and drop your 100 DPI image into this new document. You will likely need to scale it up. Photoshop will warn you that the image may appear pixelated because you are scaling up a low-resolution image to fit a high-resolution canvas.
Easily Convert Low To High Resolution Photos In Photoshop
- Go to
Source Higher-Resolution Images: The most ideal solution, if possible, is to obtain the original image at a higher resolution or a different source that provides the necessary pixel dimensions for your desired print size and DPI. Your printer's request for 300 DPI is a clear indicator that the current image lacks the pixel data for a high-quality print at a typical poster size.
DPI and Print Quality Considerations
Beyond Photoshop settings, several factors influence final print quality:
- Printer Capabilities: Professional printers typically have higher resolutions and can reproduce images at higher DPIs. Matching your image's DPI to the printer's capabilities is important.
- Paper Type: The paper's quality and coating affect how ink is absorbed and reflected. Higher-grade papers generally hold ink better, leading to clearer and more vibrant prints.
- LPI (Lines Per Inch): In the printing industry, LPI describes the resolution of printed images in terms of lines of dots. It affects how images are reproduced. A common recommendation is to match LPI with DPI; for example, if printing at 300 DPI, an LPI of around 150 is often suitable for optimal quality.
- Viewing Distance: As mentioned, the further away a viewer is, the less critical extremely high DPI becomes. A large billboard, for instance, is printed at a much lower DPI than a magazine page.
The "Document Size" and Poster Size
Yes, the "document size" in Photoshop's "Image Size" dialog box directly corresponds to the physical dimensions of your intended print. When you change the DPI without resampling, you are essentially telling Photoshop to redefine the physical size of the image based on the new DPI and the existing pixel count. If you want to conserve the actual size (poster size) while increasing DPI, you must allow Photoshop to resample (add pixels).
Is Another Program Better Than Photoshop for This Task?
Photoshop is a powerful raster editor, and its core functionality is based on manipulating pixels. While it offers tools to adjust DPI, it cannot create detail that isn't present in the original image. For the specific task of upscaling low-resolution images for large prints, specialized software like Topaz Gigapixel AI, or even some vector-based tools if the source material allows for conversion, might offer superior results in terms of perceived detail and sharpness. However, for general image preparation and adjustment, Photoshop remains a leading choice.
Ultimately, understanding DPI is about managing expectations and working within the technical limitations of digital images and print reproduction. By carefully considering your image's pixel dimensions, the intended print size, and the viewing distance, you can leverage Photoshop's tools effectively to achieve the best possible print quality for your posters and other projects.