Working effectively within Adobe Photoshop, a powerful and versatile photo editing software, hinges on a fundamental skill: mastering the art of zooming. Whether you need to meticulously refine the finest details of an image or gain a comprehensive overview of your composition, understanding how to zoom in and out is paramount. Photoshop offers a myriad of tools and techniques to achieve this, catering to various workflows and user preferences. This comprehensive guide delves into the diverse methods for navigating zoom levels, ensuring you can work with clarity, precision, and unparalleled efficiency.
The Core of Zoom: The Zoom Tool
At the heart of magnification control in Photoshop lies the Zoom Tool. Visually represented by a magnifying glass icon, this tool is readily accessible from the toolbar, typically located on the left-hand side of the Photoshop interface. Alternatively, you can summon it instantly by pressing the 'Z' keyboard shortcut.
Once the Zoom Tool is active, its behavior can be refined through the Options bar, which appears at the top of the screen. Here, you can select between 'Zoom In' and 'Zoom Out' modes. Clicking on a specific area of your image with the Zoom Tool will magnify that region, bringing it into sharper focus. Each subsequent click will zoom in progressively closer. The current magnification level of your open file is conveniently displayed in the lower-left corner of the Status Bar, and also within the document tab at the top of the window.
To perform the opposite zoom action with the Zoom Tool - for instance, to zoom out when 'Zoom In' is selected - a simple modifier key comes into play. Hold down the "Alt" key on Windows or the "Option" key on a Mac, and then click. This action will toggle the zoom direction, allowing for rapid adjustments without needing to switch modes in the Options bar.
For users who prefer a more fluid zooming experience, the Zoom Tool offers a continuous zoom capability. With the Zoom Tool selected, click and hold down your mouse button on the desired area of the image. Photoshop will then begin to zoom in continuously until you release the mouse button. This method is particularly useful for quickly scanning through different levels of magnification.
Scrubby Zoom: An Intuitive Approach
A particularly intuitive and efficient feature within Photoshop's Zoom Tool is "Scrubby Zoom." This functionality, often enabled by default, allows for direct manipulation of zoom levels by clicking and dragging. With the Zoom Tool active, simply click on your image and drag your mouse to the right to zoom in, or drag to the left to zoom out. The magnification level adjusts dynamically as you drag. It's important to initiate the drag immediately after clicking; if there's a delay, Photoshop might interpret the action as a request for Continuous Zoom.
For those who prefer a different interaction model, Scrubby Zoom can be toggled on or off. To disable it, ensure that the "Scrubby Zoom" checkbox in the tool's Options bar is unchecked. When Scrubby Zoom is inactive, clicking and dragging creates a rectangular selection area on your document. Upon releasing the mouse button, Photoshop will instantly zoom in to encompass this selected region, an action akin to using the Rectangular Marquee Tool for zoom purposes.
Resizing Windows to Fit
When working with floating document windows in Photoshop, zooming can sometimes lead to windows that no longer fit neatly within the available screen space. To address this, the "Resize Windows to Fit" option can be enabled in the Zoom Tool's Options bar. When checked, Photoshop will automatically resize the document window to accommodate the new magnification level after zooming. However, it's worth noting that if this option is enabled, document windows will not extend beyond the boundaries of the surrounding panels.
Keyboard Shortcuts: The Power of Speed
For seasoned Photoshop users and those looking to significantly enhance their workflow efficiency, keyboard shortcuts are indispensable. They provide the fastest and most direct way to control zoom levels without interrupting the creative flow.
The most fundamental zoom shortcuts involve the Control key (Ctrl on Windows) or the Command key (Cmd on Mac) in combination with the plus (+) and minus (-) keys.
- Zoom In: Press and hold
Ctrl(orCmdon Mac), then press the+key. Each press will incrementally zoom in. - Zoom Out: Press and hold
Ctrl(orCmdon Mac), then press the-key. Each press will incrementally zoom out.
These shortcuts are particularly valuable because they allow you to zoom in or out to specific, predefined magnification levels that offer the most accurate representation of your image's detail. As you zoom in using these shortcuts, you'll notice the zoom level incrementing through values like 25%, 33.3%, 50%, 66.7%, and crucially, 100%.
Precise Zoom Levels: 100% and Fit Screen
Understanding specific zoom percentages is key to accurate image editing.
100% Zoom (Actual Pixels): Viewing an image at 100% magnification is the only way to see a truly accurate representation of your image's detail. At this level, each pixel in the image is displayed by a single pixel on your screen. This is essential for tasks like sharpening, retouching, and ensuring pixel-level precision. To jump to 100% zoom instantly, you can either:
- Click the "100%" button in the Options bar Control panel when the Zoom Tool is active.
- Navigate to the "View" menu and select "100%".
- Use the keyboard shortcut
Ctrl + 1(Windows) orCmd + 1(Mac).
Fit Screen: When you need to see the entire image within the visible screen area, the "Fit Screen" command is invaluable. This option resizes the zoom level so that the entire document fits within your display. To access this:
- Click the "Fit Screen" button in the Options bar Control panel when the Zoom Tool is active.
- Navigate to the "View" menu and select "Fit on Screen" (or "Fit All").
- Use the keyboard shortcut
Ctrl + 0(Windows) orCmd + 0(Mac). This is an extremely useful shortcut for quickly regaining context.
When viewing an image at zoom levels less than 100%, you are not seeing all of the pixels. For instance, an image zoomed to an odd value like 51.25% might make details appear softer compared to viewing it at 50%. This is because Photoshop is interpolating pixels to fill the screen. Conversely, zooming in beyond 100% does not reveal more detail; it merely enlarges the existing pixels. As you zoom in extremely close, you might eventually see an outline around the pixels, known as the Pixel Grid. This grid is a visual aid for reference and will not be visible in your saved or printed images. You can toggle the visibility of the Pixel Grid via the "View" menu under "Show."
Navigating with the Hand Tool and Mouse Wheel
Zooming in on an image often necessitates panning or scrolling to view different areas. Photoshop provides dedicated tools and methods for this essential navigation task.
The Hand Tool
The Hand Tool, found in the toolbar directly above the Zoom Tool, allows you to click and drag the canvas around, much like physically moving a photograph on a desk.
- Accessing the Hand Tool:
- Select it from the toolbar.
- Use the keyboard shortcut 'H'.
- Temporary Hand Tool Access: A highly efficient technique is to temporarily activate the Hand Tool by pressing and holding the spacebar. While the spacebar is held down, you can click and drag to pan your image. Releasing the spacebar immediately reverts you to your previously active tool, making navigation seamless.
- Flick Panning: When the Hand Tool is active, you can "toss" or "throw" the image by clicking and dragging, then releasing the mouse button. The image will continue to move in that direction until it gradually comes to a stop, or you can stop it by clicking again. This feature can be enabled or disabled in Photoshop's Preferences.
- Hand Tool Tip: Double-clicking on the Hand Tool icon in the toolbar is a quick shortcut to activate the "Fit on Screen" command, instantly displaying the entire image.
Mouse Wheel Navigation
For mice equipped with a scroll wheel, navigation becomes even more intuitive.
- Scrolling: Simply use your mouse's scroll wheel to pan the image up, down, left, or right. This functionality works regardless of the currently active tool.
- Zooming with Scroll Wheel: You can also use the mouse scroll wheel for zooming. Hover your cursor over the area where you want to zoom in, and then scroll. To refine this further, holding down the Alt key (Windows) or Option key (Mac) while using the scroll wheel will limit the zoom values to the preset percentages (25%, 33.3%, etc.), ensuring a more accurate view.
How to QUICKLY Pan & Zoom in PHOTOSHOP
Advanced Zooming Features
Photoshop offers additional features to enhance the zooming workflow, particularly when managing multiple documents.
Zoom All Windows
The "Zoom All Windows" feature allows you to synchronize the zoom level of all currently open image windows simultaneously. This ensures a consistent viewing perspective across your entire project, which is incredibly useful when comparing or working on related images. To apply this, ensure all desired images are open, then navigate to the "Window" menu, under "Arrange," and select "Match Zoom."
Navigator Panel
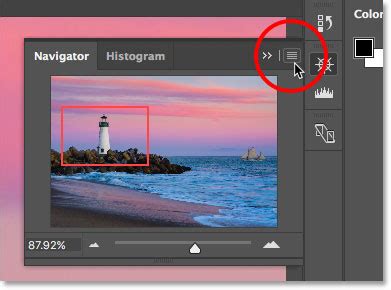
The Navigator panel provides an alternative method for zooming and navigating your images. It displays a thumbnail of your entire image, with a red rectangle indicating the currently visible area.
- Adjusting Zoom: You can change the zoom level by moving the slider located at the bottom of the Navigator panel.
- Navigating: To pan your image, simply drag the red rectangle within the thumbnail. Alternatively, you can place your cursor over the red rectangle; it will change to a hand icon, allowing you to click and drag the thumbnail to reposition the view of your image. Double-clicking the Hand Tool within the Navigator panel will also execute a "Fit on Screen."
Workflow Integration and Best Practices
Becoming proficient with Photoshop's zoom capabilities is not just about knowing the tools; it's about integrating them seamlessly into your workflow for maximum efficiency.
- Understand the Pixel Grid: Be aware of the Pixel Grid and its role in visualizing individual pixels at very high zoom levels. Remember it's a reference, not part of the final output.
- Leverage Shortcuts: Commit the essential keyboard shortcuts (
Ctrl/Cmd + +,Ctrl/Cmd + -,Ctrl/Cmd + 0,Spacebarfor Hand Tool) to memory. They will dramatically speed up your work. - Choose the Right Zoom Level: Regularly switch between detailed views (100% or higher) for precise edits and broader views (Fit Screen or lower percentages) for composition and context.
- Scrubby Zoom Preference: Decide whether Scrubby Zoom's immediate drag-to-zoom interaction suits your style, or if the selection-based zoom is more to your liking.
- Consider External Controllers: For highly repetitive zoom and navigation tasks, specialized hardware controllers like TourBox can offer further customization and streamline your workflow, allowing for even more efficient image editing.
By understanding and practicing these various methods of zooming, panning, and navigating within Photoshop, you equip yourself with the essential skills to work with images at any scale, ensuring precision, clarity, and a significantly improved editing experience.