Migrating your Lightroom Classic catalog to a new computer can feel like a daunting task, given that it houses years of meticulously organized photos, edits, keywords, and collections. This comprehensive guide will walk you through the process, ensuring a smooth transition and safeguarding your valuable photographic work. We'll cover the essential steps, potential pitfalls, and best practices to get your Lightroom Classic setup running on your new machine without a hitch.
Understanding the Lightroom Classic Catalog
At its core, a Lightroom Classic catalog is a database file (with the .lrcat extension) that acts as a central index for all your photographic assets. It doesn't store your actual image files; instead, it meticulously tracks their locations on your hard drives, along with all the associated metadata. This includes edits applied, keywords assigned, ratings given, collections created, and any other organizational or descriptive information you've added. When you make changes in Lightroom Classic, these modifications are stored within the catalog file.

A crucial companion to the .lrcat file is the .lrcat-data file. This file stores additional information, particularly for AI-driven edits. If the .lrcat-data file is missing or misplaced, AI edits can be permanently lost. It's vital to ensure both files are kept together during any transfer.
It's also worth noting that in newer versions of Lightroom Classic, particularly after major updates, you might be prompted to upgrade your catalog. This is a normal process designed to accommodate database changes and ensure compatibility with new features and performance improvements. Lightroom Classic will create a copy of your old catalog for this upgrade.
Preparing for the Transfer: Key Pre-Transfer Steps
Before embarking on the actual transfer, a few preparatory steps can significantly simplify the process and prevent potential data loss.
Backing Up Your Lightroom Catalog
The absolute first step, and arguably the most critical, is to create a robust backup of your existing Lightroom Classic catalog. This acts as a safety net, ensuring you have a complete copy of your work should anything go wrong during the transfer.
To back up your catalog:
- Open Lightroom Classic on your current computer.
- Navigate to Edit > Catalog Settings (on Windows) or Lightroom Classic > Catalog Settings (on macOS).
- In the General tab, select the Backup option.
- Choose how often you want Lightroom to prompt you to back up (e.g., "When Lightroom exits"). It's highly recommended to select "When Lightroom exits" or "Every time Lightroom starts" for maximum safety.
- Click Back Up. Lightroom will then create a backup copy of your catalog, usually in the same location as your original catalog, with "Backup" appended to the filename.
Consolidating Your Photo Files
While the catalog doesn't store your images, it does store their locations. If your photos are scattered across multiple drives or folders, it can complicate the transfer. Using Lightroom's "Consolidate" feature can help ensure all your original photo files are in a single, manageable location.
To consolidate your files:
- In Lightroom Classic, go to the Library module.
- In the Folders panel, right-click (Windows) or Control-click (macOS) on the top-level folder that contains all your images.
- Select Consolidate All Folders.
- Lightroom will then prompt you to specify a destination folder. Choose a location where you want all your images to be gathered.
This process can take a considerable amount of time depending on the number and size of your photo library.
Exporting Smart Previews (Optional but Recommended)
If you're working with large RAW files or if your original files are stored on an external drive that you might not immediately connect to the new computer, exporting Smart Previews can be a valuable step. Smart Previews are smaller, optimized versions of your photos that allow you to continue editing, organizing, and exporting even without direct access to the original files. This is particularly useful if you plan to work on your new laptop while the larger files are still being transferred or organized.
To export Smart Previews:
- Select the photos or folders for which you want to create Smart Previews.
- Go to Library > Previews > Build Smart Previews.
Transferring Your Catalog and Photos to the New Computer
With your preparations complete, you can now proceed with moving your Lightroom Classic setup to your new machine.
Method 1: Copying the Catalog and Photo Files Directly
This is the most straightforward and commonly recommended method, especially if your photo library is stored on an external drive.
Locate Your Catalog Files: On your old computer, find the folder containing your Lightroom catalog. By default, this is usually in your Pictures folder under a subfolder named "Lightroom" or a custom name you’ve given it. Remember, you're looking for the
.lrcatfile and its accompanying.lrcat-datafile, along with any preview files (.lrdata).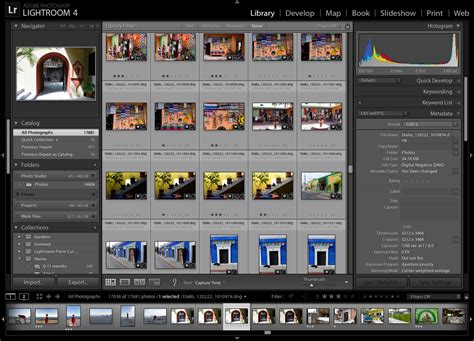
Copy to External Storage: Copy the entire catalog folder (including the
.lrcat,.lrcat-data, and.lrdatafiles) to an external hard drive or a large USB flash drive.Transfer Photo Files: If your photos are on a separate external drive, ensure that drive is also connected to your old computer and ready for transfer. Copy the entire folder structure containing your photos to the same external drive you used for the catalog, or to a different external drive if preferred.
Connect to the New Computer: Connect the external drive(s) containing your catalog and photo files to your new computer.
Install Lightroom Classic: If you haven't already, install the latest version of Adobe Lightroom Classic on your new computer.
Open the Catalog on the New Computer:
- Launch Lightroom Classic.
- Instead of creating a new catalog, go to File > Open Catalog.
- Navigate to the external drive where you copied your catalog files.
- Select your
.lrcatfile and click Open.
Move Lightroom Catalog To New Computer How To Move Lightroom Catalog To New Computer The Right Way
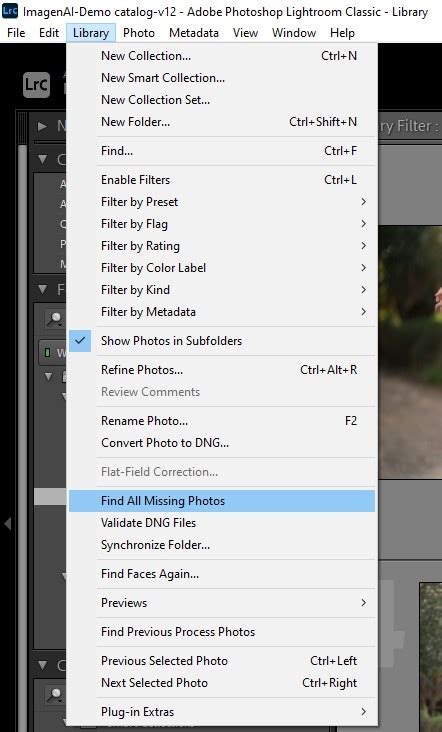
Relink Missing Files (If Necessary): If your photo files are on a different drive than where you placed the catalog, or if the drive letter (on Windows) or volume name (on macOS) has changed, Lightroom will likely report that your photos are missing.
- In the Library module, you'll see folders marked with a question mark.
- Right-click (Windows) or Control-click (macOS) on the folder with the missing photos.
- Select Find Missing Folder.
- Navigate to the correct location of your photos on the external drive and select it.
- If you have many missing photos, you might be prompted to "Find Similar Files" or "Find All Missing Folders." This can significantly speed up the process.
Important Note on Drive Letters: If you are moving between Windows computers, ensure the external drive is assigned the same drive letter on the new computer as it was on the old one. You can do this using Disk Management in Windows. This prevents Lightroom from losing track of your files.
Verify and Rebuild Previews: Once your catalog is open and files are linked, Lightroom may need to rebuild previews. This can take time, especially for large catalogs. You can monitor the progress in the upper-left corner of the Library module.
Method 2: Exporting and Importing as a Catalog (Generally Not Recommended for Full Migration)
While "Export as Catalog" is a feature in Lightroom Classic, it's generally not the preferred method for a full transfer to a new computer. This feature is more suited for sharing subsets of your work or creating archives. The user information provided explicitly advises against this: "No. NO Exporting of catalogs. No exporting of photos. Yes. ie. No Export as a Catalog."
The primary reason to avoid this for a full migration is that it creates a new catalog, and you might lose some of the intricate relationships and settings from your original master catalog. However, if you were to use it, the process would involve:
- Exporting: In your old Lightroom Classic, go to File > Export as Catalog. Select the photos or folders you want to export. Crucially, when prompted to "Include Negative Files," the advice is generally "No" if your photos are already in their final location, as the new catalog should be able to reference them. However, if you intend to move the photos as well, you might consider this option.
- Importing: On the new computer, after installing Lightroom Classic, go to File > Import from Another Catalog. Navigate to the
.lrcatfile you exported.
This method is more complex and prone to issues compared to simply copying the existing catalog.
Method 3: Using Lightroom Sync and the Cloud (For Lightroom Ecosystem Users)
If you're invested in the broader Adobe Lightroom ecosystem (Lightroom desktop, mobile, and cloud), there's another approach. Lightroom Classic can sync Smart Previews of your cataloged images to the Adobe Cloud. This sync process does not consume your Photography plan storage.
Enable Sync in Lightroom Classic: Go to Edit > Preferences > Lightroom Sync (Windows) or Lightroom Classic > Preferences > Lightroom Sync (macOS). Ensure syncing is enabled.
Sync Smart Previews: Lightroom Classic will then begin syncing Smart Previews of your images to the cloud.
Access on New Computer: On your new computer, install the Lightroom desktop application (not Lightroom Classic). Sign in with your Adobe ID. Your synced Smart Previews will become available in Lightroom desktop, allowing you to continue editing.
Caveat: This method primarily syncs Smart Previews. While you can edit and manage them, it's not a direct transfer of your entire Lightroom Classic catalog with all its nuances. For users who primarily work with Lightroom Classic and want its full functionality on a new machine, Method 1 is superior. This cloud sync is more for users who want a unified experience across devices using the cloud-centric Lightroom.
Post-Transfer Verification and Cleanup
Once you've successfully transferred your catalog and photo files, a thorough verification process is essential to ensure everything is in order.
Review Imported Photos
Navigate through your catalog on the new computer. Browse through your folders and collections to ensure all your images are present and accessible.
Verify Edits and Metadata
This is a critical step. Open several photos and meticulously check:
- Edits: Are all your adjustments (exposure, color, cropping, etc.) intact?
- Keywords and Metadata: Have all your keywords, ratings, flags, captions, and other metadata been transferred correctly?
- Collections: Are all your organized collections present and populated with the correct images?
- Virtual Copies: If you created virtual copies of any images, verify they are still there and linked to the correct master image.
Reconnect External Drives
If your original photo files reside on external hard drives, ensure these drives are connected to your new computer and recognized by Lightroom. If you encountered issues with missing files earlier, this is where you'll confirm they are now properly linked.
Update Backup Settings
If you had configured automatic catalog backup settings on your old computer, make sure to re-establish these on your new machine. Go back to Catalog Settings and set up your preferred backup schedule.
Test and Optimize Performance
Take Lightroom Classic for a spin on your new computer. Test its responsiveness, especially when applying edits, exporting images, or performing catalog-intensive tasks. If performance is sluggish, consider optimizing your catalog:
- Go to File > Optimize Catalog.
- This process can take some time but can help improve Lightroom's speed and efficiency.
Cleaning Up Temporary Files
Lightroom may create temporary files during the import or transfer process. These often have a .lock extension and are typically found in the same directory as your catalog file. Once you are absolutely certain everything is working correctly, you can safely delete these temporary files.
Advanced Scenarios and Troubleshooting
Renaming Your Catalog
Starting with the October 2024 release (Version 14.0), Lightroom Classic allows you to rename your catalog directly from within the application.
- Go to File > Rename Catalog.
- Enter the new name for your catalog.
- When renaming via the application, you do not need to manually rename the corresponding
.lrcat-data, preview, and smart preview files, as Lightroom handles this automatically. - After renaming, your catalog will appear with the new name in the Select Catalog dialog box.
Moving Photos Within Lightroom
To avoid Lightroom losing track of your photos, it's best practice to move or rename them from within Lightroom Classic itself, rather than using your operating system's file explorer (Finder on macOS, Explorer on Windows). If you do move them outside of Lightroom, you will likely need to relink them as described in Method 1.
Watermarks Not Appearing
If you find that your custom watermarks are not appearing after the transfer, it's often because the watermark presets themselves haven't been transferred correctly. Watermarks are stored within the catalog. If you created them using the "Save Current Settings as a New Preset" option within the Watermarking dialog, they should ideally transfer with the catalog. If not, you might need to re-create them or ensure they are part of a preset that was exported and imported.
Catalog Location and Cloud Sync Services
When using cloud sync services like Microsoft OneDrive or Apple iCloud Drive, be cautious about storing your Lightroom catalog directly within these synchronized folders. Changes made by Lightroom might conflict with the cloud service's syncing mechanisms, potentially leading to corruption or unintended usage of your online storage. It's generally recommended to keep your catalog on your local drive or a dedicated external drive that is not actively being synced by these services.
Conclusion: A Smooth Transition Awaits
Transferring your Lightroom Classic catalog to a new computer is a critical process that, when done correctly, ensures continuity in your photo editing workflow. By following the steps outlined above-backing up your catalog, consolidating your files, carefully copying and opening your catalog on the new machine, and thoroughly verifying all your work-you can achieve a seamless transition. Remember, patience is key, especially when dealing with large photo libraries. Always keep your old computer accessible until you are completely confident that all your data has been transferred successfully.