In the digital age, where images are shared and distributed online with unprecedented ease, protecting your creative work from unauthorized use has become a paramount concern for photographers, designers, and artists. While no method offers absolute foolproof protection, implementing a copyright watermark in Adobe Photoshop can significantly deter potential infringers and ensure proper attribution. This comprehensive guide explores various techniques for adding copyright symbols and watermarks to your images, catering to different needs and skill levels, from simple text overlays to more sophisticated logo-based solutions.
Understanding the Importance of Copyright
With the proliferation of digital photography and online platforms for showcasing work, such as client proofing sites or portfolio galleries, the risk of your images being used without permission is a significant worry. Including copyright information directly within your artwork files is a good practice, especially when sending files to clients or collaborators. This embedded data ensures that whoever has access to the file understands who the original artist or author is, and potentially the year the file was created or sent. This is particularly useful in professional settings where files might be downloaded and stored, and individuals might not always recall the origin of the artwork. For instance, if a company representative downloads your art file and saves it to their system, having your name embedded ensures proper artist credit is maintained, even if their internal file organization is less than perfect.
The Copyright Symbol: Adding the ©
One of the most direct ways to indicate copyright is by using the copyright symbol (©). While you might be tempted to search for a specific "copyright symbol Photoshop" tool, the process is often more about text input and character maps.
For those working with web design elements, there's a method involving HTML code. When designing a page, you can select "Insert HTML" from the Object menu and then type ©. This is a common way to represent the copyright symbol on web pages.
In Photoshop, directly typing the copyright symbol can be achieved using system-level tools. On Windows, you can access the Character Map utility (found under Start > Programs > Accessories > System Tools). On Mac OS X, the Character Palette (Edit > Special Characters) serves a similar purpose. Once opened, you can locate the copyright symbol, copy it, and then paste it into your Photoshop document using the Text tool.
A common shortcut for the copyright symbol on Windows is to hold down the Alt key and type 0169 on the numeric keypad. For Mac users, the shortcut is typically Option + G. It's worth noting that some sources might suggest Alt + G for Mac, but Option + G is the more consistently recognized shortcut.

Creating a Text-Based Copyright Watermark
A straightforward and effective method for protecting your images is by creating a text-based copyright watermark. This involves adding your copyright notice directly onto the image itself.
Step-by-Step Text Watermark Creation
- Open Your Image: Begin by opening the photograph you wish to watermark in Photoshop.
- Select the Text Tool: Choose the Text tool from the Tools palette, or press the
Tkey on your keyboard. - Type Your Copyright Notice: Click anywhere on your image and type your copyright notice. This typically includes the copyright symbol (©), your name or company name, and the year. For example: © 2023 Your Name.
- Formatting the Text:
- Font and Color: With the text highlighted, use the options in the toolbar to change the font face, size, and color. Plain, neutral colors often work best, such as pure white or black, depending on which stands out more effectively against your image.
- Rotation: For a more integrated look, the copyright text can be rotated. After typing your notice, press
Ctrl+T(Windows) orCommand+T(Mac) to activate Free Transform. Position your cursor just outside one of the corner handles until it turns into a curved double-headed arrow, then click and drag left or right to rotate the text to your desired angle.
- Positioning the Watermark: Decide where to place your watermark. A good location is often an area of roughly even color that doesn't obscure the main subject of the shot, typically near a corner.
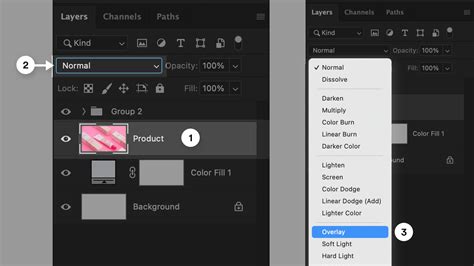
- Adjusting Opacity and Blend Mode:
- To make the watermark less intrusive, you can adjust its opacity. With the text layer selected in the Layers palette, move to the Opacity option and reduce it as needed.
- Further blending can be achieved by changing the layer's blend mode. Click the down-pointing arrow next to "Normal" in the Layers palette and select a mode like "Overlay" or "Soft Light." The "Overlay" mode can help the text blend with the image colors while remaining visible. Experiment with different blend modes and opacity levels to find what works best for your specific image.
Adding Special Characters
When typing your copyright notice, you might need to insert special characters like the copyright symbol. As mentioned earlier, you can use the Windows Character Map or Mac OS X's Character Palette for this. Alternatively, if you are working in a document and need to insert HTML code for a copyright symbol, you would use ©.
Creating a Pattern-Based Copyright Watermark
A more advanced technique involves creating a repeatable copyright watermark pattern that can be applied across an entire image. This is particularly useful for ensuring consistent protection across multiple photos.
Defining a Custom Pattern
- Create a New Document: Go to File > New. Set the dimensions to something manageable, for instance, 6 inches wide, 4 inches high, with a resolution of 300 pixels/inch. This size is arbitrary and can be adjusted.
- Add Your Copyright Text: Use the Text tool to add your copyright information to this new document. Rotate the text as desired using Free Transform (
Ctrl+TorCommand+T). - Trim the Canvas: Go to Image > Trim. In the Trim dialog box, ensure "Transparent Pixels" is selected and check all options (Top, Bottom, Left, Right) to remove any excess whitespace around your text.
- Define the Pattern: With the trimmed document active, go to Edit > Define Pattern. Give your pattern a descriptive name (e.g., "Copyright Pattern") and click OK.
Applying the Copyright Pattern
- Open Your Target Image: Open the photograph you want to watermark.
- Create a New Layer: In the Layers palette, ensure you have a new layer selected above the Background layer (which contains your image).
- Fill the Layer with the Pattern: Go to Edit > Fill. In the Fill dialog box, select "Pattern" from the Contents dropdown. Click on the thumbnail image next to "Custom Pattern" and choose the copyright pattern you just defined from the list. Click OK.
- Adjust Blend Mode and Opacity:
- The pattern will likely appear too prominent. To fix this, with the new pattern layer selected, change the blend mode from "Normal" to "Overlay."
- Next, adjust the Opacity of this layer to make the watermark subtle enough not to detract from the image. Experiment with different opacity levels until you achieve a satisfactory balance between visibility and subtlety.
How to Create a Seamless Pattern in Photoshop | How to Make a Repeating Texture in Photoshop
Using Logos as Watermarks
For professionals with their own branding, using a logo as a watermark can be highly effective. This method is slightly more involved but can offer a more polished and branded appearance.
Preparing Your Logo
- Remove Color: For a logo to work effectively as a watermark, it's often best to remove all color from it. Open your logo image in Photoshop.
- Copy and Paste: Copy your logo and paste it as a new layer onto the photograph you wish to watermark.
- Adjust Blend Mode: Select the logo's layer and change its blending mode to "Darken." This will cause any white background in your logo to disappear, leaving only the black and grey areas visible.
Inverting and Adjusting Logo Watermarks
If you prefer a white watermark instead of black, you can easily invert the logo:
- Add an Invert Adjustment Layer: Go to Layer > New Adjustment Layer > Invert.
- Position and Clip: In the Layers panel, position the Invert layer directly above your logo layer. Then, hold down
Alt(Windows) orOption(Mac) and click on the line between the Invert layer and the logo layer. This creates a clipping mask, ensuring that only the logo layer is affected by the Invert adjustment. - Change Blend Mode: Select the logo layer again and change its blend mode to "Lighten." This will effectively make the black areas of your logo appear white against the image.
This technique can also be applied to color logos, but be mindful that they can sometimes clash with the photo's colors and be difficult to read.
Embedding Copyright Data in File Info
Beyond visible watermarks, Photoshop allows you to embed copyright information directly into the file's metadata. This is a professional approach that adds copyright data without altering the visual appearance of the image.
Accessing File Info
- Open Your File: Open your Photoshop file.
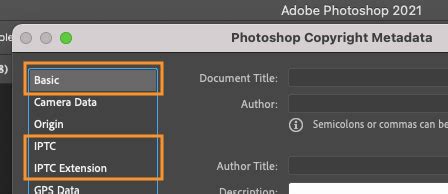
- File Info Window: Navigate to File > File Info.
- Populate Fields: In the File Info window, you can fill out various fields such as Author, Copyright Status, Copyright Notice, and URL. You can enter as much or as little information as you desire. It's often beneficial to keep this information general rather than specific to a single art file, as you can save these details as a template for future use.
- Saving as a Template: Before clicking OK, select "Export" and save your populated fields as a template. This template can then be applied to future files, saving you time. You can even save this process as a Photoshop Action for even quicker application.
When you successfully add copyright information through File Info, the copyright symbol (©) will often appear automatically within your file name or within the file's properties, indicating that copyright data is included. This process helps ensure that proper artist credit is maintained, especially when files are shared or transferred.
Automating Watermarking with Actions
For users who frequently watermark images, creating a Photoshop Action can significantly streamline the process. An action is a recorded series of steps that can be played back on any image.
Recording an Action
- Open the Actions Panel: Go to Window > Actions to open the Actions panel.
- Create a New Action: Click the "Create New Action" button (the folded page icon). Give your action a name (e.g., "Add Copyright Watermark").
- Record Steps: Click the "Record" button. Now, perform all the steps you would normally take to add your desired watermark (e.g., placing a text layer, adjusting opacity, changing blend mode, or applying a pattern fill).
- Stop Recording: Once you have completed all the steps, click the "Stop" button (the square icon) in the Actions panel.
Now, you can select your recorded action and click the "Play" button (the triangle icon) to apply the entire sequence of steps to any open image. This is an invaluable tool for maintaining consistency and efficiency in your workflow.
Considerations and Best Practices
While adding a copyright symbol or watermark is a crucial step in protecting your work, it's important to understand its limitations. A determined individual might still be able to remove or alter a watermark. Therefore, it's wise to consider a multi-layered approach to copyright protection.
- Resolution: Be mindful of the resolution of your images when applying watermarks. A watermark that is too low in resolution might appear pixelated.
- Subtlety: The goal of a watermark is often to deter rather than to be a prominent feature. Aim for subtlety, so the watermark complements, rather than detracts from, your artwork.
- Copyright Registration: For the strongest legal protection, consider formally registering your copyright with the relevant authorities in your country. While this can be costly and time-consuming, it provides a stronger legal standing should you need to take action against infringement. Many artists choose not to register every single artwork due to these factors.
By employing these techniques in Photoshop, you can significantly enhance the protection of your digital creations, ensuring that your artistic efforts are properly acknowledged and respected.