Navigating the vast array of tools in digital art software can initially feel daunting, but understanding the fundamentals of Photoshop brushes can transform your creative process and empower you to achieve professional results. This guide delves into the essential settings and techniques for creating and utilizing line art brushes in Adobe Photoshop, offering insights for artists of all levels, from beginners to seasoned professionals.
Understanding Core Brush Settings in Photoshop
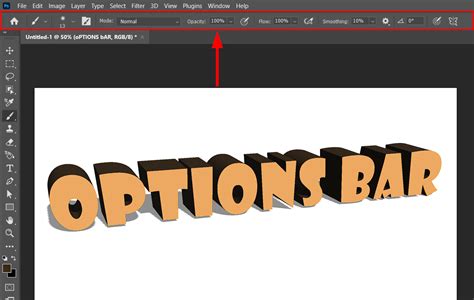
Adobe Photoshop offers a powerful suite of tools for digital painting and image editing, with the Brush tool and Pencil tool being fundamental for applying color and creating strokes. These tools, along with others like the Eraser, Blur, and Smudge tools, allow for intricate modifications to existing image colors. The options bar, accessible when any of these painting tools are selected, provides control over how color is applied and allows for the selection of preset brush tips.
A key feature is the ability to save a collection of brush settings as a preset. This allows for quick access to frequently used brush characteristics. Photoshop comes with several sample brush presets that can be modified to create unique effects. Saving tool presets is particularly useful for storing customized brush tip characteristics along with specific options bar settings such as opacity, flow, and color.
Beyond the options bar, brush tip settings significantly influence how color is applied. These settings enable gradual color application, soft edges, large brush strokes, various brush dynamics, different blending properties, and brushes of diverse shapes. Textures can be applied to brush strokes to simulate painting on various surfaces like canvas or art papers, and airbrush effects can be simulated for spraying paint. The Brush Settings panel is the central hub for configuring these brush tip options. For artists utilizing a drawing tablet, Photoshop offers advanced control over color application through pen pressure, angle, rotation, or a stylus wheel.
Opacity and Flow: Controlling Transparency and Build-up
The brush opacity setting directly impacts how transparent your brushstrokes appear. A lower numerical value results in a more see-through brushstroke, while a higher value increases opacity. When the pen pressure opacity setting is engaged, the brush's transparency is dynamically controlled by the amount of pressure applied to the drawing tablet. Less pressure yields more transparent paint, effectively mimicking a natural painting experience.
Flow, while similar to opacity, introduces a nuanced difference. It influences both the transparency of the brushstroke and its streakiness, depending on the specific brush. A lower flow setting means less paint is applied with each stroke. The longer the pen remains in contact with the canvas, the more paint is dispensed, up to the defined opacity level. This allows for a build-up of color that can feel more organic and painterly. For instance, if opacity is set to 33% and flow is also set to 33%, each pass over an area will incrementally move the color towards the chosen brush color by 33%.
A helpful shortcut for adjusting opacity is to press a single number key to set the opacity in 10% increments (e.g., '1' for 10%, '0' for 100%). Pressing two number keys allows for setting a specific opacity percentage.
Smoothing: Achieving Clean and Precise Lines
Smoothing is a critical setting for creating clean line art and precise lines. Increasing the smoothing percentage results in more "controlled" brushstrokes. This feature is particularly valuable when aiming for sharp, defined lines.
The "bullseye tool," or more accurately, the pen pressure sensitivity for size, controls line weight. Applying more pressure results in a thicker brushstroke, enabling the creation of precise, sharp lines. This capability can transform even large paint brushes into detail-oriented brushes. However, it's important to note that this specific setting might not be ideal for extensive blending or when large brushstrokes are required, as it can limit dynamic range in those scenarios.
Brush Size and Shortcuts
The brush tool shortcut is 'B'. Within the options bar, you can adjust the size of the brush tip. Beyond the direct slider, keyboard shortcuts exist for resizing brushes. By default, the bracket keys [ and ] are used to decrease and increase brush size, respectively. Alternatively, holding down the Alt/Option key and dragging the stylus left or right can also adjust brush size.
Advanced Brush Customization and Control
Photoshop's Brush Settings panel offers a deep dive into brush customization, allowing artists to fine-tune every aspect of a brush's behavior. This panel is accessed by double-clicking on the brush tool icon or by navigating to Window > Brush Settings.
Brush Tip Shape and Spacing
Within the Brush Settings panel, the "Brush Tip Shape" section is fundamental. Here, you can select different brush tip profiles, adjust their diameter, and crucially, modify the spacing between brush dabs. Brush spacing refers to the distance between each mark the brush makes. A lower spacing value creates a smoother, more continuous line, essential for clean line art. Many artists find that a spacing of 10% offers a good balance between smoothness and responsiveness.
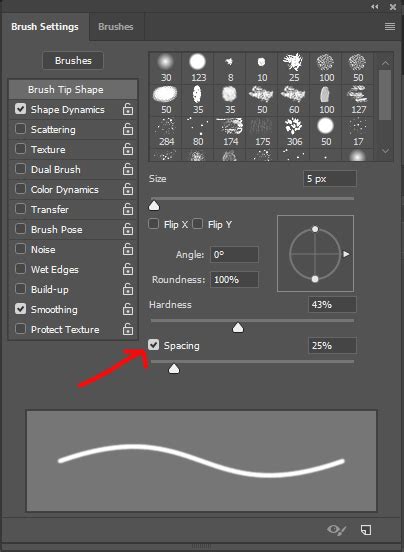
When examining the "Brush Tip Shape" options, you'll notice controls for "Roundness" and "Angle." These allow you to alter the shape of the brush tip, which can be particularly useful for simulating specific drawing tools or creating unique textures. The "Angle" setting, in particular, can be adjusted numerically or by clicking and dragging an icon, offering precise control over the orientation of the brush tip.
Shape Dynamics and Pen Pressure
The "Shape Dynamics" section is where you can introduce variability to your brushstrokes. "Size Jitter" can be set to respond to pen pressure, meaning the harder you press with your stylus, the thicker the line will be, and vice-versa. This pressure sensitivity is paramount for achieving natural-looking linework that mimics traditional inking. The "Minimum Diameter" slider within Size Jitter controls the smallest possible brush size when little to no pressure is applied, allowing for very fine lines.
Transfer Settings: Mimicking Natural Media
The "Transfer" section in the Brush Settings panel offers controls that further enhance the mimicry of traditional media. "Opacity Jitter" and "Flow Jitter" can also be set to respond to pen pressure, providing even more subtle control over the build-up of color and transparency.
"Dual Brush" allows you to combine two different brush tips, creating complex textures and effects. For line art, this can be used to add subtle texture to your lines or create unique inking styles.
Other Brush Settings
Other sections within the Brush Settings panel include "Texture," where you can apply various patterns to your brush strokes; "Dual Brush," which allows for combining two brush tips; "Color Dynamics," for varying hue, saturation, and brightness; "Transfer," which controls opacity and flow jitter; "Dual Tip," for combining two brush tips; "Shape Dynamics," for controlling size, angle, and roundness jitter; "Scattering," for distributing brush dabs; "Texture," for applying patterns; "Dual Brush," for combining two brush tips; "Color Dynamics," for varying color attributes; "Transfer," for opacity and flow jitter; "Dual Tip," for combining two brush tips; "Shape Dynamics," for controlling size, angle, and roundness jitter; "Scattering," for distributing brush dabs; and "Dual Tip," for combining two brush tips.
When working with a drawing tablet, settings like "Pen Pressure," "Pen Tilt," and "Stylus Wheel" can be assigned to various brush parameters (e.g., Size, Opacity, Flow, Angle, Roundness) to achieve highly dynamic and responsive brush strokes.
Creating Effective Line Art Brushes
While Photoshop offers a vast library of default brushes, many artists find it beneficial to create or customize brushes specifically for line art. This often involves starting with a basic round brush and adjusting its settings.
The Hard Round Brush for Line Art
The "Hard Round" brush is a common starting point for line art due to its crisp edges. Its hardness is typically set to 100%, providing a consistent and defined stroke.
To create a custom line art brush:
- Select the Brush Tool: Press 'B' or select it from the toolbar.
- Choose a Hard Round Brush: From the Brush Presets panel, select a basic hard round brush.
- Open Brush Settings: Access the Brush Settings panel (Window > Brush Settings).
- Adjust Spacing: In the "Brush Tip Shape" section, reduce the "Spacing" to around 10% for smooth lines.
- Enable Shape Dynamics: Go to the "Shape Dynamics" section. Under "Size Jitter," set "Control" to "Pen Pressure." Adjust the "Minimum Diameter" to control the thinnest possible line.
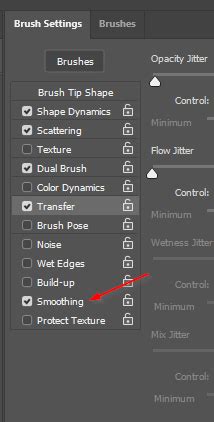
- Configure Smoothing: In the "Other Dynamics" section (or "Transfer" depending on Photoshop version), ensure "Smoothing" is enabled. A setting between 10% and 45% is often recommended for a balance of responsiveness and smoothness. Experiment with higher percentages if you need very clean, stable lines, but be aware that this can increase input lag.
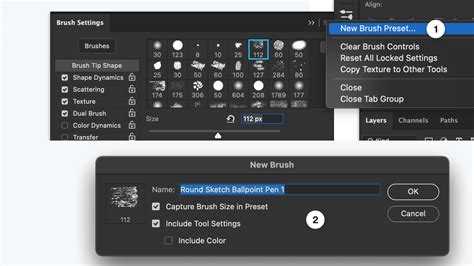
- Save the Brush: Once satisfied with the settings, click the "Create new brush" icon at the bottom of the Brush Settings panel. Give your brush a descriptive name (e.g., "My Line Art Brush").
Utilizing Pen Pressure for Line Weight
The true power of digital line art often lies in the ability to vary line weight dynamically. By enabling "Pen Pressure" for "Size Jitter" in the "Shape Dynamics" section, you allow your stylus pressure to control the thickness of your strokes. This emulates the natural feel of traditional inking pens and brushes.
Smoothing for Precision
The "Smoothing" setting plays a crucial role in ensuring clean, wobble-free lines, especially for artists with less steady hands or those working at high speeds. The "Pulled String Mode" in Photoshop's smoothing engine works by creating an invisible "string" that guides your brush. The higher the smoothing percentage, the longer this string becomes, leading to more controlled, albeit potentially less immediate, strokes. Experimentation is key to finding a smoothing level that suits your drawing style and tablet responsiveness.
Exploring Pre-made Brush Packs for Line Art
For artists seeking to expedite their workflow or explore different inking styles, numerous pre-made brush packs are available. These packs often contain a curated selection of brushes designed for specific purposes, such as comic inking, manga, or general illustration.
Some notable brush creators and packs mentioned include:
- Kyle T. Webster: Known for his extensive collection of high-quality Photoshop brushes, many of which are free.
- Frenden: Offers brushes designed to replicate traditional inking tools.
- "Attack Of The Liners": A comprehensive pack featuring liners, shaders, stamps, and more, aiming to provide all necessary brushes for comic creation.
- Miguel Nogueira: A freelance concept artist who may offer custom brush sets.
- Artistmef (Ihor Vitkovskyi): Specializes in Photoshop add-ons and textures, including sets of underline brushes.
- Esben Lash Rasmussen: An illustrator known for his work in the entertainment industry, offering brush packs like "Line brushes."
- Drew Green: A cartoonist who uses specific brush packs for his work in animation and comics.
- David: Creator of "camelhair-brushes" that aim for smooth yet crisp lines, inspired by Corel Painter.
- Guerillacraft: Offers "Inkers" brushes that imitate traditional ink.
- Robert Marzullo (Ram Studios Comics): Provides a variety of brushes, including texture brushes for backgrounds and specific inking brushes.
- Onur Cem: Created brushes on Behance that imitate graphic pencils.
- Behance and DeviantArt: Platforms where artists often share free brush sets.
When selecting pre-made brushes, consider the style you aim to achieve. Some brushes are designed for sharp, clean lines, while others offer a more textured, traditional feel. It's also important to check compatibility with your version of Photoshop.
Easy One Line Art Tutorial for Beginners
Workflow Tips for Line Art Creation
Before diving into line art, a well-defined sketch is essential. Many artists employ a multi-layered sketching approach:
- Initial Sketch: Focuses on capturing the overall idea and composition.
- Refinement Sketch: Adds more detail and tidies up the forms.
- Clean-up Sketch: Further refines the illustration before the final line art stage.
This iterative sketching process helps ensure that the underlying structure of the artwork is solid, making the subsequent line art phase more manageable and producing a cleaner final result.
When setting up your brush for line art, reducing the spacing to around 10% is a good starting point. Enabling pressure sensitivity for size in the "Shape Dynamics" section is crucial for dynamic line weight. Adjusting smoothing to a level that provides stability without introducing excessive lag is also key.
For artists using older versions of Photoshop that may lack robust built-in smoothing, third-party stabilizers like Lazy Nezumi Pro can be a valuable investment, offering improved line stability across various art programs.
Ultimately, mastering Photoshop brushes for line art is an ongoing journey of exploration and experimentation. By understanding the core settings, customizing brushes to your needs, and leveraging the power of your drawing tablet, you can unlock a world of creative possibilities and achieve professional-quality line art.