Adding light sources and effects to your photographs in Photoshop can transform a flat image into a captivating visual narrative. Whether you aim to simulate the ethereal glow of sun rays piercing through a canopy or introduce a subtle, focused illumination to highlight a specific subject, Photoshop offers a robust set of tools to achieve these results. This guide will walk you through the process of creating realistic and visually appealing light source effects, from the initial setup to the final touches.
Laying the Foundation: Understanding Light and Image Selection
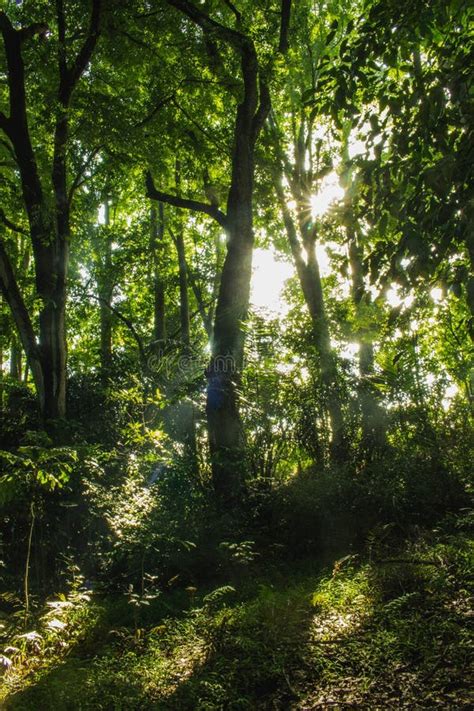
The success of any light effect hinges on the source image. For a truly realistic outcome, it's paramount to select an image that is already backlit by a significant light source, such as the sun or a similarly large illuminator. Our example features a subject positioned within a forest setting, with a setting sun providing the backlight. This scenario is ideal for crafting convincing light ray and sun ray effects because the natural lighting conditions already support the desired visual.
Before diving into the technical steps, it's crucial to analyze the existing lighting within your chosen photograph. This analysis will inform the direction and trajectory of the light rays you intend to add. Understanding where the light naturally emanates from will help you integrate your artificial light source seamlessly, making the final effect appear organic rather than superimposed.
Crafting the Initial Light Rays
You don't need complex or specialized tools to begin creating a light ray effect. The process starts with a fundamental layer and a simple brush.
Begin by creating a new, empty layer above your background image. This new layer will serve as the canvas for your light rays. Next, select the Brush Tool. Choose a relatively soft brush with a low opacity. You will then use this brush to paint thin, white strips along the paths where you envision the light rays appearing. At this stage, precision is not the primary concern; the goal is to establish the general direction and spread of the light. Think of these as nascent beams, awaiting further refinement.
Enhancing Realism with Blur and Transformation
Once you have a foundational layout of your light effect, the next step is to imbue it with a greater sense of naturalism. This involves transforming the raw brush strokes into something more akin to diffused light.
Before proceeding with the blurring process, it's beneficial to convert the layer containing your painted light rays into a Smart Object. To do this, right-click on the layer in your Layers panel and select "Convert to Smart Object." This conversion allows for non-destructive editing, meaning you can alter the blur effect later without permanently degrading the image quality.
Now, access the "Radial Blur" filter. You can find this under the Filter menu, typically within the Blur options. In the Radial Blur dialog box, set the "Blur Method" option to "Zoom." This method is crucial for simulating the way light appears to emanate from a central point and spread outwards. You can then set a single point from which the blur effect will originate. This point should ideally align with the apparent source of your intended light. Apply the Radial Blur. Observe the effect it has on your brush strokes. You might find that duplicating this blur effect multiple times, or adjusting its intensity, helps to dial in the right amount of diffusion and intensity for your light rays. The aim is to soften the sharp edges of the brush strokes and create a more organic, glowing appearance.
Creative Background Blur! - 1-Minute Photoshop
Refining Color and Tone with Adjustment Layers
With the blur effect satisfactorily established, the focus shifts to refining the color and tone of your light effect. The area you initially painted and subsequently blurred will now serve as a template. This template can be utilized within a Layer Mask attached to a Levels Adjustment Layer, allowing for precise control over the light's appearance.
To begin altering the color of your light effect, you first need to create a selection based on the light rays you’ve painted. With the light ray layer selected (and ideally still visible for reference, though it will be hidden later), Ctrl-click (or Cmd-click on Mac) on the layer thumbnail in the Layers panel. This action will create a selection precisely around the contents of that layer - your light ray template.
Now, create a Levels Adjustment Layer directly above your light ray layer. It's good practice to hide the original light ray layer at this point, as the Levels Adjustment Layer will now control its appearance via the mask you'll create. With the selection still active, click on the mask icon at the bottom of the Layers panel to create a Layer Mask for the Levels Adjustment Layer. This mask will ensure that any adjustments made in the Levels layer only affect the areas defined by your light ray selection.
Levels Adjustment Layers are powerful tools for manipulating the highlight and shadow information within an image or a specific layer. You can use them to adjust the overall brightness and contrast of your light rays. More importantly for color manipulation, you can target specific color channels. To change the color of your light effect, switch to the Red color channel within the Levels Adjustment Layer. Make adjustments to the sliders to tint the light rays towards red. Then, repeat this process for the Green color channel, adjusting the sliders to achieve the desired green hue. Feel free to switch back and forth between the Red, Green, and Blue channels (or RGB composite) as needed to fine-tune the color of your light effect until you achieve the look you desire. For instance, if you want a warm, golden hour glow, you'll likely increase the Red and Green channels.
Adding Subtle Imperfections: Noise for Realism
Even after adjusting the color and tone, the light ray effect might still appear a little too clean or well-defined. Natural light sources are rarely perfectly smooth; they often contain subtle variations and imperfections. Adding a touch of noise can significantly enhance the realism of your effect.
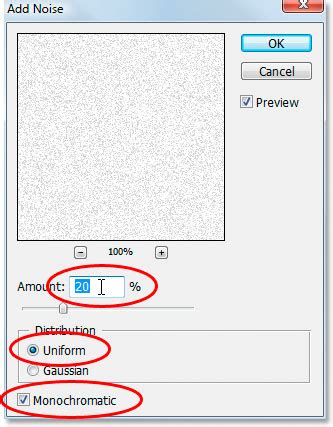
To apply noise, ensure you have one of your Levels Adjustment Layers selected. Navigate to the Filter menu, then select "Noise," and choose "Add Noise." In the Add Noise dialog box, adjust the noise level. The key here is to match the noise level as closely as possible to the existing noise or grain present in your original photograph. This consistency will prevent the added noise from looking artificial and will help the light rays blend more seamlessly with the rest of the image. Experiment with different amounts of noise and distribution methods (Gaussian or Uniform) until you achieve a natural-looking texture for your light rays.
Integrating Light with the Background and Subject
Once the light rays themselves are perfected, the next crucial step is to integrate them convincingly with the rest of your image, including the background and any subjects. This often involves using layer masks and blending modes to control how the light interacts with different elements.
If you've treated your background separately, you can insert one or more Curves Adjustment Layers. These adjustment layers should have layer masks applied to focus their effect only to the specific areas where you want the light to interact. For instance, a Curves layer could be used to subtly brighten parts of the background that would logically be illuminated by your added light source. You can paint directly onto the layer mask with black and white to precisely control where these adjustments are visible.
If you have multiple adjustment layers creating various light and shadow effects on your subject, you have a couple of options for managing them. You can either lift the background layer above these adjustment layers, ensuring the background remains unaffected. However, a more preferred and organized method is to group your subject and all its associated adjustment layers together. Place this group above the background layer. Set the blending mode of this group to "Normal" if it isn't already. This organizational structure not only keeps your layers tidy but also ensures that the light and shadow effects are applied correctly to your subject without bleeding into the background unexpectedly.
The principle here is to think about how light would naturally behave. Light rays would pass through elements, casting subtle shadows or illuminating surfaces they encounter. Your layer masks and adjustment layers are the tools to simulate these interactions. For example, if a light ray is meant to pass behind a tree branch, you would use a mask on the light ray layer itself to "erase" that portion of the light, creating a sense of depth and occlusion.
Advanced Techniques and Considerations
Beyond the core steps, several advanced techniques can elevate your light source effects.
Color Grading: While Levels Adjustment Layers are excellent for initial color shifts, consider using Color Balance or Hue/Saturation adjustment layers for more nuanced color grading. These tools offer finer control over specific color ranges and can help you match the light's color to the overall color palette of your image.
Blending Modes: Experiment with different blending modes for your light ray layers. Modes like "Screen," "Lighten," or "Overlay" can create a more integrated and luminous effect than the default "Normal" mode. "Screen" is particularly effective for simulating light passing through a medium, as it brightens the underlying layers.
Layer Masks for Diffusion: Instead of relying solely on Radial Blur, you can use layer masks with soft brushes to manually control the diffusion of your light rays. Painting with varying opacities of black on the mask can create softer edges and more natural fall-off of light intensity.
Adding Flares and Glints: For an extra touch of realism, consider adding lens flares or subtle glints of light. Photoshop's Lens Flare filter (Filter > Render > Lens Flare) can be used, but it often requires significant manipulation to look natural. Alternatively, you can paint small, bright highlights on separate layers with a soft brush and then apply a subtle Gaussian blur to simulate specular highlights.
Consistency with Image Lighting: Always refer back to your original image's lighting. Is the light source high or low? Is it direct or diffused? Does it have a warm or cool tone? Ensuring your added light source is consistent with these characteristics is paramount for believability.
Second and Third Order Implications: Think about the secondary effects of your added light. Would it cast subtle shadows on the subject? Would it create highlights on reflective surfaces? Would it alter the color of nearby objects through color bounce? Considering these implications will add layers of realism to your composite.

Avoiding Common Pitfalls
Several common misconceptions and clichés can detract from the realism of light effects.
Overly Perfect Rays: Perfectly straight, uniform light rays often look artificial. Natural light is rarely so precise. Introducing subtle variations in thickness, intensity, and curvature through brushwork and blurring is key.
Unrealistic Color: Light rays typically take on the color of their source. A setting sun will produce warm, golden tones, while a midday sun will be cooler and brighter. Avoid arbitrarily coloring your light rays without considering the source.
Ignoring Occlusion: Light doesn't pass through solid objects. If your light rays are meant to be behind an object, ensure they are masked out appropriately.
Inconsistent Light Direction: All added light sources should originate from the same general direction or consistent sources within the scene. Mismatched light directions are a dead giveaway of manipulation.
Lack of Interaction: The most convincing light effects are those that interact with the scene. This means subtle highlights on surfaces, soft shadows cast by the light, and color shifts on nearby elements.
By carefully considering the nature of light and employing Photoshop's versatile tools, you can effectively introduce compelling light source effects that enhance the mood, drama, and realism of your images. The process is an iterative one, often requiring experimentation and a keen eye for detail, but the results can be remarkably rewarding.