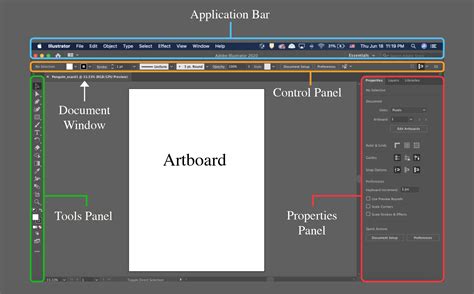
Adobe Illustrator's artboards are the fundamental canvases upon which all your designs are built. Think of them as individual sheets of paper, stacked or arranged, each capable of holding distinct artwork. This feature is incredibly powerful, allowing you to manage multiple designs within a single document, streamlining your workflow, and saving you the time and effort of creating and juggling separate files. Whether you're designing a suite of icons, preparing assets for animation, or simply organizing different versions of a logo, understanding how to effectively create, manage, and arrange artboards is crucial for efficient and professional design work in Illustrator.
Understanding the Concept of Artboards
At its core, an artboard in Adobe Illustrator functions as a virtual canvas. This is where you will create every design that you intend to make. The primary advantage of using artboards lies in their ability to facilitate the creation of multiple artworks for different purposes within a single Illustrator document. You can conceptualize artboards as sheets of paper of any size, stacked on top of one another, allowing for a versatile and organized approach to design. This is particularly useful when you need to create multiple frames for an animation project or design elements that will be exported individually, thus avoiding the need to create multiple separate documents for what is essentially one cohesive project. The ability to see all artboards adjacent to one another aids in maintaining design continuity and consistency throughout your entire project, enabling small tweaks without the necessity of opening numerous project files.
Creating New Artboards
There are several intuitive ways to introduce new artboards into your Illustrator document, catering to different needs and preferences.
Creating Artboards During Document Setup
When you first launch Illustrator and are presented with the "New Document" dialog box, you have the opportunity to define your artboard setup from the outset. This is an excellent starting point if you know the scope of your project and the number of distinct design areas you'll require.
- Initiate Document Creation: Begin by clicking "Create New…" from the initial pop-up screen or by going to
File > New. - Define Dimensions and Quantity: In the "New Document" window, navigate to the "Preset Details" panel. Here, you can enter your desired frame width and height for your artboards. Crucially, you can also specify how many artboards you would like to start with in the "Number of Artboards" field.
- Advanced Settings: For more control, expand the "Advanced Settings" section. Here, you can set your Color Mode (typically RGB Color for web and screen use, or CMYK Color for print) and Raster Effects resolution (Screen 72 ppi is standard for digital work).
- Finalize: Once your settings are configured, click the "Create" button at the bottom right of the dialog box. Your document will then open with the specified number of artboards, each with the defined dimensions.
Adding Artboards to an Existing Document
Even if you've already started a project, you're not limited to the artboards you initially created. Illustrator provides flexible tools to add more artboards as your project evolves.
Using the Artboard Tool
The Artboard Tool is your primary gateway to managing artboards within an existing document.
- Select the Artboard Tool: Access the Artboard Tool by clicking its icon in the Tools panel (typically found on the left side of the Illustrator window). Alternatively, you can use the keyboard shortcut
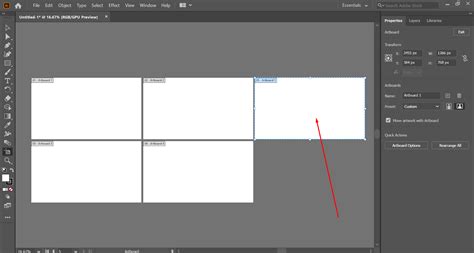
Shift + O. - Enter Artboard Editing Mode: Once selected, Illustrator enters "artboard editing mode." You will notice bounding boxes around your existing artboards, and the Properties panel (usually on the right) will display artboard-specific editing options.
- Create New Artboards:
- Click and Drag: In the Artboards panel (accessible via
Window > Artboards), or directly in your document window, you can click and drag in an open area to create a new artboard. The size of this new artboard will be determined by how far you drag. - Using the Control Bar: With the Artboard Tool active, you'll see options in the Control bar at the top of the Illustrator window. You can click a "New Artboard" button (often a plus icon) to add a new artboard, which will typically adopt the dimensions of your currently selected artboard or a default size.
- Duplicating Existing Artboards: You can also duplicate an existing artboard. With the Artboard Tool selected, you can often drag an existing artboard while holding the
Alt(Windows) orOption(macOS) key to create a copy. This is particularly useful when you need multiple artboards of the same size and basic layout.
- Click and Drag: In the Artboards panel (accessible via
Creating Individual Artboard Sizes for Specific Assets
This is a highly efficient technique, especially when working with icon sets or individual graphic elements that need to be exported separately.
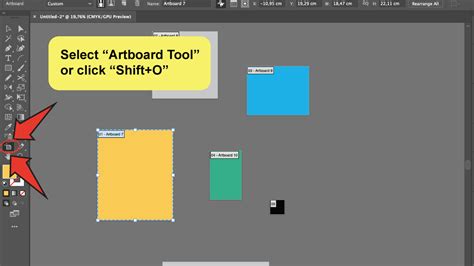
- Activate the Artboard Tool: Select the Artboard Tool (
Shift + O). - Double-Click on Artwork: Navigate to your document window. Double-click directly on the artwork (e.g., an icon) for which you want to create a precisely sized artboard. Illustrator will automatically generate a new artboard that perfectly encompasses that artwork. This is a rapid way to create artboards that are tailored to fit individual icons, which is exceptionally useful for exporting.
Managing and Organizing Artboards
Once you have multiple artboards, keeping them organized is key to maintaining a clear and efficient workflow.
Naming and Numbering Artboards
By default, Illustrator names artboards sequentially (Artboard 1, Artboard 2, and so on). However, as you add, delete, or rearrange artboards, these numbers can become out of sync with their visual order, leading to confusion.
Bulk Renaming for Order
A quick method to re-establish order when names are out of sync with numbers is to perform a bulk rename.
- Select the Artboard Tool: Ensure the Artboard Tool is active (
Shift + O). - Access the Artboards Panel: Open the Artboards panel via
Window > Artboards. - Select All Artboards: In the Artboards panel, click on the first artboard, then hold down the
Shiftkey and click on the last artboard to select all of them. - Apply a Common Prefix: Look at the Control bar at the top of the Illustrator window. You will see a "Name" field. Enter a common prefix here (e.g., "icon", "page", "section") and press
Enter. This action renames all selected artboards with your chosen prefix, followed by sequential numbers (e.g., icon 1, icon 2, icon 3). This effectively reorders the naming convention from first to last, ensuring your artboard names align with their numerical order.
Individual Descriptive Naming
While bulk renaming is fast, the most robust method for long-term clarity is to name each artboard individually with a descriptive name that reflects its content.
- Select the Artboard Tool: Activate the Artboard Tool (
Shift + O). - Open the Artboards Panel: Go to
Window > Artboards. - Double-Click to Rename: In the Artboards panel, double-click on the name of the artboard you wish to rename. Type in a descriptive name (e.g., "Homepage Banner," "Logo Primary," "User Profile Icon"). Press
Enterto confirm. - Utilize the Properties Panel: Alternatively, with the Artboard Tool active, select an artboard. The Properties panel will display its specific options, including a "Name" field where you can directly input a descriptive label.
Changing the Order of Artboards
The order of artboards in the Artboards panel dictates their sequential numbering. Changing this order is a two-step process: first, reorder them in the panel, and then visually rearrange them in the document window.
Reordering in the Artboards Panel
- Open the Artboards Panel: Navigate to
Window > Artboards. - Select an Artboard: Click on the artboard in the panel that you wish to move.
- Adjust Position: You can move the selected artboard up or down in the list using the arrow buttons located at the bottom of the Artboards panel. Alternatively, you can click and drag the artboard name to its desired position within the list, much like you would rearrange items in the Layers panel.
Important Note: Simply moving an artboard to the first position in the panel does not automatically change its visual location in the document window. To align the visual arrangement with the panel's order, a separate rearrangement step is necessary.
Rearranging Artboards Visually
This step ensures that the artboards are laid out in the document window according to the order you've established in the Artboards panel.
- Access the Rearrange Artboards Dialog: With the Artboards panel open, click the "Rearrange All Artboards" button (often represented by an icon showing multiple squares).
- Configure Layout Settings: A dialog box will appear, offering various layout options.
- Layout: Choose how you want your artboards to be arranged (e.g., Grid by Row, Grid by Column).
- Spacing: Adjust the horizontal and vertical spacing between artboards.
- Move Artwork with Artboard: Ensure that the "Move Artwork with Artboard" option is checked. This critical setting guarantees that any artwork placed on an artboard moves with it when you rearrange.
- Confirm Rearrangement: Click "OK." Illustrator will automatically reposition your artboards in the document window according to your chosen layout and spacing.
Adjusting the Reference Point
By default, artboards are typically arranged starting from the top-left corner. You can change this reference point before rearranging to influence the overall layout.
- Select the Artboard Tool: Activate the Artboard Tool (
Shift + O). - Locate the Reference Point Icon: In the Control bar at the top of the Illustrator window, you will find a reference point icon (often a 3x3 grid).
- Choose a New Reference: Click on this icon and select a different reference point (e.g., center, top-right). This new reference point will be used as the anchor when the artboards are rearranged.
Post-Rearrangement Naming: After rearranging, you might find that the sequential numbering of your artboards has changed. You may need to re-run the bulk renaming process described earlier to ensure the numbers accurately reflect the new visual order.
Advanced Artboard Management Techniques
Beyond basic creation and arrangement, Illustrator offers advanced features for fine-tuning your artboard setup.
Creating Custom Artboard Sizes
While presets are available for common devices, you often need to create artboards with specific, custom dimensions.
- During Document Creation: As detailed earlier, you can input custom Width and Height values in the "New Document" dialog.
- Using the Artboard Tool: With the Artboard Tool active, select an existing artboard. In the Properties panel or the Control bar, you can directly input new Width and Height values for the selected artboard. This allows for precise resizing of individual artboards.
Creating a Margin for Artwork
To prevent elements like icons from appearing too close to the edge of their artboards, it's often beneficial to scale the artwork slightly inwards, creating a visual margin.
- Exit Artboard Mode: Ensure you are not in artboard editing mode. Select the Selection Tool (
V). - Select Your Artwork: Select all the artwork that needs to be scaled (e.g., all icons on their respective artboards).
- Access Transform Each: Go to
Object > Transform > Transform Each.... - Configure Scaling:
- Reference Point: Set the reference point for scaling. Often, the center point is appropriate.
- Scale: Enter a percentage less than 100% (e.g., 95%) to scale the artwork down. Ensure the "Scale Proportionally" lock is enabled to maintain aspect ratios.
- Options: You can choose whether to scale strokes and effects.
- Apply: Click "OK." This will scale all selected artwork uniformly, creating a consistent margin around each element.
Scaling Strokes and Effects
If your artwork involves strokes or effects, it's crucial to configure Illustrator's preferences to ensure they scale appropriately.
- Access Preferences: Go to
Edit > Preferences(Windows) orIllustrator > Settings(macOS). - Navigate to General: In the Preferences dialog, select the "General" category.
- Adjust Scaling Options: Ensure that "Scale Strokes and Effects" is checked if you want these attributes to scale proportionally with your artwork.
30 Illustrator Secrets Graphic Designers MUST KNOW!
Working Efficiently with Bulk Actions
The power of artboards truly shines when you leverage bulk actions. Instead of making changes individually, which can be time-consuming, Illustrator allows for efficient management of multiple artboards simultaneously. This includes bulk renaming, resizing, and rearranging, all of which contribute to a significantly faster and more streamlined design process.
Artboards for Exporting
One of the most practical applications of artboards is for exporting individual assets. Each artboard can be treated as a separate page or canvas, allowing you to export them as individual files.
- Prepare Artboards: Ensure each design element is on its own artboard and that the artboards are appropriately sized and named.
- Use Export for Screens: Go to
File > Export > Export for Screens.... - Select Artboards: In the "Export for Screens" dialog, you'll see a list of your artboards. You can select which artboards you want to export.
- Choose Formats and Settings: Specify the desired file formats (e.g., JPG, PNG, SVG), resolutions, and other export settings for each artboard.
- Export: Click "Export Artboard" to generate your individual files.
This method is invaluable for exporting icon sets, website assets, or any collection of elements that need to be delivered as separate files.
Streamlining Your Design Workflow
Artboards are more than just digital pages; they are integral tools for optimizing your design process in Adobe Illustrator. By mastering the creation, naming, ordering, and exporting of artboards, you can significantly enhance your productivity, maintain design consistency, and manage complex projects with greater ease and professionalism. Whether you are a beginner or an experienced designer, a solid understanding of artboard functionality will undoubtedly elevate your workflow.
tags: #how #to #add #artboards #illustrator