Blurring in Adobe Photoshop is a versatile technique that can transform ordinary images into compelling visual narratives. Whether you aim to create a dreamy, ethereal quality, simulate a shallow depth of field, add a sense of motion, or protect sensitive information, Photoshop offers a robust suite of tools and filters to achieve these effects. This guide delves into the various methods of applying blur, from simple slider adjustments to sophisticated filter galleries, empowering users to enhance their designs and protect privacy with precision and creativity.
Getting Started with Image Blurring in Photoshop
The fundamental concept of blurring an image in Photoshop can be approached with remarkable ease, even for beginners. Photoshop provides intuitive controls that allow for immediate experimentation. You can begin by selecting any photograph, whether from your personal uploads or from Photoshop's extensive library. Once an image is selected, navigating to the "Filter" menu and then to "Advanced Options" opens up a world of possibilities. Within these advanced options, a dedicated blur slider enables you to dynamically adjust the intensity of the blur effect. Sliding the control to the right progressively increases the blur, while moving it to the left can be used to sharpen the image, offering a direct and responsive way to preview and control the outcome. This on-the-fly adjustment is ideal for quickly assessing how a blur might impact a design or to add subtle artistic nuances.
Artistic Applications of Subtle Blurring
Blurring is far more than a tool to mimic visual impairments; it's a powerful artistic instrument capable of significantly enhancing visual compositions. A gentle application of blur can introduce a sense of artful whimsy or a dreamy, ethereal quality to a landscape, transforming a static scene into something more evocative and atmospheric. In portraiture, a subtle blur can create a soft, flattering effect, reminiscent of a photobooth snapshot, drawing attention to the subject's features while softening the background. The ability to "gently inch the slider" allows designers and photographers to explore these nuanced effects, discovering how even a slight reduction in sharpness can imbue an image with a unique emotional resonance or aesthetic appeal.
Utilizing Blurred Images as Design Backdrops
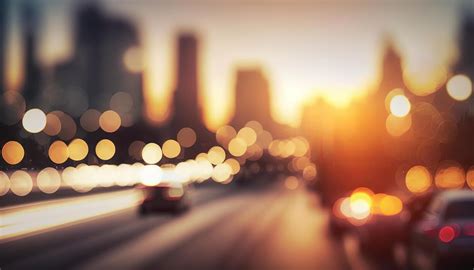
In the realm of graphic design, the impact of a well-chosen background cannot be overstated. Flat, uninspired backgrounds, often likened to those found in rudimentary documents, can detract from the overall professionalism and visual interest of a design. In contrast, a heavily blurred photograph can serve as a dynamic and organic backdrop, providing texture and depth that a solid color simply cannot replicate. The thematic relevance of a blurred image is another significant advantage. A blurred seascape can evoke a sense of tranquility and vastness, a blurred cityscape can suggest urban energy, and a blurred forest canopy can create an intimate, natural ambiance. These blurred backdrops not only enhance the visual appeal but also establish a distinct color palette that can be harmoniously integrated with other design elements, creating a cohesive and immersive user experience.
Advanced Blur Techniques in Photoshop
Beyond the basic slider, Photoshop offers a sophisticated array of blur filters designed for more specific and artistic outcomes. These tools provide granular control over the blur effect, allowing for complex manipulations that can simulate various photographic phenomena or create entirely novel visual styles.
The Blur Gallery: A Suite of Sophisticated Blurs
Photoshop's Blur Gallery is a central hub for advanced blurring techniques. It provides intuitive on-image controls that allow users to directly manipulate blur effects within the image canvas. Accessing the Blur Gallery, typically via Filter > Blur Gallery, presents several distinct blur types, each with unique applications:
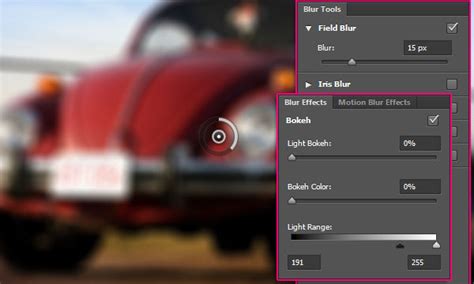
Field Blur: This powerful tool enables the creation of complex blur gradients. By placing multiple "blur pins" on the image, each with a different blur intensity, you can construct a nuanced transition of focus across the scene. This is ideal for creating depth-of-field effects where certain areas are intentionally blurred more than others, mimicking the look of professional camera lenses. Dragging the blur handle associated with each pin allows for precise control over the blur radius.
Iris Blur: Designed to simulate a shallow depth-of-field effect, Iris Blur allows you to define an elliptical area of sharpness, with the blur gradually fading outwards. This is particularly useful for isolating a subject and drawing the viewer's eye to it, regardless of the camera's actual capabilities. The default Iris Blur pin provides a central sharp area that transitions into a feathered fade area, with blur handles to adjust the extent of both.
Tilt-Shift Blur: This effect mimics the unique perspective and shallow depth of field often associated with tilt-shift lenses. It allows you to define a sharp area, with the blur then progressively softening towards the edges of the image. This can create a miniature, diorama-like effect, making real-world scenes appear as if they were small models. Similar to Iris Blur, controls are provided to define the sharp region and control the fade into blur.
When using these Blur Gallery effects, pressing the 'M' key reveals the blur mask, illustrating precisely which areas are affected by the blur. This visual feedback is crucial for refining the effect.
Enhancing Realism with Noise and Grain
Sometimes, applying blur effects can result in areas that appear unnaturally smooth or synthetic. To counteract this and introduce a more organic, photographic quality, Photoshop's Blur Effects panel includes a Noise tab. By adding noise, you can better match the texture of the blurred areas to the unblurred parts of the image.
- Amount: This setting controls the overall intensity of the noise, ensuring it aligns with the existing grain of the photograph.
- Roughness: Primarily for grain-type noise, this parameter adjusts the uniformity of the grain. Lower values create more uniform grain, while higher values introduce more variation.
- Color: A graduated slider that dictates the degree to which the noise is colored, allowing for subtle chromatic variations or monochromatic noise.
- Highlight: This option helps in better shadow and highlight matching by reducing noise in the brighter areas of the image, preventing an overly noisy appearance in highlights.
Crucially, once noise settings are specified for a particular type, Photoshop remembers them, making it easier to switch between different noise types and maintain consistency. A significant advantage of the Blur Gallery effects is their support for Smart Objects and Smart Object video layers, allowing for non-destructive editing and easy adjustments at any stage of the workflow.
Simulating Motion with Path Blur and Spin Blur
Photoshop also offers filters to convincingly simulate movement:
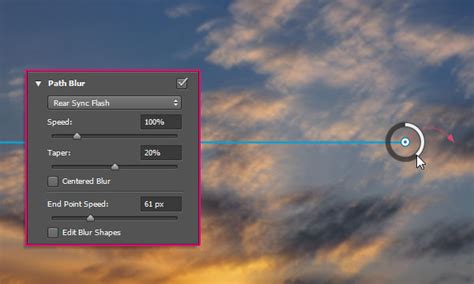
Path Blur: This filter allows you to create motion blurs that follow specific paths. You can define the path along which the blur will be applied, controlling its shape and intensity. Within the Path Blur section of the Blur Tools panel, you can choose between "Basic Blur" and "Rear Sync Flash" blur. The "Speed" slider dictates the amount of path blur, while a "Taper" slider controls how the blur diminishes along the path. "Centered Blur" can be deselected for asymmetrical blur effects. The "Strobe Strength" parameter is particularly interesting, allowing for the simulation of motion blur between flashes of light, from continuous blur (0% strobe strength) to distinct flashes with no connecting blur (100% strobe strength). You can even define custom blur shapes by drawing paths and adding curve points, offering immense creative freedom.
Spin Blur: This effect simulates rotational motion. It applies a radial blur around one or more defined points. The "Blur Angle" control dictates the extent of the rotational blur, adjustable via a slider or by entering a specific degree value (0-360°). Similar to Path Blur, "Strobe Strength" and "Strobe Flashes" can be used to simulate the effect of a stroboscope, creating segmented motion blur. The visual elements of Spin Blur include the rotation point, the blur ring, and feather handles for controlling the transition of the blur.
How to Use Motion Blur in Photoshop
Direct Brush-Based Blurring
For more targeted and manual blurring, Photoshop's dedicated Blur Tool is invaluable. By selecting the Blur Tool from the toolbar, choosing a brush tip, and setting the brush strength, you can directly paint over specific areas of an image to apply a blur effect. This method is excellent for softening particular details, drawing attention to a subject by blurring distractions, or refining the edges of other blur effects.
Blurring Faces for Privacy and Artistic Intent
A common and important application of blur in Photoshop is the obscuring of faces, whether for privacy protection, to prevent identification in shared images, or as an artistic choice. While Photoshop's built-in tools can achieve this, understanding the most efficient methods is key.
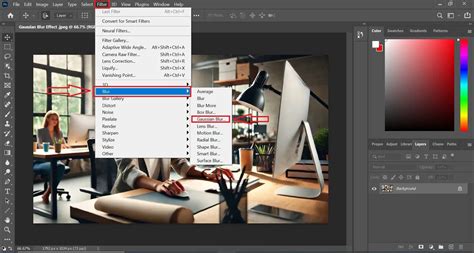
Using Gaussian Blur for Face Obscuring
A straightforward approach to blurring faces involves using selection tools and the Gaussian Blur filter.
- Preparation: Open your image in Photoshop. Duplicate the background layer (
Ctrl/Cmd + J) and then convert this duplicate layer into a Smart Object (Right-click layer > Convert to Smart Object). This ensures non-destructive editing. - Selection: Utilize selection tools like the Elliptical Marquee Tool to draw a circle around the face you wish to blur. While other selection tools can be used, the Elliptical Marquee is often convenient for facial shapes.
- Applying Gaussian Blur: Navigate to
Filter > Blur > Gaussian Blur. Adjust the "Radius" parameter to control the intensity of the blur. Because the layer is a Smart Object, you can later re-edit this Gaussian Blur by clicking on its name in the Layers panel. - Deselecting: Press
Ctrl/Cmd + Dto deselect the face and view the result.
Blurring Multiple Faces Efficiently
When dealing with multiple faces, applying Gaussian Blur to the entire image and then selectively revealing it is more efficient.
- Full Image Blur: Apply Gaussian Blur to the Smart Object layer with a high Radius value.
- Mask Inversion: Locate the Filter Mask thumbnail next to the Smart Object layer. It will be white by default. Click to select it, then press
Ctrl/Cmd + Ito invert it to black. This hides the blur effect everywhere. - Revealing the Blur: Select the Brush Tool, choose white as your foreground color, and adjust brush size and settings as needed. Paint over each face with the brush. This action reveals the underlying Gaussian Blur effect only on the painted areas. You can adjust brush size and softness for each face to achieve the desired level of obscurity. The Radius of the Gaussian Blur can be edited at any time by clicking on the effect in the Layers panel.
Alternative Blurring Effects: Mosaic Filter
For a different aesthetic, the Mosaic filter offers a pixelated effect for obscuring faces.
- Hide Gaussian Blur: If you've applied Gaussian Blur, click the eye icon next to it in the Layers panel to hide it.
- Apply Mosaic: Go to
Filter > Pixelate > Mosaic. Adjust the "Cell Size" parameter to control the degree of pixelation. The preview option allows you to see the effect before committing. This filter is also editable if the layer is a Smart Object.
Exporting Blurred Images
Once your blurring is complete, export the image in your desired format (File > Export > Export As... or Save As...) to share it online with confidence, knowing that individuals' privacy is protected.
Enhancing Blurring with Third-Party Plugins: Boris FX Optics
For users seeking even more advanced and streamlined blurring capabilities, particularly for complex tasks like masking and applying effects, third-party plugins offer powerful solutions. Boris FX Optics is a notable example, providing a professional suite of filters and AI-powered tools.
Integrating Boris FX Optics
- Setup: Import your image into Photoshop. As with built-in methods, duplicate the layer and convert it to a Smart Object for non-destructive editing.
- Applying Optics: Access the plugin via
Filter > Boris FX > Optics. The Optics interface will launch, importing your image. - Masking Faces: Optics features advanced masking tools, including "Mask ML," which can automatically detect and mask faces. Click on a face, and the AI will generate a mask. You can refine this mask by adding or subtracting areas. Pressing 'M' shows the mask, and 'Shift + M' shows an overlay. Press Enter to confirm the mask.
- Adding Blur Filters: Within Optics, navigate to the "Diffusion/Blurs" category or use the search function to find the "Blur" filter. Apply it to your masked layer.
- Adjusting Blur: The Blur filter's parameters typically include controls for blur along the X and Y axes, and a combined "Gang" parameter. Since the filter is applied to a mask, the blur will only affect the selected face. Mask adjustments can be made by clicking the mask thumbnail in Optics and refining its edges.
- Manual Refinement: For further control, you can add new layers within Optics and use its "Paint" filter or the Blur tool for manual refinement, painting over specific areas to adjust the blur. While the Blur tool can blur faces, using masking with blur filters is generally more efficient for multiple faces.
- Applying and Exporting: Once satisfied, click "Apply" in the Optics UI to return to Photoshop. Then, export your image as usual.
The Mask ML tool in Optics is particularly adept at quickly masking objects, making it a highly efficient solution for blurring multiple faces or other sensitive elements in an image.
Conclusion: A World of Blur Possibilities
Photoshop's comprehensive range of blurring tools, from simple sliders to advanced galleries and third-party integrations, offers immense creative potential. Whether you aim to add subtle artistic touches, create dramatic visual effects, simulate motion, or ensure privacy, mastering these techniques allows for precise control and impactful results. The ability to combine blur effects with other Photoshop features, such as layer masks and blending modes, opens up an almost infinite array of possibilities for image manipulation and enhancement.