Anchored objects in Adobe InDesign are a powerful feature that allows graphics, text frames, and other elements to flow seamlessly with your text. This capability is invaluable for maintaining design integrity, especially in documents with frequently updated or reflowing content. Whether you're incorporating icons into recipes, annotating images with callouts, or managing complex layouts with sidebars and illustrations, understanding how to effectively anchor objects can save significant time and prevent design headaches. This tutorial will delve into the intricacies of anchored objects, from basic inline placement to advanced custom positioning, drawing upon practical examples and InDesign's robust toolset.
The Advantage of Anchored Graphics: Flowing with Text
Anchored graphics possess the distinct advantage of flowing with text. This means that if the line of text to which an object is anchored moves, so too does the graphic. This dynamic relationship ensures that elements intended to accompany specific text remain in proximity, regardless of edits, additions, or deletions that alter the document's flow. Before the advent of the anchored objects feature, designers often had to manually reposition illustrations, figures, callouts, charts, tables, pull quotes, sidebars, and tip boxes that needed to stay with their associated text. When a story reflowed, these elements, treated as unrelated vessels, would drift, necessitating a tedious chore of manually steering them back into the fleet. In essence, anchored objects are more accurately described as tethered objects, bound not to a fixed page location but to the "lead ship"-the text itself.
Consider a market analysis report, a typical example of a multi-page document laden with illustrations and figures. Such documents often feature sidebar illustrations, sidebar text frames, and full-page-width illustrations. Without anchored objects, designers would face the laborious task of constantly adjusting these elements to keep pace with last-minute reflows in the copy they support.
Methods for Creating Anchored Objects
There are fundamentally two primary approaches to creating anchored objects in InDesign: you can start with the content that needs to be anchored, or you can begin with the container.
Method 1: Starting with the Content
- Prepare Your Text Frame: Set your body copy text frame, or a series of threaded frames, to act as the primary text flow.
- Create or Place Your Object: Create or place your first illustration, chart, pull quote, or any other object you wish to anchor anywhere on the page. Style it according to your design requirements. If the object necessitates multiple components, such as a caption or a photo credit, group them together with the illustration.
- Cut and Paste: Select your object or group using the Selection tool. Then, cut it to the clipboard via
Edit > Cut. - Insert into Text: Switch to the Type tool. Position your cursor just ahead of the text to which the anchored object must be tethered. Perform a normal paste operation (
Command/Ctrl + V). Avoid using "Paste in Place" for this step, as it can lead to unintended positioning. This action will insert an anchor marker at the insertion point, and the object will appear within the text flow, potentially causing a "calamitous shipwreck" of the layout initially, as the object might appear large and disruptive.
The pasted object will appear, but likely not in its intended position or size. This is a normal part of the process. The next steps involve refining its placement and appearance.
Method 2: Using the Anchored Object Command
This method offers a more direct route to creating anchored objects.
- Position the Cursor: Using the Type tool, click within your main text flow at the precise location where you want the anchor marker to appear.
- Access Anchored Object Options: Navigate to
Object > Anchored Object > Insert. This action will open the familiar "Insert Anchored Object" dialog box. - Choose Object Style (Optional): If you have pre-defined object styles, you can select one here to act as a template for your new anchored object. Remember, you can always modify these settings later.
- Set Dimensions: Determine the desired height and width of the anchored object itself.
- Configure Options: The dialog box presents various options for anchoring, which will be detailed in subsequent sections.
- Finalize Placement: Click "OK" to insert the anchored object.
Understanding Anchored Object Options
Once an object is anchored, or when you are inserting a new one, the "Anchored Object Options" dialog box becomes your central control panel. This dialog allows you to define how the object behaves in relation to the text. The dialog box offers three main modes: Inline, Above Line, and Custom.
Inline Mode
Inline mode is the most common and straightforward anchoring method. When an object is anchored inline, it is treated as if it were a character within the text.
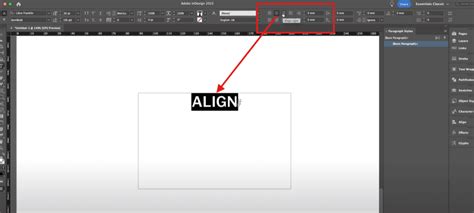
- Alignment: In this mode, the object is aligned with the baseline of the insertion point.
- Vertical Offset: Choosing "Inline" allows only a vertical, or y-axis, offset in positive or negative values, which is used for raising or lowering the object relative to the text's baseline.
- Text Wrap Interaction: If an anchored object has a text wrap applied, lines below the insertion point will wrap around it. However, the line containing the insertion point will not wrap. This can lead to an unwrapped line of text running behind the object. To mitigate this, style the line containing the anchor marker with no paragraph spacing and a leading of 0pt. Then, use the vertical alignment options in the dialog box to reposition the anchored object correctly.
- Prevent Manual Positioning: This option acts as a shortcut to the "Lock Position" command. When checked, the anchored object will move with its tethered text but cannot be manually repositioned on the page unless explicitly unlocked.
Anchoring an Icon in Recipes
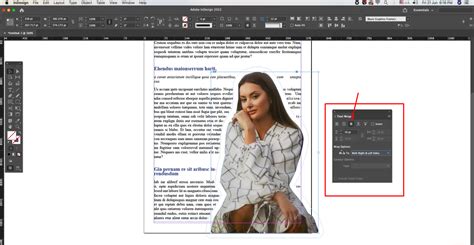
A practical application of inline anchoring is placing icons next to specific text elements, such as a "quick recipe" icon.
- Place the Icon: Place your icon image into the document.
- Resize the Icon: Select the picture frame containing the icon. Using the Selection tool, hold
Cmd-Shift(Mac) orCTRL-Shift(Windows) and drag the bottom-right resize handle inwards to scale the icon down. Aim for a size roughly equivalent to the height of the surrounding text. HoldingCmd(Mac) orCTRL(Windows) resizes both the frame and the image within it simultaneously. - Adjust Placement: Switch to Preview mode (
Wkey) to hide guides and better assess placement. Use the Selection tool to drag the icon up or down, or use the Up/Down Arrow keys for fine adjustments. Crucially, avoid clicking the center of the image, as this moves the image within its frame, not the frame itself. - Baseline Shift (Alternative): Another method for adjusting vertical placement is to use the Type tool. Click just to the right of the icon and drag to highlight it as if it were a character. Then, apply Baseline Shifting (found in the
Type > Characterpanel orControlpanel) to nudge it up or down. The increments for keyboard adjustments can be customized inInDesign > Preferences > Units & Increments(Mac) orEdit > Preferences > Units & Increments(Windows). - Test the Anchor: To verify the anchoring, modify the text to which the icon is attached. For instance, changing a recipe title should cause the icon to move along with the text.
InDesign: How to Anchor a Graphic to Text (Video Tutorial)
Above Line Mode

"Above Line" mode anchors the object above the text insertion point. This is useful for elements that need to precede text, such as decorative rules or custom headers.
- Alignment Options: In this mode, you have several alignment options: Left, Center, Right, Towards Spine, Away from Spine, and Text Alignment.
- Page-Aware Alignment: InDesign's alignment options are sensitive to facing pages. "Towards Spine" and "Away from Spine" ensure that objects are positioned correctly relative to the gutter on both left-hand and right-hand pages. For instance, an object aligned "Away from Spine" on a left-read page will appear on the outside edge of the text column, and if it flows to a right-read page, it will automatically reposition to the right side of its column.
- Text Alignment: This option causes the anchored object to inherit its alignment from the surrounding text, as defined in the Paragraph panel, Control panel, or a paragraph style.
- Breaks: Objects anchored "Above Line" do not require explicit column or page breaks before them. Any necessary breaks should be applied to the text's paragraph style.
Custom Mode

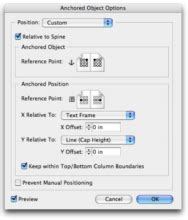
Custom mode offers the most granular control over an anchored object's position, allowing it to be placed anywhere on the page relative to the text or other page elements. This is where the concept of "tethering" becomes most apparent.
- Object Reference Point: You must first specify which part of the anchored object will serve as the reference point for positioning. This is done using the proxy grid, where you click on a specific point (e.g., top-left corner, center).
- Positioning Reference: You then define what this reference point will align to. This can be the text frame, a specific line within the text, or the page itself.
- Relative To Spine: When working with facing pages, this option allows you to define positioning relative to the document's spine. The proxy grid will show a two-page spread, enabling you to set different positions for left- and right-read pages.
- X and Y Offset: These fields allow you to fine-tune the object's position horizontally (X) and vertically (Y) from the defined reference point.
- Keep within Top/Bottom Column Boundaries: This is a crucial option when dealing with anchored objects that might otherwise extend beyond the text column. When enabled, it prevents the object from moving outside the defined column boundaries. If reflowing text would push the object out, it will align to the top or bottom inset of the column. This option also prevents manual dragging of the object beyond these boundaries.
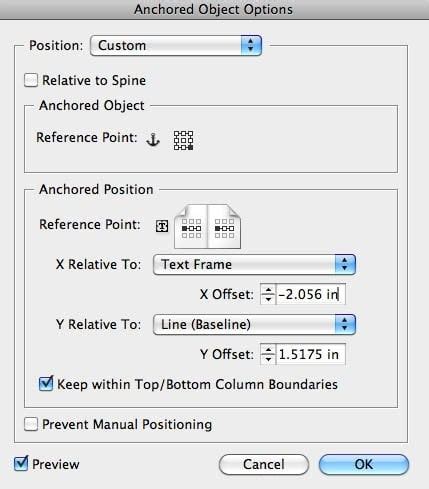
Positioning an Object in the Margin
For an object that needs to reside in the margin rather than within the body copy column, Custom mode is essential.
- Set X and Y Relative To: Choose appropriate options for
X Relative ToandY Relative To. For instance, to position an object relative to the page margin, select "Page Margin" or "Page Edge." - Define Reference Points: Select the desired reference point on the anchored object proxy (e.g., top-left corner). Then, select the corresponding reference point on the page item proxy (e.g., top-left corner of the page margin).
- Adjust Offsets: Use the X and Y Offset values to fine-tune the position.
- Test Reflow: As text reflows, the object will maintain its position relative to the page margins or edges, ensuring it stays in its designated spot.
Advanced Techniques and Considerations
Grouping Objects for Anchoring
If you need to anchor multiple elements together as a single unit (e.g., an image and its caption, or an image with annotation arrows), you can group them first.
- Group Elements: Select all the objects you want to anchor together using the Selection tool. Go to
Object > Group(Command/Ctrl + G). - Anchor the Group: Treat the grouped object as a single item. Cut it and paste it into the text flow, or use the
Object > Anchored Object > Insertcommand. - Configure Options: Adjust the anchored object options as needed. The group will now behave as a single anchored entity.
Annotating Anchored Images
A common challenge is annotating an anchored image with arrows or other drawn elements. Directly drawing tools like the Line or Pencil tool do not anchor to images.
Method 1: Cut and Paste Inline (Accidental Discovery)
A less foolproof but often faster method discovered through trial and error involves cutting the drawing element and pasting it inline directly behind the image.
- Draw the Annotation: Create your arrow or annotation using the drawing tools.
- Cut the Annotation: Select the drawn element and cut it (
Edit > Cut). - Paste Inline: Select the anchored image, then place your cursor just behind it in the text flow. Paste (
Edit > Paste). The annotation should now appear inline with the image. - Apply Custom Anchor Position: With the annotation now anchored inline with the image, you can adjust its position. You might need to use the "Anchored Object Options" to fine-tune its placement relative to the image.
- Drag into Place: You can then drag the annotation into its desired position relative to the image.
Caveat: This method is "less foolproof" because it's theoretically possible to type text between the image and the annotation, breaking the intended link. However, for quick annotations, it can be efficient.
Method 2: Grouping Image and Annotation
The more robust method for associating annotations with images is to group them before anchoring.
- Group Image and Annotation: Select the anchored image and its annotation(s). Group them together (
Object > Group). - Anchor the Group: If the image was already anchored, you might need to release it, group it with the annotation, and then re-anchor the entire group. If starting fresh, create or place the image, add annotations, group them, and then anchor the group to the text.
- Configure Options: Adjust the anchored object options for the group as necessary.
Releasing and Deleting Anchored Objects
- Releasing an Object: To detach an anchored object from its text, select the object with the Selection tool. Right-click on the anchor icon (if visible) or navigate to
Object > Anchored Object > Release. The object will then become a free-floating element on the page. - Deleting an Object: Once released, or if you simply want to remove the anchored object and its anchor marker, select the object with the Selection tool and press the
DeleteorBackspacekey. If you want to remove just the anchor marker without deleting the object, you can select the marker with the Type tool and delete it.
Anchoring Text Characters
You can also anchor text characters. This is achieved by first creating outlines of the text characters (Type > Create Outlines). Once converted to outlines, each character becomes an inline anchored object that can be manipulated and positioned like any other graphic element.
Object Styles for Consistent Anchoring
For documents requiring multiple anchored objects with identical settings, creating Object Styles is highly recommended.
- Create and Style an Object: Anchor your first object and configure all its settings in the Anchored Object Options dialog box to your satisfaction.
- Create Object Style: With the anchored object selected, go to the
Object Stylespanel (Window > Styles > Object Styles). Click the "Create New Style" button. - Define Style Attributes: In the "New Object Style" dialog box, ensure that "Anchored Object Options" is checked in the list of attributes to include. You can name your style descriptively (e.g., "Recipe Icon," "Margin Callout").
- Apply to New Objects: When you place or create subsequent objects that need the same anchoring treatment, simply select them and apply your newly created Object Style from the Object Styles panel. This ensures consistency and saves considerable time.
Conclusion
Anchored objects in Adobe InDesign are a fundamental tool for creating dynamic, text-dependent layouts. By mastering the various anchoring modes-Inline, Above Line, and Custom-and understanding how to configure their options, designers can ensure that graphics, callouts, and other supporting elements remain perfectly aligned with their associated text. Whether you are placing a simple icon in a recipe or managing complex page elements in a multi-page report, the ability to tether objects to text provides a robust solution for maintaining design integrity and streamlining the editorial workflow. Remember that anchored objects are not fixed to a page but are dynamically linked to the text flow, allowing your designs to adapt gracefully to content changes.