Inkscape, a powerful and free open-source vector graphics editor, empowers designers to create and manipulate graphic elements with ease. A crucial aspect of any design project is the effective use of typography. Fonts play an indispensable role in enhancing the visual appeal and communication of your designs, whether you're crafting a digital poster, an advertisement, or simply naming your artwork. This guide provides a comprehensive understanding of how to add and utilize fonts within Inkscape, catering to both novice users and seasoned professionals.
Understanding Inkscape's Font Handling
Inkscape fundamentally relies on fonts that are installed on your operating system. This means that for a font to be available within Inkscape, it must first be recognized by your computer's system. Once a font is installed on your system, Inkscape automatically indexes it upon launching, making it accessible through its text tools. This integration ensures a seamless workflow, allowing you to leverage your entire font library directly within the design environment.
The Importance of a Robust Font Library
As any designer will attest, having an extensive and well-organized font library is essential for creative flexibility. The text tool in Inkscape is particularly useful for a variety of applications, from creating eye-catching digital posters and advertisements to adding descriptive labels and titles to your creations. The ability to easily incorporate new fonts expands your design possibilities exponentially, allowing you to perfectly match the tone and style of your project.
Acquiring and Installing New Fonts
Before you can begin using a new font in Inkscape, it must first be installed on your computer. Fortunately, a vast array of free fonts are available online, offering a wealth of options for every design need. Popular and reliable sources for downloading free fonts include Dafont and Font Squirrel. These platforms provide extensive collections that can significantly enrich your design toolkit.
Downloading and Unzipping Font Files
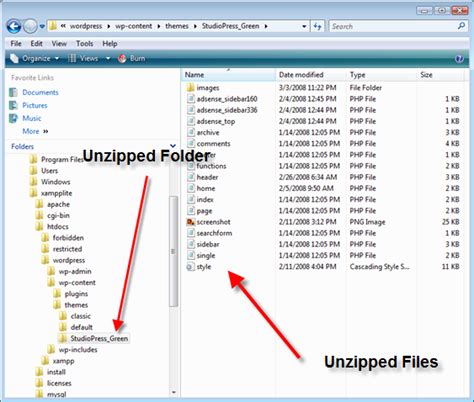
When you download a font from these online repositories, it often comes in a zipped folder. Upon downloading the zipped folder to your device, you will need to locate it and then unzip its contents. Once the folder is unzipped, you will find the font files within. Depending on the font, you might see a single font file or multiple files if the font includes various weights and styles (e.g., regular, bold, italic).
Installing Fonts on Windows
For Windows users, the installation process is straightforward. After unzipping the font folder and locating the font files, you can typically install a font by double-clicking on the font file (often a .ttf or .otf file). This action will open a font preview window. At the top of this window, you will find an "Install" button. Clicking this button adds the font to your system. If you wish to install multiple font files simultaneously, such as different weights and styles of the same font family, you can select all the desired files by holding down the Control key while clicking on them, and then click "Install."
Installing Fonts on macOS
Mac users will find a similar, user-friendly installation process. After downloading and unzipping the font folder, locate the font file(s). Double-clicking on a font file will open it in Font Book, macOS's built-in font management application. Within Font Book, you'll see an "Install Font" button, which you should click to add the font to your system. As with Windows, you can select multiple font files in Finder before opening them in Font Book to install them all at once.
Integrating Fonts into Inkscape
Once a font has been successfully installed on your operating system, it becomes available for use in Inkscape. The key to ensuring Inkscape recognizes newly installed fonts is to restart the application after the installation is complete. If Inkscape was open during the font installation, it's crucial to close it entirely and then relaunch it. This allows Inkscape to refresh its font cache and index the newly added font.
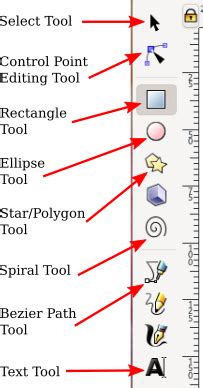
Using the Text Tool in Inkscape
To begin using a font in your Inkscape project, you'll employ the "Create and edit text objects" tool, commonly found on the left-hand side toolbar. Select this tool and then click anywhere on your document's canvas to create a text object. You can then start typing your desired text.
Selecting and Changing Fonts
With your text object active and in edit mode, you can change the font. In the top-left corner of the Inkscape interface, you'll find a dropdown menu labeled "Select Font Family" (or similar, depending on your Inkscape version). This menu displays all the fonts currently installed on your system. You can either scroll through this extensive list to find your desired font or begin typing the font's name to narrow down the options. Once you select a font from the list, the text you've entered will immediately update to reflect the chosen typeface.
It's important to note that you are typically in "text edit mode" when you can change the font. If you click away from the text object, you exit edit mode. To re-enter edit mode and make further font adjustments, simply double-click on the existing text object. While highlighting your text isn't always necessary to change the font for the entire object, there can be instances where it proves beneficial. If you find that the font isn't applying as expected, try selecting or highlighting the text while in edit mode before changing the font. This is achieved by clicking and dragging your mouse over the text.
Troubleshooting Font Issues
Occasionally, users may encounter problems with specific fonts not appearing or functioning correctly in Inkscape. One common culprit can be the font name or file name itself. It's also possible that a previously selected font remains active when you intend to use a new one. To mitigate this, try the following:
- Activate the font tool, then select your desired font before clicking on the canvas.
- Click on the canvas to create your text.
- If the font isn't as expected, select the text, and then re-select the desired font from the dropdown menu.
- Observe the font list as you perform these actions to ensure the correct font is being actively selected.
If you continue to experience difficulties with a particular font, consider these additional troubleshooting steps:
- Uninstall and Reinstall: Try uninstalling the problematic font from your system, downloading a fresh copy from its source, and then reinstalling it.
- Check File Permissions: Ensure that the font file has the correct read permissions on your operating system.
- Verify Font Styles: Some fonts, particularly script or decorative ones, may not have a true "bold" or "italic" style built into the font file. Ensure that you are not inadvertently trying to apply a bold style to a font that doesn't support it.
- Save a Blank Document: As a diagnostic step, try saving a blank Inkscape document with the desired font selected in the text tool. Then, reopen this saved document and activate the text tool. Check if your desired font appears in the font list. This can help determine if the issue is with the font itself or the document you are working on.
A known bug in older versions of Inkscape (specifically pre-1.0) could lead to missing fonts. Ensure you are using a recent version of Inkscape (1.0 or later) as these issues have been addressed.
Leveraging Advanced Font Features: PUA Encoded Characters and Glyphs
Modern fonts often come with enhanced features, such as glyphs, which can add decorative elements like swirls, flourishes, and unique ligatures to your text. Inkscape fully supports these advanced typographic features, allowing for highly customized text designs.
Understanding PUA Encoded Characters
Inkscape supports fonts encoded with PUA, which stands for "Private Use Area." When a font is PUA encoded, it means that all its special characters, beyond the standard alphabet and numerals, are accessible. These can include decorative swashes, stylistic alternates, and other embellishments that significantly enhance a font's aesthetic potential. If a font is not PUA encoded, you will generally only be able to access its basic characters.
Accessing and Using Glyphs
To utilize the special characters or glyphs offered by a font, you can often use your operating system's Character Map utility.
- Open Character Map: On Windows, search for "Character Map." On macOS, you can find it in Applications > Utilities > Character Viewer.
- Select Your Font: In the Character Map application, choose the font you are working with from the dropdown menu. This will display all available characters, including the special glyphs.
- Copy the Glyph: Locate the desired glyph, select it, and then click "Copy."
- Paste into Inkscape: Return to your Inkscape document, ensure your text object is in edit mode, place your cursor where you want the glyph to appear, and paste (Ctrl+V or Cmd+V).
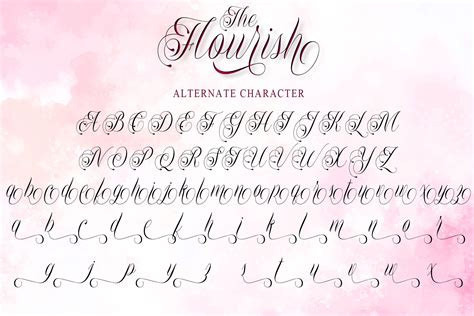
For instance, if you are using a calligraphy script font like "Pretty Baby" (or any other modern calligraphy font), you might want to add decorative swirls or alternative letterforms. You would find these glyphs in the Character Map, copy them, and paste them directly into your Inkscape text object. This process can be repeated for various characters within your text to create a truly unique and visually rich typographic design.
How to use special characters in fonts using the Character Map
Modifying Text and Glyphs
Once you have applied your desired font and glyphs, you can further refine your text. The size of your text can be adjusted by exiting edit mode (clicking away from the text) and then selecting the text object again to reveal its resizing handles. Color can be applied using the "Fill and Stroke" panel (Object > Fill and Stroke) or by selecting a color from the palette at the bottom of the screen.
For advanced modifications, such as altering the curves of a swash or precisely adjusting the shape of a glyph, you may need to convert your text object into a path. This is done by selecting the text object and navigating to Path > Object to Path. Once converted, the text becomes a collection of vector paths that can be manipulated with the Node tool, offering complete creative control over its form.
Advanced Font Management: Custom Font Directories
For users who manage a substantial font library, installing every font onto the operating system can become cumbersome, especially when switching between computers or managing fonts on external drives. Inkscape offers a convenient feature that bypasses the need for system-wide font installation.
Utilizing the Custom Fonts Directory
Within Inkscape's Preferences menu, there is an option to specify a "Custom Fonts directory." This allows you to designate a specific folder on your computer, or even on an external drive, from which Inkscape will load fonts. This is particularly useful for fonts that you have accumulated over time and do not wish to install individually on every new system.

Setting Up a Custom Font Folder
To implement this feature:
- Create a Font Folder: Designate a folder on your computer or an external drive to store the fonts you want Inkscape to access. You can organize this folder as you see fit.
- Locate the Preference: Navigate to Inkscape's Preferences (Edit > Preferences on Windows/Linux, Inkscape > Preferences on macOS).
- Find the Font Option: Look for the section related to "System" or "Fonts."
- Add the Directory: You will find an input box where you can paste the full path address of your custom font folder.
- Apply Changes: After pasting the path, close the Preferences menu.
- Restart Inkscape: For the changes to take effect, you must restart Inkscape. Save any open work and close the application completely before reopening it.
Thanks to the Custom Fonts directory feature, managing and utilizing your font collection within Inkscape becomes exceptionally convenient, offering a flexible alternative to traditional system-wide font installation.
System-Specific Font Cache Management (Linux)
On Linux systems, font management can involve additional steps related to font cache files. When installing fonts, especially system-wide, it's advisable to manage the font cache. The font cache file, often named fonts.cache-1, is typically located in directories like /usr/share/fonts. After installing new fonts, deleting this cache file and then rebuilding it ensures that the operating system and applications can effectively recognize and utilize the updated font list.
For users who prefer to install fonts only for their personal use on Linux, copying the font files into a hidden directory named .fonts within your home directory is a common and effective method. Previously, file browsers like GNOME's Nautilus offered a special fonts:/// location for font installation, though this functionality may vary across different desktop environments and versions.
By understanding and implementing these methods, you can ensure a seamless and efficient workflow for incorporating and utilizing a diverse range of fonts within your Inkscape projects, ultimately enhancing the visual impact and communicative power of your designs.