In the realm of graphic design and print production, precision and consistency are paramount. Adobe InDesign, a leading software for page layout and desktop publishing, offers a robust set of tools to achieve these goals. Among the most fundamental and powerful of these tools are guides. Guides act as invisible rulers and alignment aids, allowing designers to meticulously arrange text, images, and other page elements. This article delves into the various methods of adding, managing, and utilizing guides within Adobe InDesign, from basic ruler guides to more complex column and spread guides, ensuring a polished and professional final product.
The Indispensable Role of Guides in Layout Design
Guides provide a way of measuring and dividing up a page for layout purposes, without directly impacting the look of the document. Unlike grid lines or page objects, guides won’t print or be visible in the final exported product. Their primary function is to serve as visual benchmarks for alignment and spacing. When creating print or editorial layouts in InDesign, one of the first things a designer likes to do is create guides to guide them in the layout process. The idea behind guides is not to let them overwhelm you, but to assist in the creative process. Not having any kind of guide system can make your process arbitrary, which could result in an overall poor final product. Because frames and shapes easily snap to guides, setting them up early can insure that the final result has clean margins and consistent spacing.
Creating Basic Ruler Guides
Ruler guides are the most straightforward type of guide in InDesign. They are created by clicking and dragging from the horizontal or vertical rulers that frame the document window.
To create a horizontal ruler guide: Click and drag downwards from the top ruler.To create a vertical ruler guide: Click and drag to the right from the ruler on the left side of the document window.
As you drag, a blue line will appear, indicating the position of the new guide. Drag the guide into place and release the mouse. If guides aren’t visible, you can make them appear by navigating to View > Grids & Guides > Show Guides.
Adjusting and Positioning Ruler Guides
Once a guide is created, it can be easily moved by clicking and dragging it to a new position. For precise placement, you can type specific values into the X or Y positioning boxes in the Options bar. To manually adjust a guide on the X-axis (for vertical guides) or Y-axis (for horizontal guides), type the appropriate value.
Alternatively, you can use the arrow keys for fine adjustments. Holding down Shift while dragging a guide constrains its movement to horizontal or vertical alignment, depending on the initial drag direction. Double-clicking a ruler at a specific key can also place a guide.
Leveraging the "Create Guides" Function for Grids
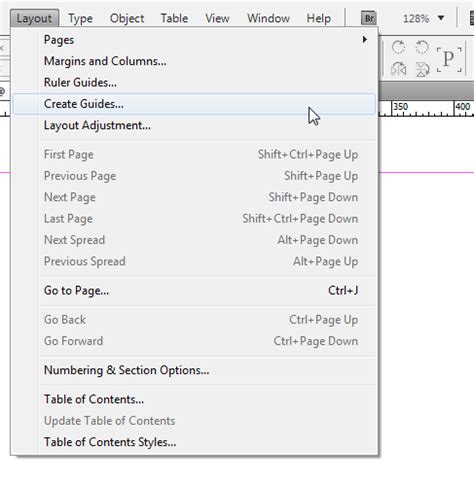
While individual ruler guides are useful, InDesign offers a more powerful method for establishing an entire grid system at once: the Layout > Create Guides command. This feature is particularly helpful for setting up consistent columns and rows across your document.
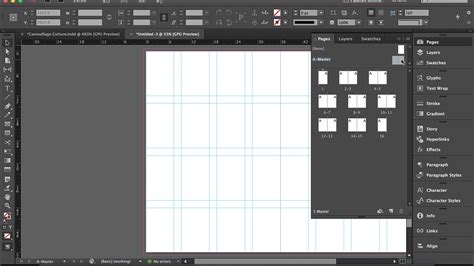
Using columns in the document setup stage (i.e., adding 3 or 4 columns to a page) is a good starting point. However, many designers prefer to leave the columns field at 0 and create their own guides once the InDesign document is set to go. In the Create Guide prompt window, you can specify how many rows and columns you'd like to work with. As a rule of thumb, using an even number and usually starting at 6 rows and 6 columns is a common practice. You can also choose to fit the guides to the margins or the page, which is a matter of personal preference. Playing around with these selections will help you discover what works best according to the layout you are creating.
The six rows and six columns create a custom grid for your layout. While this setup may look daunting at first, it will save you time when you're designing. For example, a book cover can be created using guides to set the main art as well as typography. The guides not only help you line up type and images but also determine the distance between content on a page.
Understanding Gutters and Spacing
Within the Create Guides dialog box, you can also define the spacing between your rows and columns, referred to as gutters. By default, InDesign measures in picas, a common unit of measurement for newspaper layouts where one pica is roughly 1/6th inch. Depending on the project, it may be easier to work with a different increment, such as inches or pixels. To change the unit of measurement, right-click a ruler and make a selection.
The Use Spacing option allows you to define the width of these gutters. For instance, setting up guides with gutters of 1/4th inch allows for consistent and even spacing between columns of text, images, and shapes. The size of the gutters will vary with the design of the project; if a little text needs to fill a big space, larger margins can help.
Spread Guides: Extending Guides Across Multiple Pages
In multi-page spreads, you often need guides that apply to the entire spread, not just individual pages. These are known as spread guides.
To create a spread guide, you can drag any ruler guide to the pasteboard. Alternatively, you can create a guide directly on the target spread. Select the guide and hold down Alt (Windows) or Option (Mac OS) while dragging it from within the page. This action will make the guide appear on the entire spread. Guides always appear on the target spread. If you later drag a spread guide onto a page, it will behave like a page guide. Conversely, dragging a page guide onto the pasteboard turns it into a spread guide.
To ensure a guide is positioned correctly on the target spread, you can select the guide at the desired location on the target spread. If the window is not showing the entire spread, the new guide becomes visible only on the target spread.
Managing Guides: Visibility, Locking, and Deletion
Effective guide management is crucial for a smooth workflow. InDesign provides options to control the visibility, lock status, and deletion of guides.
Showing and Hiding Guides
Guides can be toggled on and off using the Show/Hide Guides command. In the Layers panel, you can select or deselect Show Guides, and then click OK. This command allows you to quickly declutter your workspace when guides are no longer needed for immediate alignment. Guides can also be hidden with the layer on which they were created.
Locking Guides
To prevent accidental movement or deletion of guides, you can lock them. Navigate to View > Grids & Guides > Lock Guides. In the Layers panel, you can also select or deselect Lock Guides for specific layers, and then click OK. Locked guides are often displayed as thin lines with narrow stroke widths, making them less obtrusive than active guides.
Deleting Guides
Individual ruler guides can be deleted by selecting them and pressing the Delete key. To remove all guides from a spread, navigate to Layout > Delete All Guides On Spread. If you wish to delete only specific ruler guides, select those ruler guides first. To deselect all guides, click in an empty area.
Advanced Guide Features and Snapping
InDesign offers sophisticated features that enhance the utility of guides, including snapping and smart guides.
Snap To Guides
The Snap To Guides and Snap To Document Grid commands are invaluable for precise alignment. When these commands are active, objects will snap to guides or the document grid when you draw, move, or resize them. This ensures that objects align perfectly with your defined layout structure. Guides must be visible for objects to snap to them.
The Snap To Zone is a configurable area around a guide. When an object's edges or centers are within this zone, it will snap to the guide. This zone can be adjusted in the Preferences under Guides & Grid. Typing a value for Snap To Zone and clicking OK customizes this behavior.
Smart Guides and Smart Corners
Smart Guides and Smart Corners provide dynamic visual feedback, helping you align objects relative to each other and to the page. Smart Guides appear as temporary guides that help you align objects, showing centers or edges. They also assist in rotating page items by indicating alignment with other objects or the page. For example, Smart Guides can help you align an object close to 24 degrees, or to the same rotation angle as an adjacent object. Preferences allow you to turn Smart Guides on and off, and to control which items and intersections are displayed in the current page view.
ADOBE INDESIGN: 3 SMART SOLUTIONS FOR 3 SMART GUIDES PROBLEMS
Equitable Language in InDesign
It's important to note that Adobe is committed to inclusivity. Equitable language is being replaced in InDesign, starting from version 17.0 (2022), to reflect core Adobe values of inclusivity. This ongoing effort ensures that the software's terminology is welcoming and representative of all users.
Conclusion: Guides as the Foundation of Professional Layouts
In conclusion, mastering the use of guides in Adobe InDesign is fundamental to creating professional and aesthetically pleasing layouts. From simple ruler guides to complex grid systems and spread guides, these tools provide the essential framework for precise alignment and consistent spacing. By understanding and effectively utilizing the various guide features, designers can streamline their workflow, avoid arbitrary placement, and ultimately produce polished final products that meet the highest standards of design. Learning how to create a brochure like a graphic designer with Adobe InDesign, as detailed in various tutorials, often hinges on the proficient application of these guiding principles.