Motion blur stands as one of the most potent tools in a video editor's arsenal, instrumental in imbuing movement with a sense of smoothness, naturalism, and cinematic flair. Whether you are animating text, crafting slow-motion sequences, or working with dynamic action shots, the judicious application of motion blur in DaVinci Resolve can elevate your edits from competent to professional. This guide will walk you through the step-by-step process of adding motion blur in DaVinci Resolve, exploring the various methodologies available, offering best practices, and addressing common troubleshooting scenarios.
The Fusion Workspace: A Direct Approach to Motion Blur
The most straightforward method for introducing motion blur in DaVinci Resolve involves utilizing the dedicated Motion Blur node within the Fusion workspace. This powerful node offers granular control over the blur effect, allowing for precise adjustments.
Step 1: Accessing the Fusion WorkspaceBegin by selecting the desired clip on your timeline. Once highlighted, navigate to and click on the Fusion workspace icon, typically located at the bottom of the DaVinci Resolve interface.
Step 2: Introducing the Motion Blur NodeWithin the Fusion node editor, which is the area where you connect various processing nodes, right-click. From the context menu that appears, select "Add Tool," then navigate through "Filter" and choose "Motion Blur."
Step 3: Integrating the Node into the WorkflowFor the Motion Blur node to affect your clip, it must be correctly positioned within the node chain. Connect the output of your primary media node (usually labeled "MediaIn" or similar) to the input of the Motion Blur node. Subsequently, connect the output of the Motion Blur node to the final output node (often labeled "MediaOut" or "Output"). This ensures the blur effect is applied before the image is rendered.

Step 4: Fine-Tuning the Motion Blur SettingsOnce the node is connected, select it to reveal its parameters in the Inspector panel, typically located on the right side of the Fusion interface.
- Shutter Angle: This parameter is crucial for controlling the intensity and perceived naturalness of the motion blur. A value of 180° is often considered the standard for a realistic, film-like motion blur, mimicking the shutter speed of traditional film cameras. Increasing this value, up to 360°, will result in a stronger, more pronounced blur. Experimentation is key to finding the sweet spot for your specific footage.
- Samples: The "Samples" setting dictates the number of samples taken to calculate the motion blur. Higher values will produce a smoother, more refined blur, especially noticeable in areas of fast movement. However, it's important to note that increasing the sample count significantly impacts performance, leading to slower playback and rendering times. For less demanding projects or systems with limited processing power, a lower sample count might be necessary.
Step 5: Previewing and Iterative RefinementAfter adjusting the settings, play back your timeline to observe the effect of the motion blur. Continuously tweak the "Shutter Angle" and "Samples" parameters until the motion appears natural, realistic, and visually pleasing, avoiding any unnatural artifacts or excessive blurring.
The Color Panel: Leveraging Optical Flow for Motion Blur
An alternative and often more sophisticated method for incorporating motion blur, particularly beneficial for slow-motion or retimed footage, is available through the Optical Flow settings within the Color panel. This approach analyzes the pixel movement within your footage to generate a more accurate and often smoother blur.
Step 1: Navigating to the Color PanelWith your clip selected on the timeline, switch to the Color workspace by clicking the corresponding icon at the bottom of DaVinci Resolve.
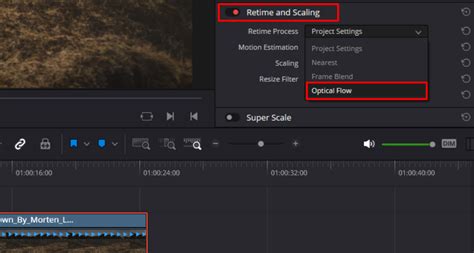
Step 2: Enabling Optical FlowRight-click directly on your clip within the Color workspace. In the context menu, navigate to "Retime and Scaling" and select "Optical Flow." This tells DaVinci Resolve to analyze the motion within the clip.
Step 3: Activating Motion Blur within RetimingWithin the Retiming controls that now appear, locate the "Retime Process" option. From the dropdown menu associated with this setting, select "Motion Blur."
Step 4: Adjusting Strength and ArtifactsOnce Motion Blur is enabled, you will likely find a "Strength" or similar slider. This allows you to fine-tune the intensity of the motion blur. As you adjust this setting, pay close attention to the footage for any unwanted artifacts, such as warping or ghosting around moving objects. Continue to adjust the strength until the movement appears cinematic and fluid without introducing distracting visual errors.
Creative Applications of Motion Blur
The application of motion blur extends far beyond simply making footage look "smoother." It can be a powerful creative tool when used strategically:
- Text Animations: Adding motion blur to animated titles, lower thirds, or any moving text elements can significantly enhance their cinematic quality, making them feel more integrated into the scene.
- Transitions: Employing motion blur within transition effects, such as wipes, zooms, or slides, can create a more dynamic and visually appealing flow between shots, especially when dealing with fast-paced edits.
- Slow Motion: As mentioned, the Optical Flow method with motion blur is particularly adept at creating natural-looking slow-motion clips. It helps to fill in the gaps between frames generated by slowing down footage, preventing a choppy or robotic appearance.
- Action Shots: Fast camera pans, rapid object movements, or quick cuts can often appear jarring. Applying motion blur can soften these harsh movements, making them look more like natural camera motion and less like digital stuttering.
For action shots that involve significant camera movement, consider combining motion blur with DaVinci Resolve's motion tracking capabilities. This can lead to even more sophisticated and dynamic results, ensuring that both the subject and the camera's movement are rendered with appropriate blur.
Motion Tracking in DaVinci Resolve | Beginner Fusion Tutorial
Best Practices for Achieving Optimal Motion Blur
To ensure your motion blur effects are not only present but also effective and aesthetically pleasing, adhere to these best practices:
- Realistic Shutter Angle: For most natural-looking results that mimic film, keep the "Shutter Angle" around 180°. Deviate from this value cautiously and with a clear artistic intention.
- Performance vs. Quality: While higher "Samples" in Fusion yield smoother blur, they demand more processing power. If you experience playback lag, reduce the sample count or consider optimizing your media.
- Stabilize First: For shaky or unstable footage, it is almost always best to stabilize it before applying motion blur. Applying blur to inherently unstable footage will often exacerbate the shakiness and lead to undesirable results.
- Keyframing and Motion Blur Synergy: When animating elements, especially in Fusion, always combine keyframing with the motion blur effect. Keyframes define the movement's path and timing, while motion blur adds the perceptual realism to that movement.
- Enhance with Vignettes: For an even more polished and cinematic look, consider adding a subtle vignette effect after applying motion blur. A slight darkening of the edges can draw the viewer's eye towards the center of the frame and enhance the sense of depth and focus, complementing the motion blur.
Troubleshooting Common Motion Blur Issues
Even with careful application, you might encounter challenges when working with motion blur. Here are some common problems and their solutions:
- Choppy Playback: If your timeline playback becomes choppy after applying motion blur, the most likely culprits are either too many "Samples" in Fusion or a lack of optimized media. Try lowering the sample count in the Motion Blur node or generating optimized media for your clips.
- Artifacts in Slow Motion: When using Optical Flow for slow motion, artifacts like warping or ghosting can appear. In the Color panel's Retiming settings, experiment with different "Motion Estimation" methods. Options like "Enhanced" or "Speed Warp" can sometimes yield better results depending on the footage.
- Blur Appears Too Strong: If the motion blur looks overly intense and unnatural, the "Shutter Angle" is likely set too high. Reduce this value, typically aiming for 180° or less.
- Effect Not Visible: If you've applied motion blur but cannot see any visible effect, double-check your node connections in Fusion to ensure the Motion Blur node is correctly placed in the chain. In the Color panel, confirm that "Motion Blur" is indeed enabled under the "Retime Process" settings.
Elevating Your Edits with Motion Blur
Mastering the art of applying motion blur in DaVinci Resolve is a relatively accessible yet highly impactful skill that can significantly enhance the professionalism and visual appeal of your video projects. Whether you are animating text, refining slow-motion sequences, or smoothing out fast-paced action shots, the ability to add and control motion blur will undoubtedly elevate your storytelling capabilities. By understanding the different methods, applying best practices, and knowing how to troubleshoot common issues, you can confidently integrate this powerful effect into your workflow.
For those seeking to delve deeper into the intricacies of DaVinci Resolve and unlock its full potential, exploring comprehensive training resources, such as dedicated courses, can provide an invaluable learning path.
Frequently Asked Questions About Motion Blur in DaVinci Resolve
How do I add motion blur in DaVinci Resolve?The primary methods involve using the Motion Blur node in the Fusion workspace or enabling Motion Blur via Optical Flow settings in the Color panel for retimed footage. In Fusion, add the Motion Blur node, connect it between your media and output nodes, and adjust the Shutter Angle and Samples. In the Color panel, right-click the clip, go to Retime and Scaling, choose Optical Flow, and then select Motion Blur under Retime Process.
Can I add motion blur to slow motion in DaVinci Resolve?Yes, absolutely. The most effective way to add motion blur to slow-motion clips in DaVinci Resolve is by utilizing the Optical Flow feature in the Color panel. After enabling Optical Flow, select Motion Blur under the Retime Process settings, and then fine-tune the strength to achieve smooth, cinematic slow-motion.
Is motion blur free in DaVinci Resolve?Yes, motion blur is available and free to use in both the standard free version of DaVinci Resolve and the paid Studio version. The core functionalities for adding motion blur are present in both, though the Studio version may offer additional advanced features or optimizations.