The world of graphic design and printing often relies on clever techniques to achieve specific visual effects, and halftones are a cornerstone of this practice. Whether you're aiming for a classic comic book aesthetic, a vintage magazine look, or a cost-effective printing solution, understanding how to create and manipulate halftones is an invaluable skill. This tutorial delves into the process of generating halftone effects, specifically tailored for screen printing applications within Affinity Designer, building upon the foundational principles of this impactful visual tool.
Understanding the Halftone Principle
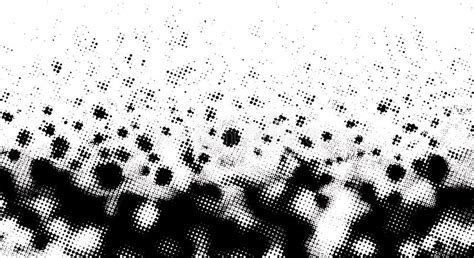
At its core, a halftone effect is a method used in printing to simulate continuous-tone imagery, such as photographs, by using dots of varying sizes and spacing. When viewed from a distance, these dots coalesce, creating the illusion of a smooth tone or a gradient. This technique is particularly significant in traditional printing processes because it allows for the reproduction of grayscale or color images using a limited number of ink colors. By controlling the density and arrangement of dots, printers can use less ink while still achieving a visually rich image. This is why you'll find halftones prevalent in publications like magazines and newspapers, and it's a defining characteristic of the iconic look of comic books.
Preparing Your Image for Halftone Conversion
Before diving into the creation of the halftone effect, it's crucial to prepare your source image. This often involves converting the image to grayscale, as the halftone process fundamentally deals with varying levels of tonal intensity. For this tutorial, we'll assume you have a suitable image ready. If you are working with a color image and wish to convert it, Affinity Designer offers straightforward methods.
Step 1: Importing Your Image
Begin by opening your chosen image within Affinity Designer. Navigate to File > Open and select the image file you wish to transform. This will load the image into your workspace, ready for manipulation.
Applying the Halftone Effect in Affinity Designer
Affinity Designer, while primarily a vector-based program, offers robust tools for raster effects, making it a powerful choice for creating halftones. The process involves applying a specific filter and then fine-tuning its parameters to achieve the desired look.
Step 2: Converting to Grayscale (If Necessary)
If your image is not already in grayscale, it's essential to convert it. Select your image layer and navigate to the Adjustments Panel. Choose the Black and White adjustment. This will effectively remove color information, leaving you with a range of gray tones.
Step 3: Merging and Isolating Tonal Information
To ensure the halftone effect is applied to the core tonal values of your image, it's often beneficial to merge the image with its grayscale adjustment. Select both the original image layer and the Black and White adjustment layer in the Layers Panel. Right-click on the selected items and choose Merge Visible. Following this, it's good practice to uncheck the visibility of the original image layer and the Black and White adjustment layer in the Layers Panel. This isolates the newly merged grayscale image, ensuring that subsequent filters are applied to this consolidated layer.
Step 4: Accessing the Halftone Filter
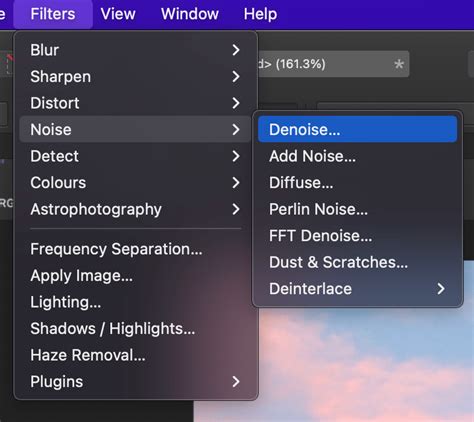
Affinity Designer provides a Live Filter for creating halftone effects, which allows for non-destructive editing. Locate the Live Filters icon in your toolbar or within the relevant panel and select Halftone. This action will open the Live Halftone dialogue box, where you can control all aspects of the halftone generation.
Fine-Tuning Halftone Parameters for Screen Printing
The true artistry in creating halftones lies in adjusting the various parameters within the Halftone dialogue box. Each setting influences the appearance of the dots and, consequently, the overall image. For screen printing, precision and intentionality in these settings are key to achieving predictable and high-quality results.
Step 5: Setting the Screen Type and Dot Shape
Within the Live Halftone dialogue box, you'll find several crucial settings. For a classic halftone effect, set the Screen to Monochrome. This ensures that you are working with a single set of halftone dots. Next, select the Dot shape. While Cosine is a common and effective choice, providing a smooth transition between dot sizes, you can experiment with other options to see how they affect the final output.
Step 6: Adjusting Cell Size
The Cell Size parameter directly controls the density of the dots on your image. A smaller cell size will result in more dots and a finer halftone pattern, while a larger cell size will produce fewer, larger dots and a coarser pattern. For this tutorial, set the Cell Size to 25. This value can be adjusted based on the resolution of your intended print and the desired level of detail.
Step 7: Controlling Contrast
Contrast dictates the range of dot sizes used to represent the tonal values in your image. A higher contrast setting will lead to more pronounced differences between the smallest and largest dots, resulting in a more dramatic tonal range. Conversely, a lower contrast will produce a more subtle transition. Set the Contrast to 60 for a balanced effect.
Step 8: Orienting the Screen Angle
The Screen Angle determines the orientation of the halftone dot pattern. This is particularly important when printing with multiple colors, as different angles are used for each color separation to prevent moiré patterns. For a single-color halftone, a common and visually pleasing angle is 135 degrees. This angle often provides a good balance and can help to mask any minor imperfections in the dot placement.
How to Create Halftone in Affinity Photo [2026 Full Guide]
Step 9: Applying Blend Mode for Intensity
The Blend Mode affects how the halftone layer interacts with the layers below it. Setting the blend mode to Hard Mix can create a stark, high-contrast effect, which is often desirable for certain screen printing applications, especially when working with limited ink colors.
Step 10: Adjusting Opacity
Finally, the Opacity of the halftone layer controls its overall transparency. Adjusting this value allows you to blend the halftone effect more subtly or intensely with your base image. Set the Opacity to 75% to allow some of the underlying image detail to show through while still maintaining a strong halftone presence.
Adding Color to Your Halftone Effect
While halftones are inherently about tonal reproduction, they can be powerfully enhanced with color. This is where creative layering and blending come into play, allowing for vibrant and unique screen printing designs.
Step 11: Creating a New Pixel Layer for Color
To introduce color, add a new Pixel Layer above your existing halftone layer. Click on the Add Pixel Layer icon in the Layers Panel. This new layer will serve as the canvas for your color gradient.
Step 12: Applying a Gradient
With the new pixel layer selected, choose the Gradient Tool from the Tools Panel. Drag the Gradient Tool across your canvas from top to bottom. This will create a linear gradient. Next, select the bottom point of the gradient and open the Color Panel. Within the Color Panel, click the icon in the right corner and select Wheel to bring up the Color Wheel for precise color selection.
Step 13: Defining Gradient Colors
Now, set the color for the bottom point of your gradient. Aim for a reddish, slightly orange color. Then, click on the top point of the gradient to select it for color adjustment.
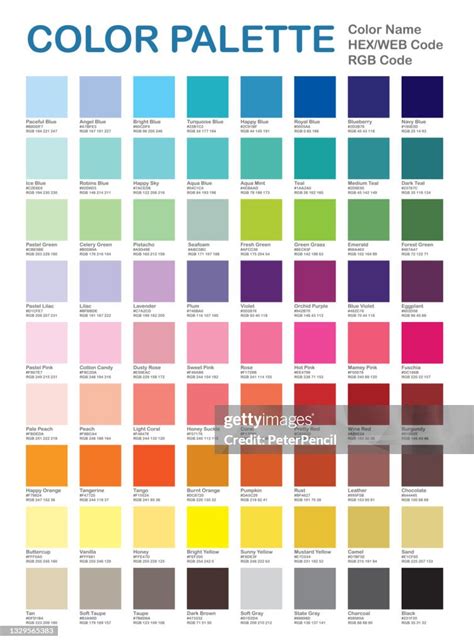
Step 14: Specifying Precise Color Values
For more accurate and repeatable results, it's best to use hex codes. Select the bottom point of your gradient and change its fill color to #F3651D (a vibrant orange-red). Then, select the top point and change its fill color to #125ED0 (a deep blue). This creates a striking contrast between the top and bottom of your image.
Step 15: Blending the Color Layer
With your color gradient layer in place, return to the Layers Panel. Select the filled pixel layer containing your gradient. Change its Blend Mode to Hard Light. This blend mode will interact with the underlying halftone layer to create a rich, colored halftone effect. Finally, lower the Opacity of this color layer to approximately 80%. This allows the underlying halftone structure to remain visible while the color saturates the image.
Advanced Halftone Variations: Lines and Circles
The versatility of the halftone filter extends beyond simple dots. Affinity Designer allows you to easily switch to different halftone shapes for unique artistic outcomes.
Bonus Step 1: Accessing Shape Options
To explore alternative halftone patterns, double-click on the Halftone layer in the Layers Panel. This will reopen the Live Halftone dialogue box, allowing you to modify existing settings.
Bonus Step 2: Selecting Line or Circular Screens
Within the dialogue box, click on the Screen option and choose either Line or Circular. Experimenting with these options can yield dramatically different visual textures, each suited to different design aesthetics and screen printing applications.
Bonus Step 3: Adjusting Parameters for New Shapes
Once you've selected Line or Circular, you'll need to re-evaluate and adjust other parameters. The Cell Size will now influence the thickness or diameter of the lines or circles. Adjust this to achieve the desired density and scale.
Bonus Step 4: Fine-Tuning Contrast for Variations
Similarly, the Contrast setting will affect the range of line thicknesses or circle sizes. For example, if you opt for a Circular Screen, setting the Cell Size to 15 and the Contrast to 45 can produce a finely detailed, almost textured appearance.
Bonus Step 5: Re-evaluating Screen Angle
The Screen Angle remains relevant for line and circular screens, influencing their orientation. While 135 degrees is a good starting point, you might find other angles work better depending on the specific shape and your overall design goals.
By mastering these steps, you can effectively create compelling halftone effects in Affinity Designer, opening up a world of creative possibilities for your screen printing projects. The ability to precisely control dot size, shape, angle, and color blending ensures that your designs are not only visually striking but also optimized for the unique demands of the screen printing process.
tags: #screen #printing #halftones #with #affinity #designer