Adding texture to text in Photoshop is a fundamental technique for graphic designers, artists, and hobbyists looking to elevate their typography. This process allows for the creation of visually rich and engaging text elements, transforming flat characters into dynamic focal points. Whether aiming for a vintage feel, a gritty urban look, or a delicate watercolor aesthetic, understanding how to effectively apply textures is key. This guide will delve into various methods for incorporating textures into your text, from foundational techniques to more advanced applications, ensuring your designs stand out with unique character and depth.
Laying the Foundation: Setting Up Your Document and Text
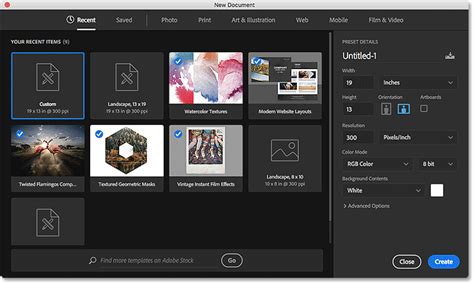
The journey to textured text begins with a well-prepared canvas. The first step involves establishing a new document within Photoshop, a process initiated by navigating to the "File" menu and selecting "New," or by utilizing the efficient keyboard shortcut Ctrl+N on Windows or Command+N on Mac. This action opens Photoshop's New Document dialog box, where you can define the dimensions and resolution suitable for your project.
Following the creation of your canvas, it's often beneficial to establish a background color that will complement or contrast with your textured text. For many textural effects, a dark background provides a strong foundation. To fill the document with a chosen color, such as black, access the "Edit" menu and select "Fill." Within the Fill dialog box, under the "Contents" option, select "Black" (or your desired color) and confirm by clicking "OK."
Once your background is set, the next crucial step is to introduce your text. Select the "Type Tool" from Photoshop's toolbar. As soon as the Type Tool is active, the "Options Bar" at the top of the screen will populate with various settings for manipulating text. Here, you can choose your preferred font, adjust the font size, and select the text color. After configuring these settings, simply click within your document and begin typing the desired text. For optimal results when applying textures, particularly those that involve intricate details or patterns, opting for a thicker, block-style font is often recommended. This ensures that the texture has sufficient surface area to be clearly visible and doesn't become lost within thin strokes.

Method 1: The Layer Mask Approach for Direct Texture Integration
One of the most versatile and widely used methods for adding texture to text in Photoshop involves the strategic use of layer masks. This technique allows for precise control over how a texture interacts with your text, revealing or concealing parts of the texture based on the text's shape.
The process begins with having your text layer already in place on your black background. The next essential element is the texture itself. Open the photograph or image you intend to use as your texture by going to "File" > "Open." Once the texture image is open, you need to copy it to Photoshop's clipboard, essentially placing it in the computer's temporary memory. To do this, select the entire image by going to the "Select" menu and choosing "All," or by using the keyboard shortcut Ctrl+A (Win) / Command+A (Mac). You will see a selection outline appear around the edges of the texture photo.
With the texture photo now stored in memory, switch back to your original document containing the text. It is imperative that your text layer is selected in the "Layers" palette. If it's not highlighted in blue, click on it to ensure it's the active layer. Now, with the text layer selected, click on the "Layer Mask" icon at the bottom of the Layers palette. This icon typically looks like a rectangle with a circle inside.
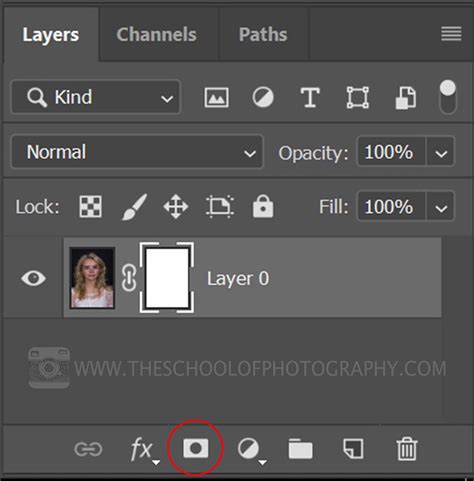
This action adds a layer mask to your text layer, and you'll notice your document window may fill with solid white. This white area represents the layer mask itself, which is not typically visible during regular editing. Now, the clever part: you're going to paste the copied texture photo directly into this layer mask. Navigate to the "Edit" menu and select "Paste," or use the shortcut Ctrl+V (Win) / Command+V (Mac). The texture photo will now be pasted into the layer mask.
To remove the selection outline from around the texture photo, go to the "Select" menu and choose "Deselect," or use Ctrl+D (Win) / Command+D (Mac). This action exits you from the layer mask editing mode and returns you to the normal document view.
At this stage, the texture is applied, but it might appear too much like a direct photograph. To transform it into a more stylized texture, Photoshop's "Threshold" image adjustment is invaluable. This adjustment can be applied directly to layer masks, allowing you to convert the grayscale image within the mask into pure black and white. Ensure the layer mask thumbnail is selected in the Layers palette (indicated by a white highlight border around it). If it's not selected, click on it. Then, go to "Image" > "Adjustments" > "Threshold."
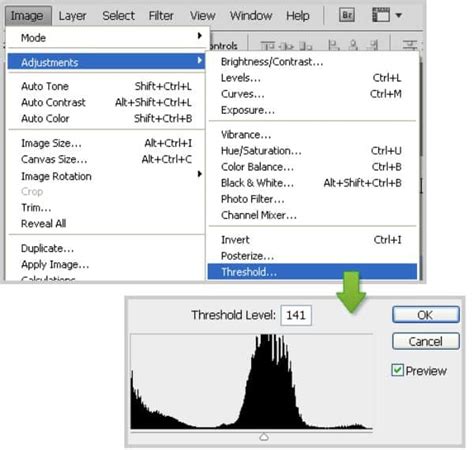
The Threshold dialog box will appear, and you'll immediately see a change in your text's appearance. The Threshold adjustment effectively converts all pixels in the mask to either solid black or solid white. On a layer mask, white areas reveal the underlying layer (in this case, the text with its applied texture), while black areas conceal it. By dragging the slider within the Threshold dialog box, you control the balance between black and white. Moving the slider to the left increases the white areas, making more of the texture visible within your text. Conversely, dragging it to the right increases the black areas, hiding more of the texture and making the text appear more solid. Experiment with the slider until you achieve the desired level of texture visibility and impact. The precise position of the slider will depend entirely on the chosen texture image and your artistic intent.
Method 2: Clipping Masks for Seamless Texture Integration
Another highly effective and popular method for applying textures to text in Photoshop utilizes clipping masks. This technique "clips" a texture layer to the shape of a layer directly beneath it, ensuring the texture conforms precisely to the boundaries of the underlying content. This is particularly useful when you want to retain the original texture image for further manipulation or wish to layer multiple textures.
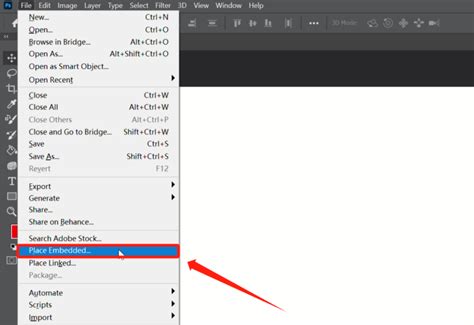
Begin by creating your text on a canvas, as described previously. Ensure you have a texture image ready. Open this texture image in Photoshop. Instead of pasting it into the current document, you can copy it to your clipboard (Ctrl+A, Ctrl+C or Command+A, Command+C) and then paste it into your main document (Ctrl+V or Command+V). Alternatively, for a more non-destructive workflow, you can use "File" > "Place Linked." This imports the texture image as a separate layer while maintaining a link to the original file, allowing for easier updates if the source texture changes.
Position the texture layer directly above your text layer in the Layers palette. It's crucial that the texture layer is immediately above the text layer you want to apply it to. Now, to create the clipping mask, you have a couple of options. The most common is to right-click (or Control-click on a Mac) on the texture layer in the Layers palette. From the contextual menu that appears, select "Create Clipping Mask."
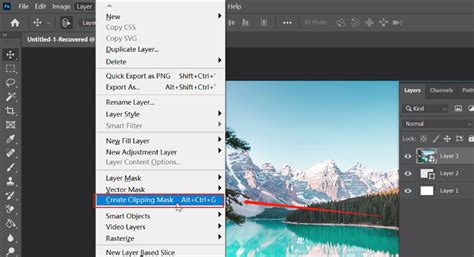
Alternatively, you can hold down the Alt key (Win) or Option key (Mac) and hover your cursor over the dividing line between the texture layer and the text layer in the Layers palette. Your cursor will change to a small square with a downward-pointing arrow. Click at this point to create the clipping mask.
Upon creating the clipping mask, the texture will instantly conform to the shape of your text. Any part of the texture that extends beyond the boundaries of your text will become invisible. This method is excellent because it keeps your original text editable. You can still select the text layer and change the font, size, or wording, and the texture will automatically adapt.
Once the clipping mask is in place, you can further refine the appearance. Select the texture layer and use the "Move Tool" (V) to reposition the texture within the text. You can also resize, rotate, or even apply other adjustments and filters to the texture layer itself. For instance, you can change the texture's blending mode in the Layers palette (e.g., "Multiply," "Overlay," "Soft Light") to alter how it interacts with the text color, creating different visual effects. You can also duplicate the texture layer, change the blending mode of the duplicate, or apply layer styles to the text layer itself for added depth, such as inner shadows, bevels, or color overlays.
Advanced Techniques and Creative Possibilities
Beyond the fundamental layer mask and clipping mask methods, Photoshop offers a wealth of advanced techniques to enhance textured text effects. Exploring these can lead to truly unique and captivating designs.
Layer Styles and Blending Modes
Layer Styles offer a non-destructive way to add effects like shadows, highlights, strokes, and color overlays to your text layer. When combined with textured text created via clipping masks or layer masks, they can add significant depth and polish. For example, adding a subtle "Inner Shadow" to your textured text can give it a sense of depth, making it appear as if the texture is carved into the letters. A "Bevel and Emboss" effect can further enhance this dimensionality.
Blending Modes are crucial for integrating textures seamlessly. As mentioned, changing the blending mode of a texture layer (especially when used with a clipping mask) can dramatically alter its appearance. Modes like "Multiply" are excellent for darkening textures, while "Overlay" and "Soft Light" can create more vibrant and integrated effects. Experimentation is key here, as different textures will react uniquely to various blending modes.
Blending Modes - Photoshop for Beginners | Lesson 5
Smart Objects for Non-Destructive Editing
For complex projects or when working with templates, Smart Objects are invaluable. Converting your text layer (or even multiple text layers) into a Smart Object before applying textures or effects ensures that all subsequent edits remain non-destructive. This means you can resize, transform, or apply filters to the Smart Object without permanently altering the original pixel data. If you are using pre-made text effect templates, they often rely heavily on Smart Objects for easy customization. You can double-click a Smart Object layer to open it in its own window, edit the text within, save it, and the changes will automatically update in your main document, complete with all applied textures and effects.
Creating Custom Brushes from Textures
For an even more organic and painterly feel, you can transform parts of your textures into custom Photoshop brushes. Select an interesting area of your texture using the "Lasso Tool." Then, navigate to "Edit" > "Define Brush Preset." This allows you to create a new brush that, when painted with, will apply the selected texture. This technique is perfect for adding subtle textures to backgrounds, or for creating artistic brush strokes that complement your main text.
Exploring Diverse Texture Sources
The possibilities for texture sources are virtually limitless. Beyond photographs, consider using:
- Paper Textures: Old paper, parchment, watercolor paper, or crumpled paper can lend a vintage or artistic feel.
- Fabric Textures: Denim, canvas, silk, or knit fabrics can add unique tactile qualities.
- Natural Textures: Wood grain, stone, sand, or bark can provide organic and earthy aesthetics.
- Abstract Textures: Gradients, noise, or digital patterns can create modern and futuristic looks.
- Hand-Painted Textures: Textures created digitally using brushes in Photoshop or apps like Procreate, or scanned traditional artwork, offer highly personalized results.
Resources like Envato Elements, Adobe Stock, and various free texture websites offer vast libraries of high-resolution textures that can be used for these purposes. When selecting a texture, ensure it's large enough for your document to avoid pixelation when scaled.
Integrating Textures with Backgrounds and Other Elements
To create a cohesive design, consider applying textures not only to your text but also to the background or other elements within your composition. Repeating the process of opening, copying, and pasting textures, and then adjusting their blending modes and opacity, can unify the visual style. For example, a subtle paper texture applied to the background layer with a low opacity and a "Soft Light" blending mode can complement textured text without overpowering it.
Adding illustrative elements, such as watercolor brush strokes or graphic shapes, can further enhance the design. These elements can also be textured using similar techniques, or they can serve as a contrast to textured text. The key is to maintain a visual harmony between all components of your artwork.
By mastering these techniques, you can imbue your text with a rich tapestry of visual interest, transforming ordinary typography into compelling design elements that capture attention and convey a distinct aesthetic. The flexibility of Photoshop allows for endless experimentation, encouraging you to push creative boundaries and develop your unique style in applying textures to text.