Adding page numbers to your InDesign documents is a fundamental step in creating professional and navigable layouts. Whether you are designing a magazine, a brochure, a book, or any extensive document, the inclusion of page numbers significantly enhances readability and provides a polished, professional aesthetic. This guide will walk you through the process of implementing automatic page numbers in Adobe InDesign, ensuring your documents are both functional and visually appealing.
Leveraging Parent Pages for Automatic Numbering
The cornerstone of implementing automatic page numbers in InDesign lies in the effective use of Parent Pages, formerly known as Master Pages. A Parent Page acts as a template, meaning any element or text placed on it will automatically propagate to every page within your document that utilizes that specific Parent Page.
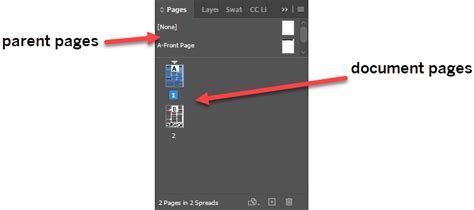
To access the Parent Pages, navigate to the Pages panel, typically located on the right-hand side of your InDesign workspace. This panel displays a thumbnail view of your document's layout.
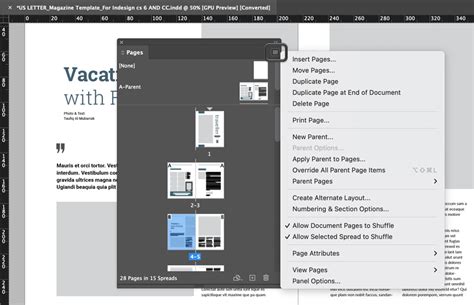
If the "A-Parent" section of the panel is not fully visible, you can adjust its size by clicking and dragging the line above the first page thumbnail downwards to allocate more space.
To begin working on a Parent Page, double-click on the "A-Parent" thumbnail. This action will bring up a blank spread in your main InDesign view, ready for your modifications. It is crucial to double-click; a single click might lead you to start editing a regular document page instead of the template. You can confirm you are on the correct Parent Page by observing that the "A-Parent" label is highlighted in the Pages panel or by checking the bottom status bar of your InDesign window.
It's worth noting that if your document is set up for print with facing pages, you will see a spread for the A-Parent, comprising two pages. If this concept is unfamiliar, resources like an "Adobe InDesign CC - Essential Training" course can provide a comprehensive understanding of InDesign's foundational principles and advanced techniques.
Once you have successfully navigated to the Parent Page, zoom in slightly. You might notice an "A" already present on the page. This is a placeholder indicating that this element is part of the "A-Parent" template. If you navigate to a regular page in your document (by double-clicking its thumbnail in the Pages panel), you will see this "A" marker appear, signifying the inheritance from the Parent Page.
Initially, you might only see the page number marker on one page of a spread, typically the right-hand page, especially if you've only applied the marker to one of the Parent Pages. Furthermore, the marker might be positioned arbitrarily within a text frame. These aspects will be addressed in the subsequent steps.
Styling Your Page Numbers
The page number marker is essentially text housed within a text frame. This means you can style it using the same methods you would apply to any other text in your InDesign document.
Double-click back on the "A-Parent" page thumbnail in the Pages panel to return to the parent page editing environment.
Select the "A" marker. You can then change its font to something more visually engaging than the default. For inspiration on how to style page numbers effectively, consider collecting examples from various print magazines and brochures to observe how other designers have approached this element.

Ensuring Page Numbers Appear on Both Pages of a Spread
Currently, the page number might only be appearing on one page of your document spread. To ensure it's present on both, you can duplicate the existing marker.
With the Selection Tool (black arrow), click on the text frame containing your page number marker. Copy this text frame.
Paste the copied frame onto the other page of the spread. If you zoom out to view the entire spread, you can utilize Smart Guides to precisely align the two text frames. Smart Guides are helpful visual cues that appear as you move objects, assisting in quick and accurate alignment.
A useful tip for the right-hand page is to right-align the text within its frame. This ensures consistent spacing from the page edge, even when your document reaches two-digit page numbers.
Incorporating Text Before or After the Page Number
Since the page number marker resides within a text frame, you have the flexibility to add any text before or after it. This could include labels like "Page," "Pg," or even the document's title.
To do this, simply use your Selection Tool to ensure the text frame is sufficiently wide to accommodate the additional text.
If, by any chance, you accidentally delete the page number marker ("A"), you can quickly restore it by using the Undo function (Ctrl+Z on Windows, Cmd+Z on Mac). Alternatively, you can insert it again by navigating to Type > Insert Special Characters > Markers > Current Page Number. It is important to remember that you cannot simply type the letter "A"; it must be inserted as a special marker.

Adding Other Design Elements to Parent Pages
The utility of Parent Pages extends beyond just page numbers. Any design elements you place on a Parent Page will automatically appear on all document pages that utilize that Parent Page. For instance, you might add a decorative arrow or a footer element. As you navigate through your document, these elements, along with the page number and any accompanying text, will be consistently present.
This automatic propagation is incredibly beneficial when you add new pages to your InDesign document or rearrange existing ones. The page numbers will automatically update to reflect the new order, saving you significant manual effort.
Parent Page/Master Page Overrides in InDesign Aren’t Full Disconnects—Here’s Why That’s Good
Excluding Pages from Parent Page Application (e.g., the Cover)
A common requirement is to exclude certain pages, such as the document's cover, from the Parent Page elements, including the page numbers. Currently, the Parent Page is applied to all pages by default.
To remove Parent Page elements from a specific page, such as the cover, return to the Pages Panel. Right-click on the page you wish to modify (e.g., Page 1, the cover page). In the pop-up menu, select Apply Parent to Pages and choose "None" from the available options.
After applying "None" to the cover page, if you move to the subsequent pages of your document, you will observe that they continue to be numbered sequentially (e.g., Page 2, Page 3), even though the cover page itself does not display any page number or Parent Page elements. This is a standard and expected behavior for managing page numbering in documents with distinct introductory or unnumbered sections. For more in-depth information and additional tips on managing page numbering for print, consulting resources like articles from pogo design can be highly beneficial.
The Value Proposition of Automatic Page Numbers
While the process of adding automatic page numbers might appear to involve several steps, it is a remarkably time-efficient task once mastered. Implementing this feature leads to more consistent layouts, a heightened sense of professionalism, and, most importantly, substantial time savings in the long run, especially for documents with numerous pages or those undergoing frequent revisions.
Advanced Page Numbering and Parent Page Management
InDesign offers the capability to utilize multiple sets of Parent Pages within a single document. This advanced feature is invaluable for accommodating documents with diverse sections, varying design requirements, or different numbering styles. Exploring these advanced techniques, alongside other sophisticated InDesign functionalities, can be achieved through comprehensive training resources, such as an "Adobe InDesign CC - Advanced Training" course.
For individuals looking to deepen their expertise in InDesign and a suite of other Adobe Creative Cloud applications like Photoshop, Illustrator, Lightroom, and Premiere Pro, as well as platforms like Figma and Webflow, becoming a BYOL (Bring Your Own Laptop) member provides access to a vast library of over 30 essential and advanced courses. This membership often includes personalized support, opportunities to earn certificates, and engagement in community challenges, fostering a holistic learning experience. Further exploration of these courses and membership benefits is available via a dedicated sign-up link.
The ability to automate repetitive tasks like page numbering in InDesign is a testament to the software's power in streamlining complex design workflows. This efficiency, combined with the professional polish it imparts, makes mastering automatic page numbering an essential skill for any InDesign user.