Editing photographs individually can be a time-consuming endeavor, often reserved for when time is an abundant luxury. However, for most photographers, the reality is that time is a precious commodity. This is precisely why understanding and implementing batch editing techniques in Lightroom CC and Lightroom Classic is not just beneficial, but a fundamental necessity for a streamlined and efficient workflow. This comprehensive guide will delve into the core principles of batch editing within both versions of Lightroom, exploring the various methodologies available to achieve consistent and professional results across your entire collection of images.
What is Batch Editing in Lightroom?
At its essence, batch editing in Lightroom is the powerful capability to apply identical adjustments to multiple photographs simultaneously. This ensures a uniform look and feel across a series of images, which is particularly invaluable when striving for a cohesive aesthetic within a project or a specific shoot. By mastering these batch editing techniques, photographers can significantly reduce the time spent on repetitive tasks, thereby dedicating more energy to the creative aspects of their craft.
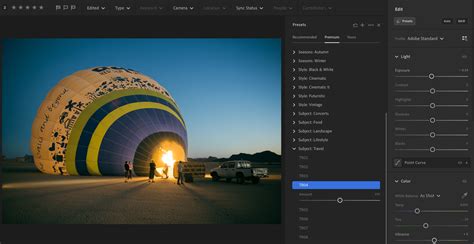
A pro tip that can further amplify the efficiency of your batch editing workflow involves the judicious use of Lightroom presets. Presets function akin to pre-configured filters, encapsulating a specific set of edits that can be applied to numerous photos with a single click. This not only accelerates the editing process but also plays a crucial role in maintaining a consistent visual style across all your images.
Lightroom CC: Batch Editing Methods
Lightroom CC, the cloud-centric version of the software, offers distinct approaches to batch editing, prioritizing accessibility and cross-device synchronization.
CC Method 1: Applying Edits During Import
One of the most effective ways to save considerable time, especially when dealing with large volumes of photos, is to apply changes to a batch of photos as they are being imported into Lightroom. This method establishes a uniform baseline from the outset, ensuring that all imported photos receive the same initial adjustments.
Step 1: Initiate the Import ProcessBegin by opening Lightroom CC and navigating to the Library module. Locate and click the "Import" button, typically found at the bottom left of the screen. This action will open the import dialog box, where you can then select the specific photos you wish to import into your catalog.
Step 2: Configure Import SettingsBefore completing the import, it's crucial to specify the settings or presets that you want to apply. Within the import dialog box, look for the "Apply During Import" panel, usually situated on the right-hand side. Here, you will find an option to select a preset from a dropdown menu. Lightroom offers a selection of built-in presets, and you can also choose from any custom presets you may have created.
Step 3: Select and Apply Your PresetFrom the "Apply During Import" panel, choose the preset that best aligns with your desired aesthetic. This selected preset will then be automatically applied to every photo that is imported. Once you've made your selection, click the "Import" button to bring your photos into Lightroom, already benefiting from the applied preset.
This technique is particularly advantageous when you have a well-defined editing style or are working on a project that mandates consistent processing. It effectively eliminates the need to manually apply the same adjustments to each photo individually after the import is complete.
CC Method 2: Copying and Pasting Edits
For applying identical adjustments to multiple photos after they have already been imported, copying and pasting edits stands out as one of the most straightforward and highly effective methods within Lightroom photo editing. This process guarantees that all selected photos undergo the exact same treatment, thereby preserving a consistent visual narrative throughout your collection.
Step 1: Select the Source ImageThe first step involves identifying and selecting the photo that contains the edits you wish to replicate. This image will serve as your master template for the batch editing process.Navigate to the Develop module in Lightroom CC.Select the photograph that already possesses the edits you want to copy.To copy all the edit settings from this photo, press Command + C on a Mac or Ctrl + C on a Windows operating system.
Step 2: Customize Which Edits to Copy (Optional)In scenarios where you do not wish to copy all the applied settings and prefer to select only specific adjustments - for instance, only the exposure or color corrections - a more granular approach is available.Utilize the keyboard shortcut Command + Shift + C on Mac or Ctrl + Shift + C on Windows. This action will open the "Copy Settings" dialog box.Within this dialog box, you gain the ability to meticulously choose which specific settings you want to copy. The available categories typically include "Basic Tone," "Color," "Effects," and others, allowing for precise control over the copied adjustments.Once you have finalized your selection of desired settings, click the "Copy" button to proceed.
Step 3: Apply Edits to Target ImagesWith the desired edits copied, the next phase is to apply them to your other selected photographs.Return to the Library module in Lightroom CC.Select the photos to which you want to apply the copied edits. This can be done by holding down the Command key (Mac) or Control key (Windows) and clicking on each individual photo. Alternatively, for a contiguous range of photos, click the first photo, hold down the Shift key, and then click the last photo in the sequence.With your target photos selected, press Command + V on a Mac or Ctrl + V on a Windows system to paste the copied settings onto all the selected images.
By meticulously following these steps, you can efficiently execute a Lightroom batch edit, ensuring that your creative adjustments are consistently applied across multiple photos. This method is particularly beneficial when working with a series of images captured under similar lighting conditions, where maintaining a uniform visual tone is paramount.
Lightroom Classic: Powerful Batch Editing Capabilities
Lightroom Classic users are not left wanting when it comes to robust batch editing functionality. The software provides a comprehensive suite of tools designed to make applying editing settings across multiple images and videos both straightforward and efficient. Here, we will explore the three primary methods available in Lightroom Classic for batch editing.
Classic Method 1: Applying Presets During Import
Similar to Lightroom CC, applying presets during the import process in Lightroom Classic is an excellent strategy for establishing a consistent editing baseline from the very beginning of your workflow.
Step 1: Access the Import FunctionalityLaunch Lightroom Classic and navigate to the Library module. Click on the "Import" button, typically located at the bottom left corner of the screen, to open the import dialog box.
Step 2: Locate the Import Settings PanelWithin the import dialog box, direct your attention to the "Apply During Import" panel, which is usually found on the right-hand side of the window.
Step 3: Select and Apply Your PresetIn the "Apply During Import" panel, utilize the "Develop Settings" dropdown menu to select the preset you wish to apply to all the photos being imported. Once your selection is made, click the "Import" button to bring the photos into your Lightroom Classic catalog, with the chosen preset already applied.
This method ensures that all imported images commence with identical adjustments, thereby significantly streamlining your workflow from the initial stages.
Classic Method 2: Applying Presets in the Library Module
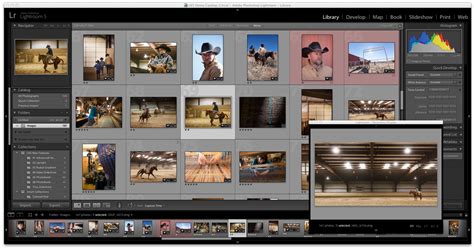
The Library module, particularly when utilized in its grid view mode, offers a swift and intuitive way to apply presets to multiple photos simultaneously.
Step 1: Select Your Target ImagesEnsure you are in the Library module and switch to the grid view mode. Select the photos you intend to edit by holding down the Command key (Mac) or Control key (Windows) and clicking on each desired photo. For selecting a contiguous range of photos, click the first photo, hold down the Shift key, and then click the last photo in the sequence.
Step 2: Modify Settings via Quick DevelopOn the right-hand side of the Library module, locate the "Quick Develop" panel. From the dropdown menu within this panel, choose the preset you wish to apply. Lightroom Classic will then apply the selected preset to all the photos that are currently highlighted.
This technique is exceptionally well-suited for rapidly applying a uniform look to a batch of photos shortly after they have been imported into the catalog.
Classic Method 3: Applying Custom Edits from One Photo to a Batch
The process of fine-tuning a single image to perfection and then synchronizing those precise settings across a multitude of other images can yield substantial time savings while guaranteeing a high degree of uniformity.
Edit the Master Image: Navigate to the Develop module and make all your desired adjustments to a single, representative photograph. This image will serve as the source for your synchronized edits.
Select the Target Images: After editing the master image, select it. Then, hold down the Command key (Mac) or Control key (Windows) and click on all the other photos to which you want to apply the same settings.
Initiate Synchronization: With both the source image and the target images selected, click the "Sync" button, typically located in the bottom right corner of the Develop module. Alternatively, you can use the keyboard shortcut Command + Shift + S on Mac or Ctrl + Shift + S on Windows.
Configure Synchronization Settings: Upon clicking "Sync," a "Synchronize Settings" dialog box will appear. Within this dialog box, you have the granular control to select precisely which settings you want to synchronize across all the selected photos. You can choose to include or exclude specific adjustments, such as exposure, white balance, color grading, or even cropping.
Execute the Synchronization: Once you have configured the synchronization settings to your satisfaction, click the "Synchronize" button to apply the chosen adjustments to all the selected photos.
By thoroughly mastering these batch editing techniques within Lightroom Classic, you can dramatically accelerate your editing workflow without any compromise on the quality or consistency of your final images.
How to Sync Lightroom Classic to Edit on Another Computer [2026 Full Guide]
Frequently Asked Questions: Lightroom Photo Editing
For those seeking to deepen their understanding of Lightroom photo editing and batch processing, the following answers to commonly posed questions should prove beneficial.
Can I Batch Edit in Lightroom Mobile?
Yes, batch editing is indeed possible within Lightroom Mobile. The process is quite intuitive: first, select the photo that contains the edits you wish to replicate. Then, tap the three-dot menu and choose the "Copy Settings" option. Subsequently, navigate to your photo library, select multiple images by tapping and holding on them, tap the three-dot menu again, and choose "Paste Settings." This action will apply the copied adjustments to all the selected photos simultaneously.
What Happens if I Apply a Preset During Import but Want to Change It Later?
Should you apply a preset during the import process and later decide that it's not quite right, you retain the flexibility to make further adjustments. Simply select the affected photos, choose a new preset, or manually modify the settings within the Develop module. It's important to remember that Lightroom operates non-destructively, meaning your original image data remains entirely intact, allowing for endless revisions and experimentation.
How Do I Ensure Specific Adjustments, Like Cropping, Are Not Included in My Batch Edits?
When utilizing the copy and paste settings functionality, you have the ability to precisely specify which adjustments are included or excluded from the batch operation. To achieve this, use the keyboard shortcut Command + Shift + C on Mac or Ctrl + Shift + C on Windows to bring up the "Copy Settings" dialog box. Within this dialog, you can easily deselect options such as "Cropping" or any other adjustments that you do not wish to be part of your batch edit.
Enhancing Your Workflow with Advanced Tools
Mastering batch editing in Lightroom is a pivotal skill that can profoundly streamline your photo editing workflow, consistently delivering professional-grade results with remarkable efficiency. Whether you are an amateur photographer taking your first steps or a seasoned professional refining your craft, leveraging the right presets and complementary tools can fundamentally transform your editing process.
For individuals looking to elevate their Lightroom photo editing experience, exploring a curated selection of Adobe Lightroom plug-ins and presets can offer a diverse array of styles and adjustments tailored to meet specific creative needs. Furthermore, investigating powerful and versatile editing solutions like ON1 Photo RAW can seamlessly integrate into your existing workflow. ON1 Photo RAW offers advanced features, including AI-driven enhancements and sophisticated noise reduction capabilities, providing another avenue for optimizing your editing efficiency and overall image quality. Discover how these tools can significantly improve your editing process and the caliber of your final output.
The Role of AI in Batch Processing
Manually applying adjustments to a large set of photos used to be an arduous and time-consuming task. The endeavor to create a cohesive overall feel or a distinct style for a collection of images could be particularly challenging, especially when faced with a significant diversity across a group of photos that are intended to be presented together. Variations in lighting conditions and the use of different lenses can cause images to appear dramatically different, even if they were all captured in the same location. Consequently, imbuing a gallery of photographs with a consistent and compelling style can present a considerable hurdle.
One aspect that is particularly appreciated in the work of some artists is their meticulous attention to color and the skillful manner in which they employ RGB curves to fine-tune their vision of a specific location or time of day. Whether you are importing photos from a professional photoshoot or from a casual afternoon hike with your family, you will invariably encounter a multitude of images that require the same fundamental edits and subtle tweaks. Presets, in this context, serve as pre-made sets of edits that function much like filters, capable of instantly enhancing your photographs. Imagine the efficiency of being able to brighten every subject in your pictures or darken every shot of the sky with just a few clicks.
The process of using AI-powered tools like Brilliance AI can further revolutionize batch processing. These tools can learn your unique editing style and apply initial edits that are remarkably consistent, significantly reducing the time spent on repetitive tweaking of individual shots. By utilizing AI to edit your photos with a personalized profile, you can achieve consistent and dynamic edits across your entire gallery. The AI intelligently adjusts for factors unique to each photo, such as lighting variations, white balance discrepancies, and other environmental nuances, ensuring a polished and unified final product.
When preparing to synchronize settings, Lightroom provides the option to meticulously choose which adjustments are applied. After initiating the synchronization process, a dialog box will appear, offering checkboxes to enable or disable specific settings, such as cropping, exposure adjustments, color corrections, and more. This granular control ensures that only the intended edits are transferred to the batch of selected images, preventing unintended modifications.
Batch editing in Lightroom, therefore, is not merely a feature but a fundamental skill that can profoundly enhance your overall Lightroom workflow, saving you countless hours of work without ever compromising on the quality or artistic integrity of your images.