Procreate offers a versatile suite of tools to manipulate focus and create dynamic visual effects through blurring. Whether you aim to soften an image, simulate speed, or add depth, understanding Procreate's blur capabilities is essential for any digital artist. This guide delves into the intricacies of applying blurs, from basic layer adjustments to selective area enhancements, ensuring you can achieve a professional finish in your artwork.
Preparing Your Canvas for Blurring
Before diving into blur effects, proper canvas preparation is paramount. This involves importing your base artwork and ensuring that different elements are organized on separate layers. To import a file saved in a folder, navigate to the Actions panel, identified by the Wrench icon. Tap on "Add" and then select "Insert a file." You will then be directed to your device's file browser, where you can locate and select the digital paper or image you wish to use.
Once your canvas is populated, perhaps with digital paper to create a seamless background, the most critical step is to ensure that your artwork pieces reside on distinct layers. Access the Layers panel, represented by stacked squares, to view all available layers. Selecting a layer allows you to apply blurs specifically to that element. For instance, if you intend to blur only the background, you would select the layer named "Background." This layer-based approach is fundamental to controlling where and how blur effects are applied.
Understanding Blur Application Modes: Layer vs. Pencil
When you access the Adjustments panel, marked by the Wand icon, and select a blur type, you'll encounter two crucial options: "Layer" and "Pencil." Understanding the distinction between these two modes is key to precise blur application.
The "Layer" blur option is straightforward: the selected blur type is applied to the entire layer that you have currently chosen. This is ideal for uniformly softening an entire object or background.
In contrast, "Pencil" blur is applied only to the specific areas of your artwork that your "pencil" (or finger) touches. This mode offers a more granular level of control, allowing you to make precise blur points on your artwork. Within Pencil mode, you can further customize the experience by setting the type of brush, its size, and the intensity of the blur. This enables you to selectively blur portions of an element, such as a specific part of a butterfly, without affecting the rest of the layer.
Exploring Procreate's Three Core Blur Types
Procreate offers three distinct blur filters, each serving a unique purpose in enhancing your artwork: Gaussian Blur, Motion Blur, and Perspective Blur. Familiarizing yourself with each type will empower you to add that finishing touch or even to create compelling effects like 3D lettering.
Gaussian Blur: The Softening Effect
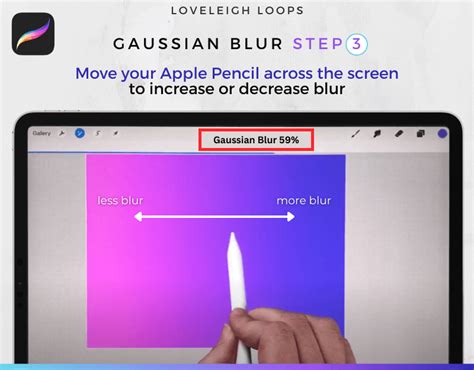
Gaussian Blur is a standard blur effect that smooths out an image or a selected area, giving it a soft, out-of-focus appearance. When you select Gaussian Blur, you'll see a blue bar at the top of the screen labeled "Slide to adjust." Initially, this bar is set at 0%, meaning no blur is applied.
To apply the blur, simply press and drag your finger or Apple Pencil across the screen. Dragging to the right increases the intensity of the blur, while dragging to the left reduces it. When you are satisfied with the level of blur, tap on the Adjustments icon again to apply the effect and exit the menu. This blur is excellent for creating a sense of depth of field or for gently softening details.
Motion Blur: Simulating Speed and Movement
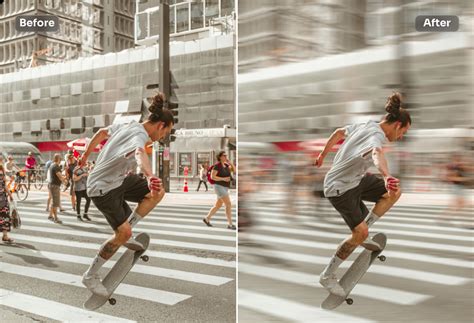
Motion Blur is designed to create the illusion of speed and motion by applying a streaky blur to your active layer. Similar to Gaussian Blur, you'll find the "Slide to adjust" bar at the top of the screen, starting at 0%.
To activate Motion Blur, drag your finger or Apple Pencil across the screen. The direction of your finger movement dictates the direction of the blur. As you drag, the blur will follow the path of your stroke, creating a streaky effect that suggests movement. Dragging further in any direction intensifies the blur. Once the desired motion effect is achieved, tap the Adjustments icon to confirm the changes. This blur is particularly effective for dynamic compositions, conveying a sense of action, or for creating zooming and blasting effects.
Perspective Blur: Simulating Depth and Focus
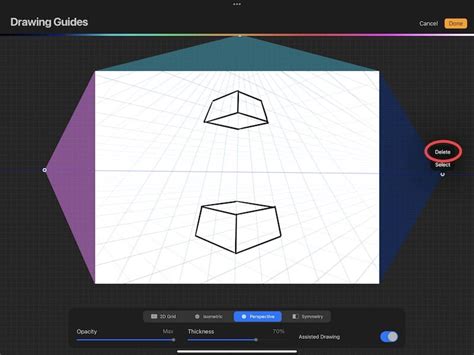
Perspective Blur allows for the creation of full or directional radial blurs, ideal for simulating zooming and blasting effects or for adding a sense of depth. When you select Perspective Blur, a disc will appear in the middle of your screen. This disc represents the point of origin for the blur.
At the top of the screen, the "Slide to adjust" bar indicates the amount of blur being applied. To increase the blur intensity, drag your finger or Apple Pencil to the right, anywhere outside the central disc. Sliding your finger back to the left will reduce the blur. A key feature of Perspective Blur is its flexibility; you can move the central disc even after applying some blur to change where the blur "originates" from.
When you are in "Directional" mode within Perspective Blur, the disc becomes larger and includes an arrow. This arrow explicitly displays the direction in which your blur is pointing, offering precise control over the focal point of the blur. This is particularly useful for advanced effects where you want to guide the viewer's eye or create a specific sense of perspective distortion.
Advanced Techniques: Blurring Specific Areas
While Procreate's blur filters can be applied globally to a layer, there are instances where you might only want to blur a particular area of your image, leaving other parts sharp. This is where the Selections tool becomes indispensable.
To blur only a part of an image in Procreate, you will first need to create a selection around the area you wish to blur. The Freehand setting of the Selections tool is often the most versatile for this purpose, allowing you to draw an outline around the desired area. For example, you might want to blur faces in the background of an image.
To begin, use your Apple Pencil or finger to draw a selection around the area you'd like to blur. Ensure that "Add" is enabled in the menu if you need to refine your selection. Once the selection is made, navigate to the Adjustments panel and select "Gaussian Blur" (or another blur type if preferred). Swipe your pencil or finger across your screen to the right to apply the blur. The further to the right you swipe, the more intense the blur will become.
After applying the blur to the selected area, you can deselect it by tapping on the Adjustments menu and then the Selections menu. The icons will no longer be highlighted in blue once deselected. This method, leveraging Procreate's seamless integration of selections and blur filters, makes it straightforward to achieve localized blurring effects.
100 PROCREATE TIPS in 15 MIN
Mastering these blur techniques in Procreate opens up a world of creative possibilities. Whether you're aiming for subtle enhancements or dramatic stylistic choices, understanding Gaussian, Motion, and Perspective blurs, along with selective area application, will elevate your digital artwork. Experiment with these tools to discover new ways to add depth, focus, and dynamism to your creations.
Explore further by learning about preventing blurriness in Procreate, using the smudge tool effectively, and mastering recoloring techniques to complement your newfound blurring skills.