The digital age has ushered in an era where sharing gaming experiences is as integral to the hobby as playing itself. With the culture of game streaming at its peak, knowing how to record Xbox One gameplay has become an essential skill for enthusiasts. Fortunately, Microsoft has embedded rich functionality and features into the Xbox One console, making the process of capturing, editing, and sharing your gaming moments more accessible than ever. This guide will walk you through various methods, from utilizing the console's built-in tools to employing advanced external hardware and software, ensuring you can preserve and share those epic gaming achievements.
Leveraging Built-in Xbox One Recording Features
The Xbox One console offers a remarkably user-friendly approach to gameplay capture through its Game DVR functionality and the Upload Studio application. These integrated tools are designed to be intuitive, even for beginners, allowing for quick recording and basic editing.
The core of this functionality lies in the Game DVR. By default, the Xbox One automatically records the past five minutes of gameplay in the background. This means that even if you haven't explicitly started a recording, you can often capture a recent impressive moment. To initiate a manual recording, you can use voice commands if you have a Kinect sensor. Simply saying "Xbox, record that" will immediately initiate its recording operation, capturing a segment of your gameplay for later use.
If you're using a game controller, the process is equally straightforward. Double-tap the Xbox button on your controller to open the guide. From the sidebar, select the "Snap an App" button and then choose "Game DVR." This will bring up the Game DVR interface, where you can select the desired length of your recording. Options typically range from 30 seconds to 5 minutes, with the ability to record longer clips if certain conditions are met.
To begin recording, you can say "Xbox, select" followed by "Start recording" if using Kinect. With a controller, you'll find a "Start recording" button within the Game DVR interface. When you're finished capturing your gameplay, you can stop the recording by saying "Xbox, select" and "Stop recording," or by clicking the "Stop recording" button in the Game DVR menu.
Managing and Editing Your Captured Clips
Once your gameplay has been recorded, a notification will appear on your screen confirming the successful capture. Your recorded clips are then accessible through the Upload Studio, a free application available for download from the Xbox Store. No Xbox Live Gold subscription is required to use Upload Studio.
How to put music in the XBOX ONE Upload Studio! Tutorial
Upload Studio provides several editing options to refine your clips:
- Trimming: You can easily trim the beginning or end of your clip to achieve the perfect duration.
- Picture-in-Picture: If you have a Kinect sensor, you can record a second video of yourself reacting to the gameplay and overlay it onto your main recording. This is achieved through the picture-in-picture option.
- Bookending: This feature allows you to place Kinect recordings before and after your gameplay clip, creating a more immersive viewing experience.
- Multi-clip Montage: For compilations of highlights, you can create a montage or highlight reel by combining up to five clips.
After editing, you can preview your clip to ensure it meets your satisfaction before sharing. The Xbox One's integrated sharing features allow you to upload your creations directly to platforms like YouTube, Twitch, and other social media or online gaming communities.
Recording Longer Gameplay Sessions and High-Paced Action
While the built-in Game DVR is excellent for quick captures and highlights, it has limitations, particularly regarding recording duration and handling very high-paced gameplay. For extended recording sessions or when capturing demanding, fast-paced online games, you'll need to consider external solutions.
Utilizing External Hard Drives for Extended Recording
To record longer than the standard 10 minutes on Xbox One, you will need to use an external hard drive. Connecting a compatible external hard drive to your Xbox One console significantly expands your storage capacity, allowing for recordings that can last up to an hour or more, depending on the resolution quality and available space on the drive. This is crucial for capturing entire matches, lengthy cutscenes, or in-depth tutorials.
Advanced Recording with Capture Cards and Software
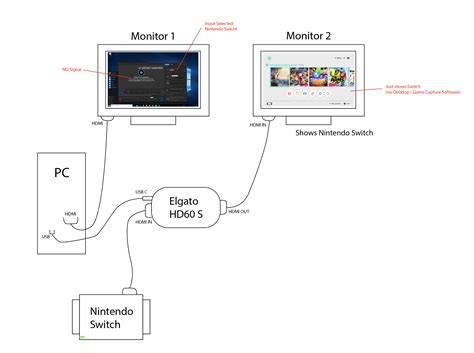
For professionals and enthusiasts seeking the highest quality and most control over their gameplay capture, employing a capture card and dedicated recording software is the recommended approach. This method involves routing your Xbox One's video output through an external capture card connected to a computer, which then uses specialized software to record the feed.
A popular and highly recommended setup involves using a capture card like Elgato Game Capture HD or Epiphan's AV.io HD, in conjunction with powerful recording software such as Open Broadcaster Software (OBS).
Setting up with a Capture Card and OBS:
- Connect your TV to the Xbox One platform: Ensure your Xbox One is connected to your primary display (TV) via HDMI.
- Connect the Capture Card: The capture card will typically connect to your Xbox One via HDMI and then to your computer via USB or another suitable interface. Elgato Game Capture HD, for instance, connects to the Xbox One using HDMI and can pass through video to a TV set also using HDMI, allowing you to play on your TV while recording on your PC.
- Add Capture Card as a Source in OBS:
- Ensure OBS (Open Broadcaster Software) is installed on your computer.
- Start OBS and add your capture card as a "Video Capture Device" source.
- For Epiphan's AV.io HD, you must add AV.io directly to the OBS as a global resource, making AV.io your scene's source to start capturing. This can be configured as a Global Source for easy re-use.
- When configuring the source, select your capture card from the device list.
- You'll need to configure settings such as "Video format," "Resolution/FPS Type," and "Resolution/FPS." For high-quality game video, capturing at 1080p and 60 frames per second is often desired. You can also set your encoding settings, such as bitrate (e.g., 9000 kb/s for video and 128 kb/s for audio).
Important Considerations for Capture Cards:
- Low Capture Delay: Devices like Epiphan's AV.io HD are known for their extremely low capture delay, often just one frame. This is critical for high-action games where even a single frame of delay can impact gameplay. If you're not playing fast-paced games, you might be able to forgo a splitter, but for competitive gaming, it's often recommended.
- HDCP Protection: Video grabbers, including Epiphan's, will not capture HDCP-protected content. Microsoft may enable or disable HDCP encryption depending on the content being played. If you encounter issues, consult your Xbox One's settings or the capture card manufacturer's documentation.
- Drivers: Many modern capture devices, like AV.io HD, do not require driver installations as they support UVC (USB Video Class) inputs, meaning they can generally be captured by any software that supports webcam inputs.
Once your capture device is configured as a source in OBS, you can start recording by clicking the "Start Recording" button on the main OBS screen.
Advanced Video Editing and Enhancement
Capturing your gameplay is only the first step. To truly make your videos stand out, especially for platforms like YouTube, robust video editing software is invaluable. Tools like Wondershare DemoCreator and PowerDirector offer a comprehensive suite of features to transform raw gameplay footage into polished, engaging content.
Wondershare DemoCreator
Wondershare DemoCreator is highlighted as a powerful yet easy-to-use screen recorder and video editor. Its key features for gameplay recording include:
- High Frame Rate Recording: Capable of recording high-paced games at up to 120 frames per second, ensuring smooth visuals even in the most action-packed moments.
- Simultaneous Recording: Allows for recording both the screen and webcam simultaneously, perfect for creating reaction videos or including your commentary.
- Comprehensive Editing Tools: Beyond recording, DemoCreator acts as a handy video editor. You can perform basic edits, add annotations, text, and callouts to highlight important moments or explain strategies.
- Special Effects and Filters: Apply cool effects and filters to your gameplay videos using a drag-and-drop interface.
- Speed Adjustment: Easily cut out unwanted clips or adjust the speed of your recorded video for dramatic effect.
When you want to edit and publish gameplay footage on social media, using advanced techniques with software like DemoCreator is highly recommended.
PowerDirector
PowerDirector is another valuable tool for recording, sharing, and editing gameplay. It's designed to help users create unique, high-quality videos that are likely to attract more views and subscribers.
- User-Friendly Interface: PowerDirector offers user-friendly tools, tips, and tricks, making it accessible for both beginners ("noobs") and experienced gamers.
- Creative Customization: The software provides virtually endless customization and unique creativity options, allowing you to play with various cool features and video effects.
- Workflow: The typical workflow involves importing your captured gameplay footage into PowerDirector. You can then add titles, transitions, overlays, effects, and music. Once your edits are complete, you can export the final video in your desired format.
The combination of a reliable capture method (either built-in or with a capture card) and sophisticated editing software like DemoCreator or PowerDirector empowers you to elevate your Xbox One gameplay videos to a professional level, ready for sharing with the world.
Recording Xbox 360 Gameplay
While this guide primarily focuses on the Xbox One, it's worth noting that recording gameplay on the Xbox 360 requires a slightly more advanced approach, as it lacks the integrated Game DVR functionality of its successor.
To record Xbox 360 gameplay, the most effective method is to connect the console to a computer. This allows you to project your gameplay onto your computer screen, where you can then use screen recording software.
Steps for Recording Xbox 360 Gameplay:
- Connect Console to Computer: Use an HDMI cable and an HDMI capture card to connect your Xbox 360 console to your computer.
- Install Drivers and Software: Install the necessary drivers for your capture card and any associated media player software on your computer.
- Launch Recording Tool: Navigate to the website of a free online screen recorder (or open your preferred desktop recording software) and initiate the recording tool.
- Configure Settings: Open the media player software on your computer. You may need to adjust audio and video settings within the recording tool's options. If the Xbox Dashboard doesn't appear on your screen, you might need to contact the hardware manufacturer for assistance.
- Start Recording: Click the "Record" button in your chosen software. You'll typically need to select the recording region by dragging a crosshair over the desired area of your screen and then confirm by releasing the mouse button. Press "Start" to begin the recording.
- Stop Recording: Once you're finished, click the "Stop" button.
- Sharing: After recording, you can often share your captured video clips directly to platforms like YouTube or via FTP.
For those seeking more advanced editing options or wanting to record during their absence, a desktop version of a screen recording tool might offer additional features like task scheduling and more robust screen capture capabilities.
By understanding these various methods, from the simple "Xbox, record that" command to complex capture card setups, you are well-equipped to capture, edit, and share your Xbox One gameplay with friends, family, and the global gaming community.