Photoshop offers powerful tools to enhance the visual appeal of your images by adjusting brightness and contrast. Understanding how to effectively manipulate these settings is crucial for bringing out the best in your photographs, whether for personal enjoyment or professional marketing materials. While there are various methods to achieve these adjustments, employing non-destructive techniques, such as adjustment layers, is paramount for maintaining image quality and preserving editing flexibility. This guide will delve into the intricacies of the Brightness/Contrast command in Photoshop, focusing on the advantages and application of adjustment layers.
The Pitfalls of Destructive Editing
When you apply adjustments directly to an image layer, you are engaging in what is known as destructive editing. This means that the original pixel data of your image is permanently altered. If you later decide that your adjustments were not quite right, or if you need to revert to the original state, you will find it difficult, if not impossible, to do so without losing quality. Historically, when learning to apply the Brightness/Contrast command as a static adjustment, the initial step often involved creating a duplicate of the image and placing it on a new layer. This was a workaround to prevent permanent damage to the original image. However, this method is cumbersome and less efficient compared to modern, non-destructive workflows.
Embracing Non-Destructive Workflows with Adjustment Layers
Adjustment layers provide a superior alternative to destructive editing. They are essentially separate layers that house your editing parameters, leaving the original image pixels untouched. This means that your adjustments are always editable, and you can tweak them at any time without any loss in image quality. This approach is fundamental to a professional and efficient Photoshop workflow.
Applying Brightness/Contrast as an Adjustment Layer
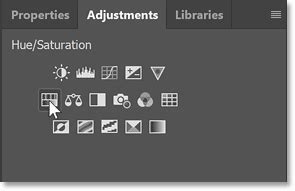
There are several straightforward ways to add a Brightness/Contrast adjustment layer to your Photoshop document. One common method is to navigate to the Adjustments panel. If this panel is not visible on your screen, you can access it by going to the Window menu at the top of the Photoshop interface and selecting Adjustments. A checkmark next to the panel's name indicates that it is currently open. By default, the Adjustments panel is often nested with other panels like Styles or Libraries, so you may need to look for it within those groupings.
Once the Adjustments panel is open, you will see a variety of adjustment icons. Locate and click on the Brightness/Contrast icon, which is typically represented by a sun symbol.
Upon clicking the Brightness/Contrast icon, a new adjustment layer will be created above your currently selected layer in the Layers panel. Crucially, the options and controls for this adjustment will appear in the Properties panel. The Properties panel, introduced in Photoshop CS6, is where you will manage the settings for your adjustment layers.
Understanding the Brightness/Contrast Controls
Within the Properties panel, you will find sliders for Brightness and Contrast. The Brightness slider controls the overall lightness or darkness of the image. Moving the slider to the right increases tonal values and expands image highlights, while moving it to the left decreases values and expands shadows. The Contrast slider, on the other hand, adjusts the difference between the lightest and darkest parts of an image. Dragging the Contrast slider to the right increases this difference, making the image appear more punchy, while moving it left decreases it, resulting in a softer image.
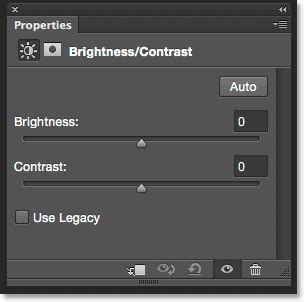
Photoshop often provides an "Auto" button within the Brightness/Contrast command. While this can offer a starting point, it's usually best to fine-tune the settings manually to achieve your desired look. For instance, you might find that Photoshop's automatic settings are a good baseline, but you can then make further adjustments using the sliders. Personal preference plays a significant role here; what looks good on one image might not be ideal for another. Experimentation is key to finding the perfect balance that brings out the details you wish to highlight.
The "Use Legacy" Option: A Glimpse into the Past
Similar to the static version of the Brightness/Contrast command, the adjustment layer version includes a "Use Legacy" option. When this option is selected, the Brightness/Contrast command behaves as it did prior to Photoshop CS3, before significant improvements were made to the algorithm. In older versions of Photoshop (CS2 and earlier), the Brightness/Contrast command was notorious for its destructive nature and often resulted in blown-out highlights or crushed shadows with little detail retained.
To illustrate the difference, consider applying extreme settings with "Use Legacy" enabled. Dragging both the Brightness and Contrast sliders to their maximum values can lead to a completely overexposed image with peculiar color artifacts. In contrast, with "Use Legacy" disabled, applying the same extreme settings will generally preserve more of the image's detail, demonstrating the vastly improved algorithms in modern Photoshop versions. There is generally no reason to enable the "Use Legacy" option in contemporary workflows, unless you are specifically comparing the old behavior to the new, or perhaps for a very niche creative effect.
Previewing Your Adjustments Non-Destructively
A common concern with adjustment layers is the absence of a dedicated "Preview" option, unlike the dialog box for static adjustments. However, this does not mean you cannot preview your original image. The key lies in the visibility icon, often depicted as an eyeball, present in both the Layers panel and the Properties panel. Clicking this visibility icon toggles the adjustment layer on and off. Clicking it once hides the adjustment layer, allowing you to view the original, untouched image. Clicking it again re-enables the adjustment layer, displaying your edited image with the applied Brightness and Contrast settings. This simple toggle is an incredibly effective way to compare your edits with the original.

The Power of Layer Stacking and Editability
When you apply Brightness/Contrast as a static adjustment, you are prompted to click "OK" in a dialog box to accept your settings. This action commits the changes to the image pixels, making them permanent. With adjustment layers, there is no such dialog box, and no need to "commit" anything. The adjustment layer remains forever editable.
To further illustrate the flexibility of adjustment layers, consider adding a second adjustment layer, such as Vibrance, to boost the colors in your image. Notice how, upon adding the Vibrance adjustment layer, the Brightness/Contrast settings in the Properties panel are temporarily replaced by the Vibrance settings. This demonstrates that you can stack multiple adjustment layers, each affecting the image in a unique way, and all of them remain independently editable. This layered approach allows for complex edits and easy modifications without compromising the original image data.

Fine-Tuning Your Edits
The Brightness/Contrast adjustment offers a range of values for its sliders. For Brightness, the range typically extends from -150 to +150, and for Contrast, from -50 to +100. These ranges provide ample scope for subtle enhancements or dramatic transformations. Remember that in "normal" mode, the Brightness/Contrast adjustment applies proportionate, non-linear adjustments, similar to how Levels and Curves adjustments function. This means that the adjustments are applied differently to various tonal ranges within the image, preserving more detail than a simple linear shift. When "Use Legacy" is selected, Brightness/Contrast simply shifts all pixel values higher or lower when adjusting brightness, a much simpler and often less effective method.
Right to the Point Photoshop Tutorial on Levels and Curves, Exposure and Brightness Contrast.
Bringing Out Details with Brightness and Contrast
When you find that lighting conditions have caused details to be lost in shadows or blown out in highlights, the Brightness and Contrast tool is your ally. By carefully adjusting these settings, you can bring out the hidden details and ensure your images are well-exposed and visually appealing. The magic truly happens when you start to combine brightness and contrast levels to discover the precise settings that highlight the specific details you want to emphasize in your images. This iterative process of adjustment and observation is fundamental to achieving professional-looking results.
The Brightness/Contrast adjustment allows you to make simple yet impactful changes to the tonal range of an image. By understanding how each slider affects the image and by leveraging the power of non-destructive adjustment layers, you can transform your photographs with confidence and precision. This method ensures that your edits are always reversible and your image quality remains pristine, paving the way for a more creative and efficient editing experience in Photoshop.