Photoshop offers a robust suite of tools for incorporating shapes into your designs, whether you're creating simple graphics, enhancing existing images, or building complex compositions. Understanding how to draw, manipulate, and integrate shapes is fundamental for any designer. This guide will walk you through the various methods of inserting shapes, from the intuitive drag-and-drop functionality to more advanced techniques for filling them with images and applying stylistic effects.
The Foundation: Accessing and Drawing Shapes
The primary method for introducing geometric and custom shapes into your Photoshop projects involves the dedicated Shape tools. These tools are instrumental for crafting elements like stickers, social media graphics, and various design components. Shapes in Photoshop are inherently vector-based, meaning their outlines are defined by mathematical equations rather than pixels. This vector nature ensures that shapes remain crisp and smooth, regardless of scaling, preserving their quality whether enlarged or reduced.
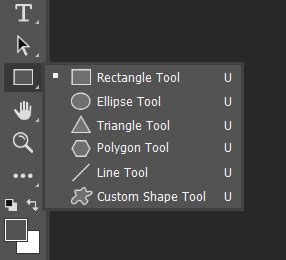
To begin, locate the Shape Tool in your Photoshop toolbar. You might see a Rectangle Tool displayed by default, but clicking and holding this icon will reveal a palette of other shape options, including the Ellipse Tool, Polygon Tool, Line Tool, and Custom Shape Tool. Each of these tools is designed for drawing specific geometric forms or pre-defined graphics.
When using a shape tool, you can customize its appearance directly within the Options Bar, which is located at the top of your workspace. Here, you can select a Fill color, an Outline (Stroke) color, and adjust the stroke's thickness. For the Custom Shape Tool, you can also choose from a vast library of pre-designed shapes. Clicking the down-facing arrow next to the shape preview in the Options Bar opens a picker. To access the extensive collection of custom shapes that come bundled with Photoshop, click the gear icon on the right side of this picker. From the subsequent menu, selecting "All" will load a comprehensive set of shapes, categorized into groups like "2019 Shapes" (which includes hundreds of new shapes added in Photoshop 2020) and various legacy sets.
Drawing Your Shape: Precision and Control
Once you've selected your desired shape tool and configured its initial properties, you can begin drawing on your canvas. The process typically involves clicking and dragging your mouse. For basic shapes like rectangles and ellipses, dragging from one corner to the opposite corner defines the shape's dimensions.
A crucial modifier when drawing shapes is the Shift key. Holding down Shift while dragging will constrain the proportions of the shape, ensuring you create a perfect square from the Rectangle Tool or a perfect circle from the Ellipse Tool. This is invaluable for maintaining symmetry and accuracy.
For instance, if you're using the Rectangle Tool and want to draw a perfect square, click and drag from the top-left corner of your desired area. As you drag towards the bottom-right, hold down the Shift key. You'll immediately notice that the width and height remain equal, creating a flawless square. Similarly, holding Shift with the Ellipse Tool will produce a perfect circle.
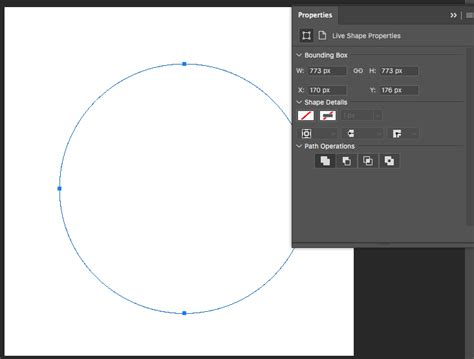
When you draw a shape by dragging it onto the canvas, Photoshop often automatically activates the Free Transform bounding box around the newly created shape. This allows for immediate resizing and repositioning. You can click and drag any of the handles on this bounding box to adjust the shape's dimensions. Once you're satisfied with the size and placement, click the checkmark icon in the Options Bar to commit these changes and exit the Free Transform mode.
Adding Shapes from the Shapes Panel: Efficiency and Variety
For a more streamlined approach, especially when working with a vast array of pre-made graphics, the Shapes panel offers a highly efficient workflow. The Shapes panel typically resides in a secondary panel column, often to the left of your main panel group. Within this panel, shapes are organized into folders. As mentioned, the "2019 Shapes" folder contains a wealth of newer additions, while other folders house classic and legacy shapes.
To add a shape from this panel, simply navigate to the desired shape, such as the "Butterfly" shape found within the "Nature" set, and click and drag it directly onto your canvas. Photoshop will automatically place this shape on its own dedicated shape layer in the Layers panel and activate the Free Transform bounding box, allowing for immediate adjustments to size and position. This method is exceptionally fast for incorporating complex or decorative shapes without needing to draw them manually.
Integrating Images into Shapes: Creative Masking Techniques
A common and visually striking technique is to place an image inside a shape, making the shape act as a frame or mask for the image content. Photoshop offers two primary methods for achieving this: clipping masks and vector masks. Both are effective, but they cater to slightly different workflows and offer distinct advantages.
Using Clipping Masks
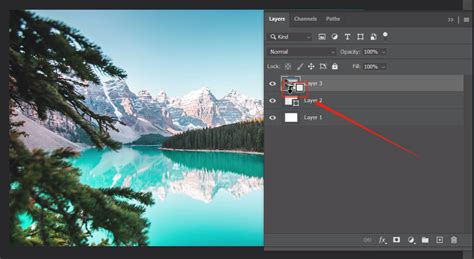
The clipping mask method involves having two separate layers: one for the image and one for the shape. The image layer is then "clipped" to the shape layer below it. This means that only the portion of the image directly above the shape remains visible, effectively filling the shape.
- Create a New Document: Start by creating a new Photoshop document. For this example, a square document of 2000x2000 pixels with a resolution of 300 pixels per inch is a good starting point, especially if you plan to place a high-resolution image.
- Draw Your Shape: Use any of the shape tools or drag a shape from the Shapes panel onto your canvas. The shape will appear on its own shape layer.
- Place Your Image: Navigate to your image file and drag it into the Photoshop document. Photoshop will typically place the image on a new layer above your shape layer. If the image is larger than your document, Photoshop will often resize it to fit.
- Create the Clipping Mask: With the image layer selected in the Layers panel, right-click on it and choose "Create Clipping Mask" from the context menu. Alternatively, you can hold down the Alt (Windows) or Option (macOS) key and click on the line separating the image layer and the shape layer in the Layers panel.
- Adjust and Refine: The image layer will now be indented, with a small downward-pointing arrow indicating it's clipped to the shape below. You can now use the Free Transform tool (Ctrl+T or Cmd+T) on the image layer to resize and reposition the image until the desired portion is visible within the shape. You can also move the shape layer itself to reposition the entire composition.
Using Vector Masks (for Easier Background Transfer)
While clipping masks are straightforward, vector masks offer an advantage when you intend to move the combined shape and image to a different background later. With a vector mask, the image and the shape's outline are effectively combined onto a single layer, simplifying the transfer process.
- Draw Your Shape: Create your shape as usual. It will appear on its own shape layer.
- Place Your Image: Drag your image into the document, placing it on a layer above the shape layer.
- Convert Shape to Vector Mask: Instead of clipping, we'll convert the shape itself into a mask. Switch to Photoshop's Paths panel. Select the shape layer you just created. You will see a path representing the outline of your shape. Copy this path.
- Delete the Shape Layer: Now, delete the original shape layer by dragging it to the trash bin icon in the Layers panel. Do not use the Delete or Backspace key, as this can sometimes delete the path copy as well.
- Create a New Layer and Paste Path: Create a new, empty layer. Switch back to the Paths panel and paste the copied path onto this new layer.
- Make Selection from Path: With the pasted path selected in the Paths panel, right-click on it and choose "Make Selection." This will turn the path into a selection outline.
- Fill Selection with Shape Color: Ensure your desired shape fill color is set as the foreground color. With the selection active, go to Edit > Fill and choose "Foreground Color." This fills the selection with your chosen color, effectively creating the shape on the new layer.
- Apply as Vector Mask: Select the image layer. Go to the Paths panel, and drag the path thumbnail (the one representing your shape) onto the "Create new fill or adjustment layer" icon at the bottom of the Layers panel, and choose "Vector Mask." This will apply the shape as a vector mask to your image.
Alternatively, a more direct method for vector masks involves using the Shapes panel and then converting the shape layer to a vector mask:
- Draw Shape from Shapes Panel: Drag a shape from the Shapes panel onto your canvas. It will create a shape layer.
- Place Image: Place your image on a layer above the shape layer.
- Convert Shape to Vector Mask: With the shape layer selected, go to the Layer > Vector Mask > Current Shape. This converts the shape layer into a vector mask applied to the selected layer. If you want to use a different shape from the Shapes panel, you can drag it onto the canvas, then right-click on the new shape layer and select "Convert to Shape." Then, select your image layer, and go to Layer > Vector Mask > Current Shape.
How to Use Vector Masks in Photoshop
With the vector mask applied, the image is now confined within the shape. The advantage here is that the shape and image are linked as a single entity. If you need to move this combined element to a new background, you're moving one layer instead of two. You can unlink the image and the mask by clicking the chain icon between their thumbnails in the Layers panel, allowing you to resize or reposition the image independently within the mask.
Styling Your Shapes: Strokes and Colors
Once your shape is in place, whether it's a basic geometric form or a shape filled with an image, you can further enhance its appearance with styles.
Adding Strokes
Adding an outline, or stroke, to a shape is a common way to define its edges or add a decorative border.
- Select the Shape Layer: In the Layers panel, click on the layer containing your shape.
- Access Layer Styles: You can access layer styles in a few ways:
- Double-click on the layer thumbnail (not the layer name).
- Go to Layer > Layer Style > Stroke.
- Click the "fx" icon at the bottom of the Layers panel and choose "Stroke."
- Configure Stroke Options: In the Layer Style dialog box, with "Stroke" selected in the left-hand column, you can:
- Color: Click the color swatch to open the Color Picker and choose your desired stroke color.
- Size: Adjust the thickness of the stroke by increasing the Size value.
- Position: Choose whether the stroke is placed on the "Inside," "Center," or "Outside" of the shape's boundary. "Outside" is often preferred for framing the shape.
- Blend Mode and Opacity: You can also adjust how the stroke interacts with other layers and its transparency.
- Confirm: Click "OK" to apply the stroke.
Changing Shape Color
If you're working with a basic shape layer (not one filled with an image via clipping or vector mask), changing its color is straightforward.
- Select the Shape Layer: Click on the shape layer in the Layers panel.
- Open Color Picker: Double-click the layer's thumbnail. This will open the Color Picker, allowing you to select a new fill color. As you click on different colors, you'll see a live preview of how the shape will look.
- Confirm: Click "OK" to apply the new color.
If you need to change the color of a shape that has been converted to a vector mask or is part of a clipping mask, you would typically adjust the fill color of the original shape layer before it was converted or clipped, or you would edit the content of the vector mask itself if it allows for color manipulation. For basic shapes drawn with the Custom Shape Tool, you can also click the shape's fill color swatch in the Options Bar.
Refining and Exporting Your Shaped Image
After inserting and styling your shape, you might want to refine the composition further.
Adjusting the Background
You can easily change the background color behind your shape.
- Add a Solid Color Fill Layer: Go to Layer > New Fill Layer > Solid Color. This will create a new layer above your currently selected layer. Ensure this new fill layer is positioned directly above your original background layer (or below your shape layer if you want the shape to overlay the colored background).
- Choose a Color: The Color Picker will open, allowing you to select your desired background color. You can even use the Eyedropper tool within the Color Picker to sample a color directly from your image or shape for a harmonious look.
Removing Background for Transparency
If you intend to use your shaped image on various backgrounds, removing the existing background and preserving transparency is key.
- Delete Unnecessary Layers: Hide or delete any background layers or solid color fill layers you no longer need. This will reveal transparency, represented by a checkerboard pattern in Photoshop.
- Trim Transparent Pixels: To remove excess transparent space around your shape, go to Image > Trim. In the Trim dialog box, ensure "Transparent Pixels" is selected at the top. Then, check the boxes for "Top," "Bottom," "Left," and "Right" at the bottom to remove all surrounding transparency. Click "OK."
- Save with Transparency: To retain transparency, you must not save the file as a JPEG, as this format does not support transparency. Instead, choose File > Save As or File > Save a Copy and select the PNG format. PNG files preserve transparency. Give your file a name and choose a save location.
By mastering these techniques, you can effectively insert, manipulate, and stylize shapes within Photoshop, opening up a world of creative possibilities for your design projects. Whether you're a beginner learning the basics or an experienced user looking to refine your workflow, understanding the nuances of shape tools, clipping masks, and vector masks will significantly enhance your Photoshop capabilities.