Changing the color of text in Adobe Photoshop is a fundamental skill for designers, photographers, and digital artists alike. Whether you're aiming for enhanced readability, conveying specific emotions, or reinforcing a brand identity, the ability to manipulate text color is crucial. This guide will walk you through the various methods for changing text color in Photoshop, addressing common issues and offering advanced techniques to elevate your designs.
Understanding the Basics: Applying a New Color to Text
The most straightforward way to alter text color in Photoshop involves using the Type Tool and the Character panel. This method is ideal for applying solid, consistent colors to your text.
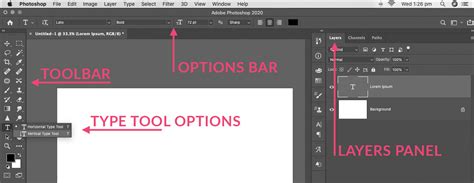
First, ensure you have text on your canvas. If not, select the Horizontal Type Tool (shortcut: T) from the toolbar. Click anywhere on your image to create a text cursor. You can then type your desired text. For more control over text layout, you can click and drag to create a text box before typing. Once your text is entered, commit the changes by clicking the checkmark (✔) in the options bar.
With your text layer active, the next step is to access the color selection. You can do this in a couple of ways:
- Using the Options Bar: When the Type Tool is selected and your text layer is active, you'll see a color swatch in the options bar at the top of the Photoshop interface. Click this swatch to open the Color Picker.
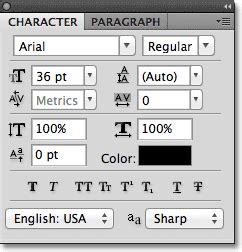
- Using the Character Panel: For more comprehensive text formatting options, open the Character panel by going to Window > Character. Within this panel, you'll find a prominent Color box. Clicking this box will also bring up the Color Picker.
Once the Color Picker is open, you have several options for selecting your new text color:
- Default Colors: Choose from the spectrum of colors presented.
- Hexadecimal Value: If you have a specific color code (e.g., from a brand guide), you can enter its hexadecimal value directly into the # field.
- Sample from Image: To create a cohesive design, you can use the Eyedropper Tool (shortcut: I) to pick colors directly from your image. This ensures your text color complements the overall composition. A handy shortcut for this is to temporarily switch to the Eyedropper tool while the Type tool is selected by holding down Alt (Windows) or Option (Mac).
After selecting your desired color, click "OK" in the Color Picker. If you want to apply the new color to specific words or characters rather than the entire text layer, you must highlight those letters first. With the Type Tool active, click and drag your cursor over the text you wish to modify. Then, open the Character panel or click the color swatch in the options bar and select your new color. This will apply the new color only to the highlighted portion.
Addressing Common Issues: Text Stays Black or Gray
It's a common frustration when new text or attempts to change existing text color result in black or shades of gray, despite following the standard procedures. Several factors can contribute to this behavior.
Image and Document Settings
One frequent culprit is the image mode or document color settings. If your image is set to a mode like Grayscale or if the document was created with specific bit depth settings, it can restrict color choices.
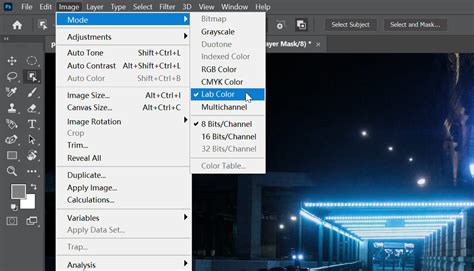
- Color Mode: The user mentioned their image settings are RGB and 32 bits. While RGB is generally good for digital displays, sometimes older versions of Photoshop or specific workflows might default to or be set to CMYK, which has a different color gamut. If you're experiencing persistent issues with color not appearing as expected, check your Image > Mode settings. For most screen-based work, RGB Color is preferred.
- Bit Depth: The user's image is set to 32 bits. While 32-bit per channel offers a vast dynamic range, it can sometimes lead to unexpected behavior with certain tools or color selections, especially if other settings are not optimized for it. For standard text color manipulation, 8-bit or 16-bit per channel is usually more predictable and widely compatible.
If your document's color mode or bit depth is not what you intend, you have two primary options:
- Create a New Document: The simplest solution is often to create a new document and ensure the color mode is set to RGB Color and the bit depth is set to 8-bit or 16-bit from the outset. You can then copy your text into this new document.
- Change Existing Document Settings: You can change the color mode and bit depth of an existing document. Navigate to Image > Mode. Here, you can select RGB Color. You can also adjust the bit depth under Image > Mode > 8 Bits/Channel or 16 Bits/Channel. Be aware that changing these settings can sometimes affect the overall appearance of your image, so it's advisable to do this on a duplicate of your file or if you understand the implications.
Layer Styles and Overlays
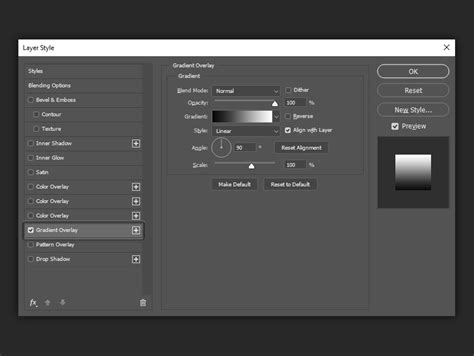
Another common reason for text not appearing in the chosen color is the presence of Layer Styles, particularly a Color Overlay.
If you've applied a Layer Style to your text layer, it can override the color selected in the Character panel. To check for and adjust this:
- Locate the Text Layer: In the Layers panel, find your text layer.
- Open Layer Styles: Double-click directly on the text layer (but not on the thumbnail or name). This will open the Layer Style dialog box.
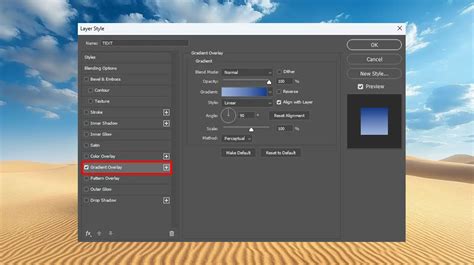
- Check for Color Overlay: In the Layer Style settings, look for Color Overlay in the list on the left. If it's checked, it means a color overlay is active.
- Adjust or Remove: You can change the color by clicking the color swatch within the Color Overlay options, or you can uncheck the Color Overlay option entirely to revert to the color set in the Character panel.
Rasterized Text Layers
If your text layer has been rasterized, it means it has been converted from editable vector text into pixels. Once rasterized, you can no longer directly change its color using the Type Tool or Character panel.
If you discover your text has been rasterized (you won't see the "T" icon next to the layer in the Layers panel, and the text itself will be pixels), you'll need to edit its color differently:
- Use the Paint Bucket Tool: Select the Paint Bucket Tool (often grouped with the Gradient Tool). Ensure the text is selected (e.g., by loading its selection from the layer mask if available, or by making a selection around it). Then, choose your desired color and click within the selected text area to fill it with that color. This is a destructive method, so it's best used on a duplicate layer or when you're certain you won't need to edit the text as live text again.
- Recreate the Text: The most robust solution is to delete the rasterized text layer and create a new text layer using the Type Tool.
Rebooting and Program Settings
Sometimes, software glitches can occur. A simple reboot of the Photoshop program or even your computer can resolve temporary issues. Additionally, ensure your Photoshop preferences are not set in a way that might interfere with color selection.
Advanced Techniques for Text Color Manipulation
Beyond basic color changes, Photoshop offers powerful tools for more creative text styling.
Layer Styles for Gradients and Effects
Layer Styles are incredibly versatile for transforming text appearance. To access them, double-click your text layer in the Layers panel.
- Gradient Overlay: Instead of a solid color, you can apply a gradient to your text. Select Gradient Overlay in the Layer Style dialog. You can then choose from pre-set gradients, create your own, adjust the angle, scale, and blending mode of the gradient. This is how you can achieve gradient text effects.
- Other Styles: Explore other options like Color Burn, Color Dodge, Inner Shadow, Outer Glow, and Bevel & Emboss to add depth, texture, and visual interest to your text.
Sampling Colors Directly from Your Image
As mentioned earlier, the Eyedropper tool is invaluable for creating harmonious designs. When working with an image that has a specific color palette, sampling directly from the image ensures your text color will blend seamlessly.
- While Typing: With the Type Tool selected, hold Alt (Windows) or Option (Mac) to temporarily activate the Eyedropper. Click on any color in your image to make it the active foreground color, which will then be applied to your text.
- From the Color Picker: Even when the Color Picker is open, you can move your cursor outside the picker and onto your image to sample colors.
Using Blending Modes
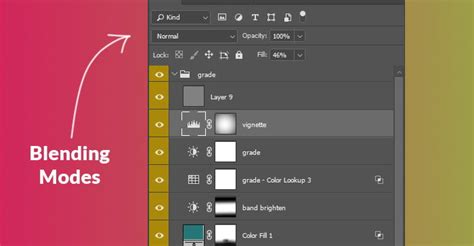
Experimenting with Blending Modes on your text layer can create unique and dynamic color effects. Blending modes determine how a layer's pixels interact with the pixels of the layers below it.
- Select your text layer in the Layers panel.
- At the top of the Layers panel, you'll see a dropdown menu that usually says "Normal." This is the blending mode dropdown.
- Try different modes like Multiply, Screen, Overlay, or Soft Light to see how they alter the appearance of your text color in relation to the background.
Non-Destructive Editing with Adjustment Layers
For maximum flexibility, use Adjustment Layers to modify text color. This approach is non-destructive, meaning you can easily tweak or remove the effect later without permanently altering the original text layer.
- Create your text layer and apply a base color.
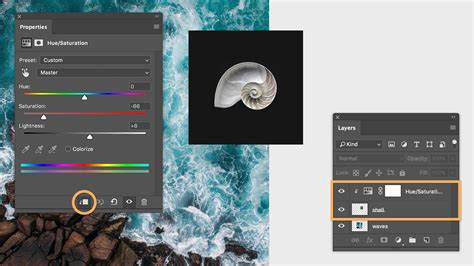
- Go to Layer > New Adjustment Layer and choose an appropriate adjustment, such as Hue/Saturation, Color Balance, or Solid Color (if you want to tint the text).
- Clip the Adjustment Layer: To ensure the adjustment layer only affects your text layer, right-click on the adjustment layer in the Layers panel and select Create Clipping Mask. Alternatively, hold Alt (Windows) or Option (Mac) and click on the line between the adjustment layer and the text layer in the Layers panel.
- Now, you can adjust the properties of the adjustment layer (e.g., change the hue, saturation, or apply a new color fill) to modify your text's appearance.
Video Tutorial Recommendation
For a visual demonstration of these techniques, consider a video tutorial on "Advanced Text Effects in Photoshop" or "Creating Gradient Text in Photoshop." Such a video would visually guide users through opening files, selecting tools, applying layer styles, and using blending modes, making the concepts easier to grasp.
Easy Photoshop Trick
Mastering text color in Photoshop is an ongoing process of exploration and practice. By understanding the basic tools and delving into advanced features like Layer Styles and Adjustment Layers, you can ensure your text not only looks good but also effectively communicates your intended message and enhances your overall design. Remember to always prioritize readability and ensure your chosen colors complement your design's aesthetic and purpose.