Rendering and exporting are the crucial final stages in video creation, transforming your meticulously edited project into a shareable, watchable file. For newcomers to DaVinci Resolve, or those working with extensive projects, this process can initially seem daunting. However, with a clear understanding of the steps involved and common troubleshooting techniques, mastering this essential skill becomes significantly more manageable with practice. This guide will walk you through the intricacies of exporting DaVinci Resolve videos, addressing common render issues, and providing solutions to ensure a smooth and successful workflow.

Understanding the Fundamentals of Video Exporting
Before diving into the specifics of DaVinci Resolve, it's important to grasp the core concepts of video exporting. Essentially, exporting is the process of converting your project file into a format compatible with various devices and platforms. The quality of the final output is heavily influenced by the settings you choose during this stage, making it indispensable to familiarize yourself with the options DaVinci Resolve offers.
Video Formats and Codecs: The Building Blocks of Your Export
When you export a video, you'll need to select both a file format and a codec. The file format acts as a container for the various components of a video file, such as video streams, audio streams, and subtitles. Common formats include MP4, MOV (QuickTime), and AVI.
The codec, on the other hand, refers to the software or algorithm used to compress and decompress the video and audio data. This is where the balance between quality and file size is struck. Some codecs are designed for lossless compression, preserving the original quality but resulting in larger files. Others employ lossy compression, which can significantly reduce file size by discarding some data, though the impact on perceived quality can be minimal for most applications.
- MP4: A widely adopted format that offers a good balance between quality and file size, making it ideal for web uploads, YouTube, and social media. DaVinci Resolve typically exports MP4 files using H.264 or H.265 codecs.
- QuickTime (MOV): Another popular format, often favored for high-quality exports. It's frequently used with codecs like DNxHD/DNxHR and ProRes, which are common in professional workflows.
For general web use and social media, exporting as MP4 or QuickTime with the H.265 codec is often recommended due to its efficiency. If you're unsure about the best choice for your project, understanding the nuances between MP4 vs. MOV can provide further clarity.
Resolution and Frame Rate: Defining Your Video's Dimensions and Motion
Two critical settings that significantly impact your video's visual fidelity are resolution and frame rate.
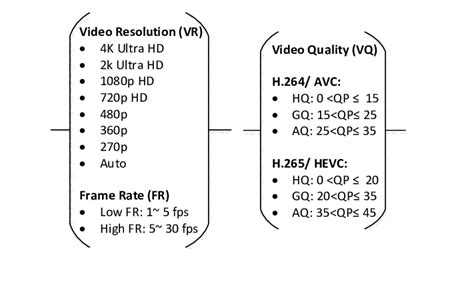
- Resolution: This refers to the number of pixels displayed on the screen, dictating the overall clarity and detail of your video. Common resolutions include 720p (HD), 1080p (Full HD), 1440p (2K), and 2160p (4K). It's crucial to export at a resolution that matches or is appropriate for your source footage. Attempting to export at a higher resolution than your timeline or source material will not enhance quality and may lead to errors. To check your timeline's resolution, navigate to the Media tab, right-click your timeline, and select "Timeline Settings."
- Frame Rate: Measured in frames per second (fps), the frame rate determines the smoothness of motion in your video. Higher frame rates, such as 60 fps, result in more fluid playback, particularly for fast-moving action. Standard frame rates include 24 fps (cinematic), 25 fps (common in Europe), and 30 fps. It's essential to ensure your project, timeline, and export settings all align in terms of frame rate. DaVinci Resolve, like many editing systems, does not natively handle variable frame rate (VFR) footage well. If your source footage is VFR, it's advisable to convert it to a fixed frame rate using a tool like Shutter Encoder before importing it into Resolve to avoid sync issues.
How to Render and Export Your Video in DaVinci Resolve
DaVinci Resolve offers two primary methods for exporting your projects: Quick Export and the more detailed Deliver tab.
Quick Export: The Fast Track to Rendering
For a swift export with preset settings, DaVinci Resolve provides a "Quick Export" option. This is accessible via "File > Quick Export." The software will present a selection of common export presets, allowing you to choose the one that best suits your needs and then proceed with the export. While convenient, this method offers less control over the finer details of the export process.
DaVinci Resolve 20 Quick Tip: Fast Export Presets!
The Deliver Tab: Granular Control Over Your Exports
The Deliver tab is where you gain full control over every aspect of your video export. This dedicated page in DaVinci Resolve allows for precise customization of formats, codecs, resolutions, and more.
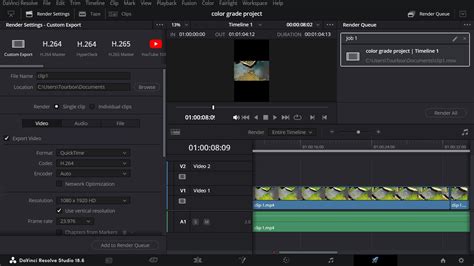
Navigating the Deliver Tab Interface
Upon entering the Deliver tab, you'll encounter several key areas:
- Render Settings (Top-Left): This panel is your command center for defining all export parameters, including video format, codec, resolution, audio settings, and quality.
- Preview Window and Timeline (Center): Here, you can scrub through your timeline and preview your project to ensure everything is as intended before rendering. You can also set In and Out markers to define specific sections of your timeline for export.
- Render Queue (Top-Right): This panel lists all the export jobs you've added. You can manage multiple exports simultaneously and initiate the rendering process from here.
Step-by-Step Export Process in the Deliver Tab
Select the Deliver Tab: Click the "Deliver" icon, typically represented by a rocket, located in the bottom panel of the DaVinci Resolve interface.
Choose a Preset or Custom Export: In the Render Settings panel, you can either select a pre-configured preset optimized for platforms like YouTube or social media, or choose "Custom Export" to manually define all your settings. While presets are convenient, custom export often yields superior results by allowing you to tailor settings precisely to your project's requirements.
Set Filename and Destination Location: Assign a descriptive name to your video file and choose the specific folder on your computer where DaVinci Resolve will save the exported video.
Select Video Format and Codec: This is a critical step that determines the container and the compression method for your video and audio.
- Format: Choose your desired container format (e.g., MP4, MOV).
- Codec: Select the codec that will compress your video and audio data (e.g., H.264, H.265, DNxHD). For online content, H.264 and H.265 are highly recommended. For professional, high-quality masters, codecs like DNxHR or ProRes are often preferred.
Choose Resolution and Frame Rate: Ensure these settings precisely match your timeline's resolution and frame rate. Exporting at a higher resolution than your timeline will not improve quality and can cause errors. Conversely, exporting at a lower resolution will downscale your footage. To verify your timeline settings, go to the Media tab, right-click your timeline, and select "Timeline Settings."
Restrict the Bitrate (Quality Settings): The bitrate dictates the amount of data used per second of video, directly impacting both quality and file size.
- To control this, check the "Restrict to" box in the Quality section and input your desired bitrate. A higher bitrate generally means better quality but a larger file.
- YouTube's Recommended Bitrates (SDR):
- 2160p (4K): 35,000â45,000 kb/s (30 fps & under), 53,000â68,000 kb/s (over 30 fps)
- 1440p (2K): 16,000 kb/s (30 fps & under), 24,000 kb/s (over 30 fps)
- 1080p: 8,000 kb/s (30 fps & under), 12,000 kb/s (over 30 fps)
- 720p: 5,000 kb/s (30 fps & under), 7,500 kb/s (over 30 fps)
- Experimenting with different bitrate values is key to finding the optimal balance for your specific footage and intended platform. A common recommendation for achieving a good balance between quality and file size for general web use is to double the frame rate and add three zeros to determine an approximate optimal bitrate. For example, for a 30fps video, a bitrate around 60,000 kb/s might be a good starting point.
Add to Render Queue: Once all settings are configured, scroll down and click "Add to Render Queue." This places your export job in the queue for processing.
Select Render All: In the Render Queue window, click "Render All" to begin the export process. DaVinci Resolve will then process your project, which can take time depending on the video's length, resolution, and complexity. Always review the exported file thoroughly to ensure there are no unexpected issues.
Advanced Export Settings and Considerations
- Optimized Media and Render Cache: For smoother playback during editing and potentially more stable renders, especially with complex projects, consider generating "Optimized Media" or using the "Render Cache." You can access these options in the Media or Edit tabs by right-clicking on your media files or timeline sections and selecting "Generate Optimized Media" or "Render Cache." This pre-renders computationally intensive parts of your timeline.
- Individual Clips vs. Entire Timeline: DaVinci Resolve allows you to render individual clips or the entire timeline. While rendering the entire timeline is standard, you might need to export individual clips for specific client requests or to create lower-resolution proxies for editing on less powerful machines.
- Chapters from Markers: For platforms like YouTube, you can utilize markers on your timeline to create chapter divisions in your exported video, improving viewer navigation.
- Render In and Out Range: Instead of rendering the entire timeline, you can define specific sections to export using the "Render In and Out Range" option, accessed by setting In (I) and Out (O) points on your timeline. This is useful for exporting short segments, such as a single scene for a showreel. You can add multiple In/Out ranges to the render queue, and they will be rendered as separate files.
- Audio Settings: Ensure your audio settings are correctly configured. Common audio codecs include AAC and PCM. The sample rate should ideally match your project's settings, often 48 kHz. If you need to export without audio, you can deselect the "Export Audio" checkbox.
Troubleshooting Common Render Issues in DaVinci Resolve
Even with careful setup, you might encounter problems during the rendering process. Here are solutions to some of the most frequent issues:
The Render Fails or Stops Halfway Through
This is a common error that can stem from several causes:
- Corrupted Media or Effects: The render might stop at a specific point due to a problematic media file or a complex effect/transition.
- Solution: Note the exact point where the render fails. Locate this section in your timeline, try replacing the suspect media clip, or temporarily disable effects and transitions in that area and attempt to re-render.
- Insufficient Disk Space: If your hard drive runs out of space during the export, the render will halt.
- Solution: Ensure you have ample free space on the drive designated for your export. It's also a best practice to render to a separate, dedicated drive, ideally an SSD, rather than your system drive.
- Software Glitches: Temporary software issues can sometimes cause renders to fail.
- Solution: Restart DaVinci Resolve and your computer, then try rendering again.
Audio and Video Are Out of Sync
If your exported video's audio doesn't align with the video, consider these possibilities:
- Corrupt Audio Clips: Damaged audio files can cause sync problems.
- Solution: Re-import your audio files or convert them to a different, more compatible format (e.g., WAV).
- Frame Rate Mismatches: Inconsistent frame rates across your project, timeline, and export settings are a frequent culprit. VFR footage is particularly problematic.
- Solution: Verify that your project, timeline, and export settings all use the same, fixed frame rate. Convert any VFR footage to a fixed frame rate using an external application before importing.
- Outdated Software or Incompatible Codecs: Using an older version of DaVinci Resolve or incompatible audio/video formats can lead to sync issues.
- Solution: Update DaVinci Resolve to the latest version. Ensure you're using codecs and audio file formats that are well-supported by Resolve.
- Manual Sync Adjustment: If all else fails, you may need to manually adjust the audio and video clips in the timeline to re-align them.
Render Artifacts Appear in the Final Video
Artifacts like glitches, color shifts, or black screens indicate a problem during the rendering process:
- Codec Issues or Insufficient Processing Power: Certain codecs can be more prone to artifacts if your computer struggles to handle the rendering load.
- Solution: Try exporting with a different codec or format. If your system is underpowered, explore optimizing Resolve's performance or consider using optimized media. Ensure your graphics card drivers are up-to-date.
- Rendering Using Optimized Media: As mentioned earlier, generating optimized media can sometimes resolve rendering artifacts by providing Resolve with more easily processable files.
- Solution: In the Media or Edit tab, select your media in the Media Pool, right-click, and choose "Generate Optimized Media."
There's No Sound in the Exported File
A missing audio track in your final export is a common frustration:
- Missing or Incorrect Audio Tracks: Double-check that your audio tracks are correctly imported and enabled in your project.
- Incorrect Audio Output Settings: In the Deliver tab, verify that your audio output settings are configured correctly and that you are using a supported audio codec.
- Project Settings Mismatch: Ensure your project settings align with the audio format you intend to export.
The File Size is Larger Than Expected
If your rendered file is significantly larger than anticipated:
- Bitrate Set Too High: The most common reason for unexpectedly large file sizes is an excessively high bitrate.
- Solution: Lower the bitrate in the Quality settings of the Deliver tab. Experiment with values that offer a better balance between quality and file size, such as 20,000 kb/s for 1080p footage, or adjust based on the platform's recommendations.
Enhancing Your DaVinci Resolve Workflow
Mastering the rendering and exporting process is a significant step in your video editing journey. To further elevate your skills and projects, consider exploring DaVinci Resolve's extensive capabilities. This includes utilizing intro templates, plugins, learning essential keyboard shortcuts, and delving deeper into advanced color grading techniques. For professional-grade assets to complement your videos, platforms like Envato Elements offer unlimited downloads of digital assets, including templates, stock footage, and music, empowering you to create polished and engaging content.