DaVinci Resolve offers a powerful and flexible editing environment, designed to adapt to your unique workflow. The ability to customize the User Interface (UI) layout is a cornerstone of this flexibility, allowing editors to arrange panels, windows, and tools in a way that maximizes efficiency and minimizes friction. Whether you're looking to create specialized layouts for specific tasks or simply want to revert to a clean slate, understanding how to manage your DaVinci Resolve workspace is essential for a seamless creative process. This guide will walk you through the methods of saving, loading, updating, and resetting your UI layouts, as well as how to undock specific panels for a more personalized setup.
The Importance of a Tailored Workspace
In the realm of video editing, efficiency is paramount. When your tools work flawlessly, creativity flows naturally, unhindered by tedious technicalities. DaVinci Resolve's customizable interface ensures that you're not bogged down by unnecessary elements or struggling with a layout that doesn't suit your particular needs. By tailoring the UI, you can bring your ideas to the screen without limits, focusing on the artistic and narrative aspects of your project rather than fighting with your software. This approach eliminates the frustration of building everything from scratch across different tools, providing a one-stop solution for your editing endeavors.
Saving Custom Screen Layouts
As you become more familiar with DaVinci Resolve, you'll likely discover that certain panel arrangements are more conducive to specific tasks. For instance, a layout optimized for color grading will differ significantly from one designed for audio mixing. DaVinci Resolve allows you to save these personalized arrangements as "Layout Presets," ensuring you can quickly recall them whenever needed.
Methods of working with custom screen layouts:
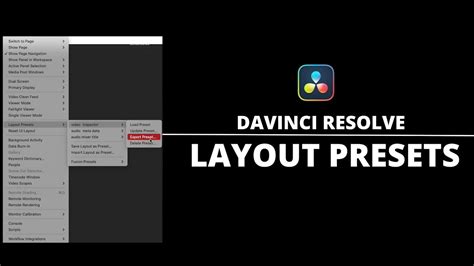
To save a custom screen preset: The process begins with customizing the various pages of DaVinci Resolve for the purpose at hand. This involves resizing panels, docking or undocking elements, and arranging windows to your preference. Once you've achieved your ideal configuration, navigate to the menu bar at the top of the window. Click on "Workspace," then select "Layout Presets," and finally choose "Save Layout As Preset." A dialog box will appear, prompting you to enter a descriptive name for your preset. Click "OK" to save it. This action preserves your current workspace configuration, allowing for quick recall.
To choose a previously saved screen preset: When you need to switch to a specific layout you've previously saved, the process is just as straightforward. Go to "Workspace," then "Layout Presets." You will see a list of your saved presets. Simply click on the name of the layout you wish to load. DaVinci Resolve will then instantly reconfigure your interface to match that saved preset.
To update a previously saved screen preset: Sometimes, you might make minor adjustments to a saved layout and want to incorporate those changes into the existing preset rather than creating a new one. To do this, first load the layout you intend to modify by following the steps above. Once loaded, make your desired changes to the interface. Then, go back to "Workspace" > "Layout Presets." Select the name of the current layout from the submenu, and then choose "Update Preset." This action will overwrite the previously saved version with your updated configuration.
To delete a screen preset: If you find that a particular layout preset is no longer relevant or you simply wish to declutter your list of presets, you can easily delete it. Navigate to "Workspace" > "Layout Presets." Find the name of the preset you wish to remove and select it. Then, choose the "Delete Preset" option from the submenu.
To export a screen preset for use on another DaVinci Resolve installation: For users who work across multiple workstations or collaborate with others, exporting and importing layout presets is invaluable. To export a preset, load it first. Then, go to "Workspace" > "Layout Presets," select the preset's name, and choose "Export Preset." This will generate a file that you can then transfer to another computer.
To import a screen preset: On a different DaVinci Resolve installation, you can import a preset file that has been exported. Go to "Workspace" > "Layout Presets" and select "Import Layout as Preset." Browse to the location of your exported preset file, select it, and click "Open." The imported preset will then be available in your list of saved layouts.
Resetting to the Default Layout
Despite the benefits of customization, there may be times when you want to return your DaVinci Resolve interface to its original, default state. This could be due to a variety of reasons, such as experimenting with new layouts and getting lost, encountering unexpected interface behavior, or simply wanting a fresh start. Fortunately, resetting the UI layout is a quick and simple process.
If you don’t like the current layout and you want to go back to the default, choose "Workspace" > "Reset UI Layout." This function is especially helpful if you want to experiment with the user interface or quickly revert to the original layout after making an adjustment that you don't like. Resetting the UI layout can also solve problems caused by faulty customizations or layout issues.
Key Takeaways for Resetting UI Layout:
- Resetting the UI layout in DaVinci Resolve is easy and quick to do.
- You can restore the user interface to its original state when you first installed the program.
- This method is helpful for troubleshooting disruptions or layout issues.
Steps to Reset the UI Layout:
Open Workspace Menu: To reset the UI layout, first open the "Workspace" menu in DaVinci Resolve. You can find the "Workspace" label in the menu bar at the top of the window. Clicking on it will open a dropdown list with various options.
Select Reset UI Layout: After opening the Workspace menu, you will see several options. Look for the "Reset UI Layout" option. This is the function we need to reset the user interface back to the default view.
Confirm and Reset: Once you have selected "Reset UI Layout," the layout will be reset immediately. This means that any adjustments you may have made will be lost, and the user interface will look as it did when you first started the program.
Check the Reset Layout: To ensure that your UI layout has been successfully reset, take a look at the user interface. It should now display all standard components in their original arrangement.
Make Further Adjustments: If you wish to make additional adjustments after the layout has been reset, you can do so now. Try out different layouts and settings until you are satisfied with the user interface.
Undocking Specific Panels of the Interface
Beyond saving entire screen layouts, DaVinci Resolve also offers the ability to undock individual panels, allowing them to float as separate windows. This is particularly useful for multi-monitor setups or for isolating specific tools for easier access.
There are certain interface elements that can either be docked in their respective pages, or opened in separate windows. For instance, Media Pool bins can be opened into floating windows simply by right-clicking on the bin and choosing "Open As a New Window" in the contextual menu. Even though you’re opening up the contents of the selected bin, you’re really creating another Media Pool, complete with Bin list, Browsing area, and all of the organizational controls found in the docked Media Pool. You can have as many floating Media Pools as you like, providing a highly flexible way to manage your media assets.
QUICK TIP: Customize AND Save your Workspace in Davinci Resolve 20!
This capability extends to other panels as well, offering a dynamic way to organize your workspace. By strategically undocking and repositioning panels, you can create an editing environment that precisely matches your workflow, ensuring that all the tools you need are readily accessible without cluttering your primary editing screen. This level of control empowers editors to work more intuitively and efficiently, transforming the editing process from a series of technical steps into a fluid, creative flow.