Photoshop offers a powerful toolkit for digital artists and photographers, and mastering its brush features is essential for creating compelling imagery. Hair, in particular, can be one of the most challenging elements to render realistically, requiring meticulous attention to detail, subtle variations in color, length, and flow. Fortunately, Photoshop provides a versatile approach to tackling these complexities, enabling users to reproduce intricate hair details with custom brushes and advanced techniques. This guide delves into the creation and application of Photoshop brushes specifically for hair, from simple presets to sophisticated masking and retouching workflows.
Creating Custom Hair Brushes from Scratch
The foundation of effective hair rendering in Photoshop often lies in custom brushes. These can be as simple or as complex as needed, allowing for a tailored approach to various hair types and styles. The process begins with defining brush presets from basic shapes.
The Single Hair Strand Brush
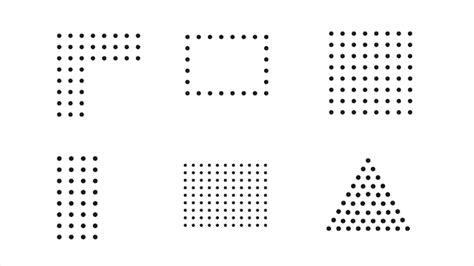
To begin crafting a foundational hair brush, start by creating a new, large, empty white canvas. Using a semi-hard round brush set to black, paint five or six dots of varying sizes and in close proximity to each other. This cluster of dots will form the basis of our single hair strand. To convert this shape into a brush preset, hold down the Control key and click on the layer icon of the painted dots. This action generates a selection. Navigate to Edit > Define Brush Preset to save your newly created brush. This simple brush can now be used to paint individual hair strands, laying the groundwork for more complex hairstyles.
The Curly Hair Brush
For more dynamic hair effects, such as curls, a different approach is needed. Return to your blank white canvas and create a new layer. Stamp a larger, hard round black dot. The goal is to create a 1 to 2-pixel crescent moon shape. Similar to the single strand brush, hold down Control and click the layer icon of the crescent moon shape to create a selection. Then, use the Crop tool to trim the canvas to the exact size of the selection. This crescent shape, when used as a brush, can effectively mimic the curve of a single curl. When painting with this brush, don't hesitate to increase its size; it scales remarkably well.
The Wavy Hair Strand Brush
To capture the essence of stray hairs or finer, wavy strands, a different shape is required. On a fresh blank canvas, paint an S-like shape on a new layer. This shape should be elongated and less tightly curved than a typical curl. Once satisfied with the form, use the Control-click method on the layer icon to create a selection, and then employ the Crop tool to fit the canvas to this selection. When using this brush, you may find it beneficial to adjust the brush settings. Experimenting with increased spacing or a small amount of scatter can help create a more natural, dispersed effect, ideal for flyaway hairs.
How to Create Your Own Photoshop Brushes
The best Photoshop brush for hair is one that offers significant variation. Therefore, it is highly recommended to create multiple versions of brushes for the same hair type. Experimenting with different shapes and brush settings will yield a more comprehensive and realistic hair painting toolkit. The principle is that you can never have too many hair strand brushes in Photoshop.
Advanced Hair Masking and Retouching Techniques
Beyond creating custom brushes, Photoshop offers sophisticated methods for hair selection and manipulation, particularly crucial for tasks like silhouetting hair against complex backgrounds.
Tackling Difficult Hair Selections
One of the most challenging aspects of hair editing is isolating it when there's low contrast between the hair and the background. In such scenarios, traditional selection methods like using channels or the Refine Edge tool may prove insufficient. This necessitates a more hands-on approach, where custom hair brushes become instrumental in painting a natural-looking mask.
When faced with a subject like a blonde with frizzy hair against a similarly colored wall, the lack of contrast makes precise selection difficult. Standard selection tools struggle to differentiate fine hair strands from the background. This is where the artistic interpretation and careful application of hair brushes come into play.
The Process of Painting a Custom Hair Mask
The process often involves starting with a rough selection of the main body of the subject, carefully excluding the hair. For the hair itself, the initial selection should focus on the solid interior parts, avoiding areas where the background might show through. It's crucial not to rely solely on automated selection tools like Refine Edge, as they may fail to capture the delicate edges of the hair.
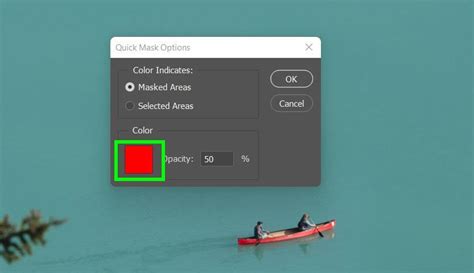
Utilizing Quick Mask Mode: Quick Mask Mode is an invaluable tool for this intricate work. It allows you to visualize your selection as a pixel overlay, typically in a color like green. Areas painted in green are selected, offering a much clearer view of fine details and soft edges compared to the standard "marching ants" selection marquee. When working on tricky hair selections, zooming in within Quick Mask Mode provides the accuracy needed to precisely define the mask.
Painting Towards the Edge: Begin painting from the interior of the hair mass towards its edges. This method gradually expands the colored selection to encompass the hair. It's vital to avoid painting over areas where the background is partially visible. If you inadvertently select background areas, you can switch your foreground color to white (by pressing the 'X' key) and paint over the unwanted selections to deselect them.
Employing Hair Brushes for Fine Details
Once the basic mask is established, hair brushes are used to refine the edges and add realistic flyaways. This technique requires practice and an artistic vision to achieve professional, photo-realistic results. A graphics tablet, such as a Wacom, significantly enhances control and precision during this process.
It's important to understand that hair brushes often work best additively. Instead of erasing, you're building up the hair detail. Therefore, it's advisable to stay within the perceived boundaries of the hair and work your way towards the outermost edges.
Brush Selection and Application: Different hair brushes will yield varied results. Experiment with brushes designed for frizzy hair, painting from the inner hair strands outwards to the very edge. Be mindful of not extending beyond the hair's natural boundaries, as dark lines from the background might become visible.
To achieve a natural look, use a variety of brushes and avoid over-densifying any single area during the initial passes. For larger curls and more defined flyaways, a Soft Round brush might be more suitable. These brushes are often best used by clicking once to stamp a specific hair, rather than dragging, especially when they are set to scatter.
Varying Brush Settings: Remember to switch between different brushes, such as denser options like "93" and "263," and vary their size and placement. This variation is key to creating believable, organic-looking hair. The default scattering of many hair brushes can be beneficial, but direct stamping often provides more control for specific strands.
Refining the Layer Mask for Realism
After painting in the hair details with custom brushes, the resulting mask might appear too sharp. To achieve a more natural integration with the background, the edges of the mask need to be softened.
Toning Down Sharpness: Adjust the brush size as needed and paint over areas where the frizzy hair looks too crisp against the background. The goal is to match the softness of focus present in the original photograph. Avoid uniform blurring; realism lies in variation. Click around the edges of the hair to soften any areas that appear too bright, dark, or sharp.
Adjusting Opacity and Curves: If the hair mask appears too transparent or soft, a Curves adjustment (Cmd+M on Mac, Ctrl+M on Windows) can be used to brighten the midtones, adding more substance to the hair. Similarly, adjusting the brush opacity during the masking process can fine-tune the transparency of individual strands.
Correcting Color Casts
Sometimes, the hair may exhibit an undesirable color cast when placed against a new background. For instance, a slight greenish hue might appear near the model's hand. To correct this, select the affected area of hair with a brush and carefully apply color adjustments. It may take a few passes to build up the desired color correction.
Exploring Diverse Hair Brush Applications
The utility of Photoshop hair brushes extends beyond simple strand creation and complex masking. They are versatile tools for various artistic and retouching needs.
Flyaway Hair and General Hair Rendering
A dedicated hair drawing brush Photoshop set is perfect for creating quick and easy flyaway hairs, adding that final touch of realism to any hairstyle. These brushes can also be instrumental in rendering entire hairstyles, from fine strands to more voluminous locks.
Multi-Purpose Hair Brushes
Some hair drawing brush Photoshop packs are designed to be multi-purpose, capable of being used for painting hair, fur, and even grass. This versatility makes them a valuable addition to any digital artist's toolkit.
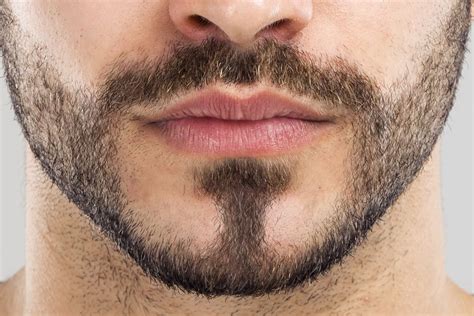
Facial Hair and Stylization
Specialized hair style brush Photoshop actions can focus on facial hair, allowing for the creation of instant, photo-realistic beards, mustaches, and other facial hair styles with just a click.
Hair Tufts and Soft Textures
For those seeking softer, more delicate hair elements, hair brush packs containing transparent PNG files of soft pastel hair tufts can be incredibly useful for adding subtle details.
Realistic Fur Rendering
The techniques used for hair rendering are often directly applicable to creating realistic fur. Photoshop hair paint brush sets designed for fur can help achieve lifelike textures for animal portraits or fantasy creatures.
Advanced Hair Manipulation and Retouching Workflows
Beyond basic brush usage, Photoshop offers advanced workflows for more complex hair retouching and manipulation.
Adding and Retouching Hair
Some tutorials focus on advanced tricks for adding, retouching, and manipulating hair in Photoshop. These workflows often combine general methods with the use of custom brushes for specific effects.
Creating a Base Layer: A common technique involves creating a new layer and adding a base color and tone from the existing hair in the image. This might initially look rudimentary but serves as a foundation for further refinement. Sampling different areas of the hair is crucial, as hair often exhibits multifaceted colors that vary across its length and texture.
Incorporating Custom Brushes: Once a base is established, custom hair brushes can be introduced. A critical step before painting or stamping with these brushes is to ensure the brush direction aligns with the natural flow of the hair in the image. This can often be achieved by rotating the brush using keyboard shortcuts (Shift with arrow keys) while previewing its placement.
Adding Variation and Realism: The process involves adding variation by resizing and rotating brushes for each stamp. This mimics the organic nature of hair, where strands naturally differ in angle and thickness. Using different brushes for different areas can further enhance realism.
Blending and Fine-Tuning: After adding hair with custom brushes, blending it seamlessly with the underlying image is essential. This can involve transforming the mask and hair layer, using warp tools to modify the shape, and adjusting the brightness of hair tips to match the surrounding strands. The tips of hair are often brighter than the portions closer to the scalp, so replicating this effect is key to realism.
Adding Noise and Blur: To further integrate the added hair, itâs important to account for the existing image's characteristics. If the original image has noise, the added hair should also have noise applied to prevent it from looking artificial. A slight blur can also help the added hair blend more naturally with the underlying image.
Utilizing Adobe Stock Assets
Photoshop tutorials often leverage Adobe Stock assets, providing sample files that users can download to practice the techniques learned. These assets can include images of individuals with challenging hair to select, allowing users to hone their masking and brushing skills.
Refining Layer Masks: Within the Select and Mask workspace, sliders and view modes (like "On Black") help refine layer masks, particularly for hair. Even if the initial mask isn't perfect, further refinement using brushes can yield better results.
Creating Hair Strands from Other Images: Sometimes, the most effective way to create realistic hair strands is by using hair from another image. Finding a photo with a solid background and good contrast with the hair is ideal. The Eyedropper tool (activated by holding Alt/Option) can be used in conjunction with the Brush tool to sample colors from this reference image and paint in new hair strands.
Color Variation is Key: A crucial tip when painting in hair is to avoid using a single color. Hair is inherently multifaceted, with each strand possessing slightly different hues. Constantly changing the colors you're painting with, based on the native colors in the image, is essential for creating believable hair.
Mastering Photoshop brushes for hair is an ongoing journey of practice and experimentation. By understanding the fundamental techniques for creating custom brushes and applying advanced masking and retouching workflows, artists can achieve increasingly realistic and compelling hair rendering in their digital creations. The ability to manipulate, modify, and highlight hair of all types â curly, straight, coily, or anything in between â is a testament to Photoshop's power as a creative tool.