Adobe Photoshop, a titan in the realm of digital imaging and graphic design, empowers creatives with unparalleled tools for image manipulation. However, this power comes with a significant appetite for storage space. Over time, Photoshop can accumulate a substantial amount of temporary files, cache data, and other operational remnants, leading to a noticeable drain on hard drive capacity. This guide delves into the intricacies of managing Photoshop's storage footprint, offering a detailed approach to clearing cache files and optimizing your system for smoother creative workflows. Understanding where and how Photoshop utilizes disk space is the first step towards reclaiming gigabytes and ensuring your system runs efficiently.
The Anatomy of Photoshop's Storage Consumption
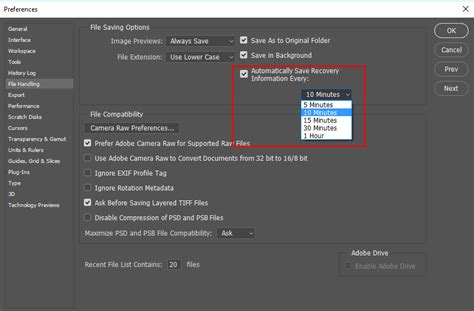
Photoshop's demand for disk space stems from several key operational aspects. Primarily, it relies on temporary files and auto-recovery data to safeguard your work and facilitate smooth operation. When you're actively editing, especially with large or complex files, Photoshop often needs more memory than your system's RAM can provide. In these instances, it designates a portion of your hard drive as a "scratch disk" to act as virtual memory. This process, while essential for handling demanding tasks, generates significant temporary data.
Furthermore, Photoshop generates cache files to enhance performance. These caches store frequently accessed data, allowing the software to retrieve it more quickly and reduce processing times. While beneficial for speed, these caches can grow considerably over time, especially with extensive use. The amount of space Photoshop consumes can fluctuate based on the version of the software, your specific usage patterns, and the complexity of the projects you undertake. For instance, a user frequently working with high-resolution images and numerous layers will naturally see a larger storage footprint compared to someone performing basic edits.
Proactive Storage Management: Installation and Updates
Before diving into clearing existing cache, it's crucial to consider proactive measures during the installation and maintenance phases. When installing Photoshop, pay attention to the installation options. Adobe often provides the ability to selectively install components or features. Choosing only the necessary elements and deselecting optional ones you don't require can significantly reduce the initial disk space usage.
The default installation location for Photoshop is typically the system drive. If you have multiple drives or partitions, consider choosing a custom installation location with more available space. This can prevent your primary system drive from becoming overburdened. Additionally, Photoshop includes language packs for numerous languages, which can consume a considerable amount of space. If you only work in one or a few languages, removing the unnecessary language packs can free up gigabytes.
Regular updates are also a vital part of managing Photoshop's storage. Adobe frequently releases updates that not only introduce new features and fix bugs but also often include performance optimizations that can indirectly affect how efficiently the software manages temporary files. Keeping Photoshop updated ensures you benefit from these improvements.
Clearing Photoshop's Internal Cache: The Purge Command
One of the most direct methods for freeing up space within Photoshop is by utilizing its built-in "Purge" command. This function allows you to systematically clear various types of temporary data that Photoshop stores.
To access this function, ensure Adobe Photoshop is closed. Then, navigate to the "Edit" menu at the top of the screen (on Windows) or the "Photoshop" menu (on Mac). Within the "Edit" menu, you will find an option labeled "Purge." Hovering over "Purge" reveals a submenu with several options:
- Clipboard: This clears any data you have copied within Photoshop that hasn't been pasted yet.
- Histories: This option removes all the recorded states in the History panel. While this allows for fewer "undo" steps, it can free up significant memory.
- Video Cache: If you work with video editing features in Photoshop, this clears the cache related to video playback.
- All: This comprehensive option purges all of the above categories simultaneously.
When you select any of these purge options, a dialog box will typically appear, asking for confirmation before proceeding with the deletion. Be aware that purging histories means you will lose the ability to undo actions beyond the current state.

Optimizing Performance Preferences for Storage and Speed
Beyond the immediate purge function, adjusting Photoshop's Performance Preferences can have a substantial impact on both storage usage and overall speed. Accessing these preferences is done through the "Edit" menu (Windows) or "Photoshop" menu (Mac), then selecting "Preferences," and finally choosing "General." Within the Preferences window, a dedicated section called "Performance" is where you'll find crucial settings.
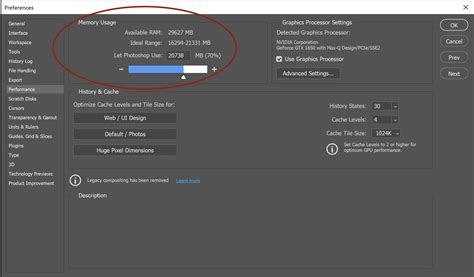
Memory Usage and History States
Within Performance Preferences, you can adjust the "Let Photoshop Use" slider, which controls the amount of RAM Photoshop is allocated. While allocating more RAM can improve performance, it's essential to strike a balance, leaving enough RAM for your operating system and other applications. A significant portion of temporary file creation is a direct consequence of insufficient RAM.
The "History States" setting determines how many previous actions Photoshop remembers, allowing you to "undo" steps. Each history state consumes memory and disk space. Lowering the number of history states can reduce the amount of memory Photoshop consumes and consequently decrease the reliance on scratch disk space for undo operations. For instance, reducing history states from 50 to 20 can offer noticeable savings.
Cache Levels and Graphics Processor
The "Cache Levels" setting affects the quality of image previews and how Photoshop handles image data. Lowering the cache levels can reduce disk space usage and potentially improve performance, especially on systems with slower storage. This setting influences the detail Photoshop renders for previews, and a lower setting means less data is held in the cache.
If your computer has a compatible graphics processor (GPU), ensuring the "Use Graphics Processor" option is enabled in the Performance Preferences is crucial. This offloads certain processing tasks to the GPU, which can significantly speed up operations and reduce the burden on your CPU and RAM, indirectly impacting temporary file generation.
Managing the Scratch Disk
Photoshop's scratch disk is a critical component for handling demanding tasks. It acts as virtual memory, extending your system's RAM by using hard drive space when original RAM is insufficient. By default, Photoshop often uses your system drive as the primary scratch disk. However, this can lead to performance issues and rapid disk space depletion, especially if your system drive is already crowded.
To manage this, you can assign multiple scratch disks or choose a different, faster drive with ample free space. Accessing this setting is done via "Edit" > "Preferences" > "Scratch Disks" (Windows) or "Photoshop" > "Preferences" > "Scratch Disks" (Mac).
If you have multiple drives, it's highly recommended to select the fastest available drive with the most free space. Ideally, this would be a Solid State Drive (SSD) or even an external high-speed drive like a Thunderbolt or RAID device. Dedicating a fast drive solely for scratch disk use can dramatically improve performance and mitigate "scratch disk full" errors. Ensure that any drive designated as a scratch disk has a substantial amount of free space; ideally, drives should never be above 85% capacity.
How To Fix Scratch Disk Error In Photoshop - Full Guide
Beyond Photoshop: Adobe Application Cache Files
While Photoshop itself can be a significant storage consumer, other Adobe applications within suites like Production Premium also generate cache and temporary files. The user's experience of their C drive growing from 46GB to 150GB after installing Production Premium, with 62GB of that accounted for by Photoshop, indicates the broader issue. The need to find an additional 100GB suggests that Premiere Pro, Bridge, and other associated applications are also contributing.
Adobe Bridge Cache
Adobe Bridge, a powerful asset management tool often bundled with Photoshop, maintains its own cache to speed up thumbnail generation and previewing. Clearing the Bridge cache is straightforward:
- Open Adobe Bridge.
- Go to "Edit" > "Preferences" (Windows) or "Bridge" > "Preferences" (Mac).
- Select the "Cache" tab.
- Click on "Purge Cache" or "Purge All Local Cache Files." This will remove cached preview data, freeing up space.
Other Adobe Application Files
For other Adobe applications like Premiere Pro, After Effects, or even Adobe Creative Cloud's own cache, the locations and methods for clearing can vary. These applications often store temporary files and caches in specific directories within your user profile or system library.
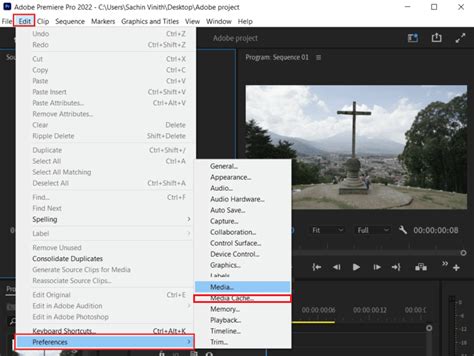
- Premiere Pro Cache: Premiere Pro's cache files, often significant in size, are typically found within media cache folders. These can be managed and purged directly from within Premiere Pro's preferences, under the Media Cache settings.
- Creative Cloud Cache: The Creative Cloud desktop application also maintains its own cache for downloads and updates. While less common as a primary space hog, it can be cleared through its own preferences or by manually deleting specific cache folders.
- Application Support Folders: A significant amount of Adobe's footprint can reside in the
/Library/Application Support/Adobe/directory on macOS, andC:\Program Files\Adobe\orC:\ProgramData\Adobe\on Windows. Within these folders, you'll find numerous subfolders for different applications, and some of these contain substantial cache files. For example,/Library/Application Support/Adobe/Adobe Photoshop 2023/AddOnModules/sensei_model_cacheon Mac can house large AI model cache files. Similarly,/Library/Application Support/Adobe/CameraRawcan contain extensive profile data. It is often possible to identify and delete specific versioned cache folders within these directories, but caution is advised to avoid deleting essential application files.
It's crucial to approach manual deletion of files within these directories with care. Incorrectly deleting core application files can lead to instability or prevent applications from launching. Always back up important data before undertaking manual file cleanup in these system-level folders.
Advanced Storage Optimization and Cleanup
Beyond the standard cache-clearing procedures, several other strategies can help manage Photoshop's storage footprint:
Selective Installation and Custom Locations
As mentioned earlier, during the initial installation of Adobe Creative Cloud or individual applications, take advantage of selective installation. Only install the applications and components you actively use. For instance, if you don't use Adobe Animate, Audition, or Premiere Pro, do not install them, as they contribute to the overall Adobe footprint. Furthermore, as noted, choosing a custom installation location on a drive with more space can be a wise decision.
Removing Unnecessary Languages
Photoshop and other Adobe applications often install language packs for a multitude of languages. If you only operate in English, for example, you can often remove the other language files. This process can sometimes be complex and might require modifying installation packages or using third-party tools, but it can yield significant space savings.
Assessing Plugins and Extensions
Photoshop's functionality can be extended through third-party plugins and extensions. While powerful, these can also consume disk space and, in some cases, generate their own caches. Regularly review your installed plugins and extensions and remove any that are no longer needed.
The Ultimate Cleanup: Reinstallation
In situations where significant space is needed and other methods prove insufficient, a complete uninstall and reinstallation of Photoshop and the Creative Cloud suite can be the most effective, albeit time-consuming, solution. This process ensures a clean slate, removing all temporary files, caches, and potentially corrupted configuration data. Use Adobe's official Creative Cloud desktop application to uninstall applications, and then reinstall them. For a more thorough cleanup, you might consider using Adobe's standalone uninstallers, if available for specific applications. After a clean install, immediately review and adjust performance preferences and scratch disk settings.
Other Performance Tweaks
Small adjustments within Photoshop's preferences can also contribute to better performance and potentially reduced temporary file usage. Disabling certain network settings if not in use, turning off "Smart Quotes" (which can sometimes trigger background processing), or disabling gestures and animations if you don't use a trackpad can offer minor but cumulative benefits.
By systematically addressing these areasâfrom internal cache management and performance preferences to scratch disk optimization and broader Adobe application cleanupâyou can effectively reclaim substantial hard drive space, ensuring Photoshop and your entire creative suite operate at their best.