Photoshop, a cornerstone of digital image manipulation, offers a versatile array of tools and techniques for altering background colors, transforming mundane images into visually striking compositions. Whether you're creating a new document from scratch, refining an existing photograph, or seeking to achieve specific artistic effects, understanding how to effectively change background colors is a fundamental skill. This guide delves into various methods, from simple initial setup to advanced masking techniques, ensuring you can achieve professional-level results with confidence.
Setting the Stage: New Document Background Colors
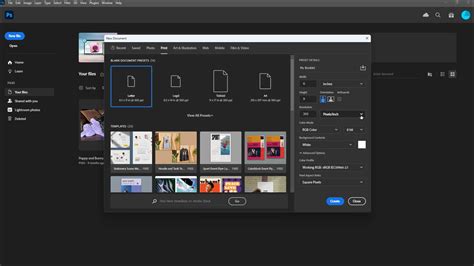
When embarking on a new project in Photoshop, the initial canvas often defaults to a stark white background. However, this can be easily modified before you even begin adding content. In the "New Document" menu, a straightforward option allows you to pre-select your desired background color. This proactive step ensures that your foundational workspace aligns with your creative vision from the outset, preventing the need for immediate background adjustments and streamlining your workflow. By specifying your preferred color here, you establish a clear direction for your project and avoid the common frustration of starting with an unintended hue.
The Power of Fill Layers: Dynamic Background Color Changes
Beyond the initial document setup, Photoshop provides a robust method for altering background colors through "Fill Layers." This technique is particularly advantageous as it offers non-destructive editing, meaning your original image data remains intact and editable. To implement this, navigate to Layer > New Fill Layer > Solid Color. This action opens a color picker, allowing you to select any hue, saturation, and brightness combination imaginable. Once chosen, this solid color will fill the entire layer. The beauty of a fill layer lies in its flexibility; you can double-click the layer thumbnail at any time to revisit the color picker and make further adjustments or even change the color entirely without impacting other elements of your design. This method is exceptionally useful for creating consistent backdrops for logos, graphics, or simply for experimenting with different color palettes.
Transforming Photographic Backgrounds: Selection and Masking Mastery
Changing the background color of an existing photograph introduces a layer of complexity, primarily due to the need to isolate the subject from its original background. Photoshop offers several powerful tools for this purpose, with the "Quick Selection Tool" being a frequently employed option. This tool allows you to "paint" over your subject, and Photoshop intelligently attempts to identify and select areas with similar colors and textures.
However, as noted, relying solely on tools like the Quick Selection Tool can sometimes lead to undesirable artifacts, such as the loss of subtle shadows or the creation of harsh edges, particularly around intricate details like hair. To combat this, a more refined approach involves the strategic use of "Layer Masks."
The process typically begins by opening your desired image in Photoshop. Then, utilizing selection tools such as the "Quick Selection Tool," "Object Selection Tool," "Magic Wand Tool," or "Lasso Tools," you meticulously select your subject. Once the subject is highlighted, you apply a mask to this selection. A layer mask essentially acts as a stencil, controlling the visibility of the layer it's applied to. By default, masking the selected subject will hide everything outside of that selection.
For the purpose of changing the background color, a crucial step is to "Invert Mask." This is achieved by clicking the three-dot menu on your layer and selecting "Invert Mask." This action effectively swaps the mask's behavior, so instead of hiding the background, it now reveals it while keeping the subject intact. With the background now isolated (or the subject masked out), you can then create a new layer behind your subject layer. This new layer will serve as your new background. You can then use the "Paint Bucket Tool" to fill this layer with your desired background color. Alternatively, you can directly apply a "Solid Color Fill Layer" and position it beneath your subject layer.

Advanced Techniques for Precision and Artistic Flair
For those dealing with complex backgrounds or fine details like flyaway hair, Photoshop offers further refinements. The "Select Subject" button in the taskbar can provide an excellent starting point for automatic subject selection. Following this, the "Colorize" option can be used in conjunction with adjustments to "Hue," "Saturation," and "Lightness" to fine-tune the new background color. Zooming in and utilizing the "Brush Tool" to meticulously correct any missed areas or halos is a common practice for achieving a polished look.
When dark backgrounds are involved, white halos around fine details can become apparent. To address this, you can adjust colors within specific areas, often by bringing back elements of the original color palette or by carefully refining the mask. Techniques like inverting the color of a layer (Ctrl + I on Windows, Cmd + I on Mac) can sometimes be useful in specific editing workflows, although this is less common for direct background color replacement.
A particularly effective method for transforming the background involves a combination of grayscale conversion and colorization. You can press Ctrl + Shift + U (Windows) or Cmd + Shift + U (Mac) to convert the image to grayscale, effectively neutralizing its original colors. Subsequently, by opening the "Hue and Saturation" menu (Ctrl + U on Windows, Cmd + U on Mac) and checking the "Colorize" option, you can then reintroduce color to the background, precisely controlling the new hue and saturation.
Leveraging Shortcuts for Efficiency
Photoshop's efficiency is significantly enhanced by its extensive library of keyboard shortcuts. For directly filling a layer with the current foreground color, you can press Alt + Backspace on Windows or Option + Delete on Mac. To fill with the background color, the shortcut is Ctrl + Backspace on Windows or Cmd + Delete on Mac.
When working with selections and preparing to manipulate the background, inverting your selection is a frequent requirement. After making an initial selection of your subject, you can invert it by pressing Shift + Ctrl + I on Windows or Shift + Cmd + I on Mac. This command is invaluable when you intend to modify or replace the background rather than the foreground.
The "Fill" dialog box, accessible via Shift + Backspace (Windows) or Shift + Delete (Mac), offers a range of options for filling layers, including colors, patterns, and content-aware fills. Understanding these shortcuts can dramatically speed up your background editing process.
Understanding Foreground and Background Colors
The fundamental concept of foreground and background colors in Photoshop is crucial for many editing tasks. The "Foreground color" dictates what color your brush, pencil, or fill tool will use, while the "Background color" is what is revealed when you erase on a layer or what fills newly added canvas space. By default, the background color is white. However, if you are working on a transparent layer and erase, the erased areas will become transparent rather than being filled with the background color.
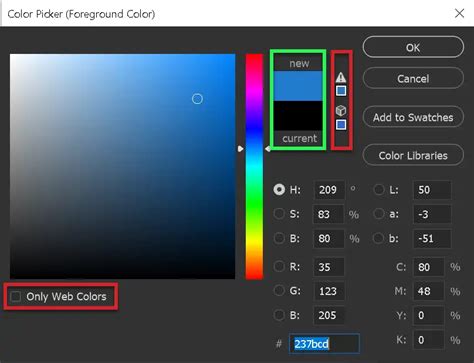
The background color also plays a role in gradient creation. When you set up a gradient, it transitions between your chosen foreground and background colors. This opens up possibilities for creating smooth transitions and ombre effects. It is essential to be aware of your selected foreground and background colors before commencing editing to avoid unintended results. For instance, accidentally having a bright, jarring color as your background color can lead to frustrating "Undo" commands.
When selecting colors for your design, consider the role of each. Foreground colors are typically used for the main subject or elements you want to draw the viewer's eye to, often making them bolder and more vibrant. Background colors, on the other hand, are often chosen to be dimmer and less sharp, providing a welcoming and acceptable backdrop that doesn't compete with the foreground. This strategic use of color enhances contrast, adds life to an image, and beautifies the overall design.
Alternative Solutions: Online Background Removal Tools
While Photoshop offers unparalleled depth and control, for users seeking a quicker and more straightforward solution, particularly for background removal, online AI-powered platforms like FocoClipping present a compelling alternative. These tools are designed for ease of use and can often remove backgrounds almost instantaneously after image upload. For beginners, such platforms can offer a less intimidating entry point into background manipulation. Professionals might find that while Photoshop offers greater creative freedom for complex edits, online tools can significantly expedite the process for simpler background changes.
The Importance of Color in Design
Color is an indispensable element in graphic design and image editing. It is the primary vehicle for creating contrast, imbuing images with vitality, and enhancing their aesthetic appeal. The ability to precisely control foreground and background colors in Photoshop empowers designers to meticulously manage the color scheme that defines an image, allowing for the creation of distinct compositions that effectively separate the background from the foreground subject.
The strategic application of color, whether through solid fills, gradients, or complex masking, is key to transforming ordinary images into compelling visual narratives. By mastering these techniques, you unlock Photoshop's potential to not only alter background colors but to fundamentally reshape the mood, focus, and impact of your visual creations. The journey of learning Photoshop is ongoing, with a vast library of resources, including video tutorials, available to further explore its endless array of creative possibilities.