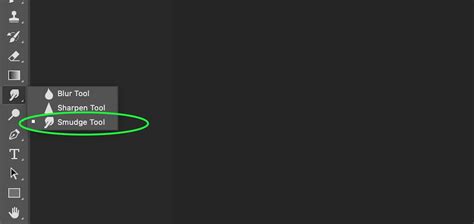
The digital canvas in Photoshop offers a universe of possibilities, not just for applying color, but for meticulously manipulating it. Among the suite of tools designed for this very purpose - the Smudge, Sharpen, and Blur tools - the Smudge tool stands out for its unique ability to blend, soften, and create painterly effects. While often associated with photo retouching, its versatility extends to digital painting and illustration, offering a nuanced approach to refining brushwork and achieving specific artistic outcomes.
Understanding the Core Functionality of the Smudge Tool
At its heart, the Smudge tool operates by simulating the effect of dragging a finger through wet paint. It doesn't introduce new color to the digital canvas; instead, it picks up the existing color where the stroke begins and pushes it in the direction of the swipe or nudge. This fundamental principle is what allows for the seamless blending of colors and the softening of harsh edges.
When you select the Smudge tool, typically represented by a finger icon in the Photoshop toolbar, you'll find a range of configuration options in the context-sensitive Options bar at the top of the window. These options allow for fine-tuning the tool's behavior to achieve desired effects.
Brush Settings: The Key to Smudge Tool Versatility
The nature of the brush tip used with the Smudge tool significantly influences the outcome. Using a textured brush tip, for instance, can produce a desirable, bristly look to the smudging. When smudging in vertical and horizontal directions with such a brush, one can effectively soften edges, creating a more organic and less defined appearance. This is particularly useful for achieving painterly effects, even when the initial painting was done with a hard-edged brush. The Smudge tool can then be employed to loosen up the overall look, making it appear more fluid and artistic.
A critical, yet often overlooked, aspect of the Smudge tool's behavior lies within its brush settings, specifically the "spacing" parameter. By default, spacing is activated, leading to the tool's standard smudging action. However, deactivating spacing dramatically alters how the tool functions.
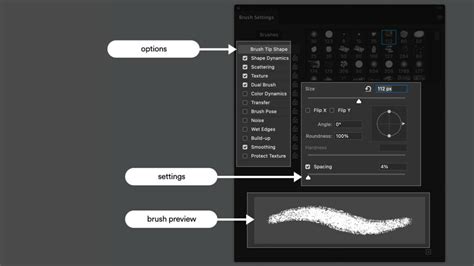
When spacing is turned off, the various brush tips begin to act more like a dry brush. They effectively pick up color from the canvas and "rip" it off, smudging it with distinct steps between the different brush tip impressions. This can create a unique, almost textured smudging effect. To further enhance this effect and reduce repetitiveness, one can introduce "angle jitter" to the brush. With angle jitter applied, the Smudge tool can begin to resemble the distinct marks of pastel chalk, offering a stylistic option for artists seeking this particular aesthetic. Therefore, for those aiming for these dry-brush or pastel-like smudging effects, remembering to deactivate spacing in the brush settings is paramount.
Differentiating Smudge from Blur and Sharpen
While the Smudge tool is part of a trio of manipulation tools that also includes the Blur and Sharpen tools, their functions and applications are distinct. Understanding these differences is crucial for effective image editing and digital art creation.
The Blur Tool: Subtle Softening
The Blur tool, as its name suggests, is designed to soften edges and reduce detail within an image. However, its effect is generally much more subtle compared to the Smudge tool. Even when working at a high strength, such as 100%, the Blur tool will only impart a very gentle softening.
This subtle nature makes the Blur tool less ideal for direct painting applications where more pronounced blending or softening is required. Instead, its strength lies in photo retouching, where a delicate reduction of detail or a slight softening of harsh lines can be beneficial.
The Sharpen Tool: Enhancing Contrast
Conversely, the Sharpen tool aims to increase contrast along edges, making details appear crisper and more defined. When applied, it can darken and sharpen edges, bringing them to the forefront. However, this enhancement often comes at a cost. The Sharpen tool is notorious for introducing color distortions around the edges it affects, resulting in an effect that is often considered unpleasing and can detract from the overall image quality.
Due to these characteristic color distortions and the often-unattractive results, the Sharpen tool is rarely a go-to instrument for digital painters or illustrators. Like the Blur tool, its primary utility is found in photo retouching, where judicious application might be used to enhance specific details, though with caution to avoid the aforementioned negative side effects.
Practical Applications and Techniques for the Smudge Tool
The Smudge tool's ability to blend and manipulate existing color makes it incredibly valuable in various scenarios, from artistic endeavors to subtle photo enhancements.
Achieving Painterly Effects and Softening Edges
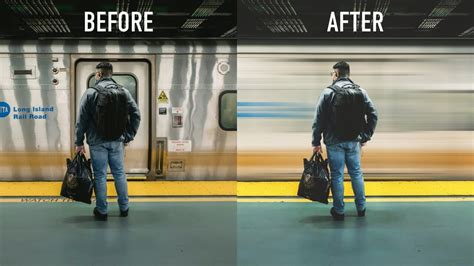
One of the most celebrated uses of the Smudge tool is its capacity to impart a painterly feel to digital artwork. Even if a piece was initially created with hard-edged brushes, the Smudge tool can be employed to soften these sharp transitions, creating a more fluid and organic appearance. This can make an image look more "loose" and hand-rendered, contributing to a desired artistic style.
Retouching and Subtle Enhancements in Photography
In the realm of photo retouching, the Smudge tool offers a way to make subjects appear more appealing, a technique frequently employed by professional photographers. It's particularly useful for gently reshaping important edges into more appealing and softer lines.
For instance, when working with portraits, the Smudge tool can be used to subtly enlarge irises by carefully stroking outward from within the iris. Similarly, if a person's eye appears to squint when they smile, the Smudge tool can be used to gently enlarge the eye itself, or to pull down an eyelid by stroking outward from the white of the eye.
Lips can also benefit from the Smudge tool's capabilities. A slight down-stroke along the lower lip can make it appear fuller, while gently stroking upwards at the points where the upper lip rises can create a more pronounced cupid's bow. It's important to note that over-smudging can lead to a loss of definition in shadows and lines, potentially rendering the image fuzzy and indistinct. Therefore, using the tool sparingly and with careful attention to brush size and pressure is key.
Shrinking a nose can be achieved by placing the brush just outside the shadow of a nostril and gently moving the brush inward, repeating the process on the other side. Dimples can be enhanced, and a cleft chin can be created by finding the shadow at the base of the chin and stroking upwards. Even eyebrows can be refined by smudging them into a more appealing arch.
The Finger Painting Option: Adding Color Nuance
A specialized feature of the Smudge tool is the "Finger Painting" option. When this checkbox is selected in the Options bar, the tool begins to use the selected foreground color from the Tools bar at the beginning of each stroke. This adds a layer of color nuance to the smudging process, allowing for more controlled blending and the boosting of contrast in specific areas.
To utilize this feature, one would first select the Eyedropper tool and click on an area of the photo to sample a color - perhaps from a lip or a shadow near the nose. This sampled color then appears in the foreground color square on the Tools bar. Subsequently, reselecting the Smudge tool with "Finger Painting" enabled allows for gentle strokes that can enhance contrast and add subtle color variations to the image. This technique requires practice, much like physical retouching methods, but offers a powerful way to refine details and improve the overall aesthetic of an image.
Learn How to Use the Smudge Tool in Adobe Photoshop Elements 2023: A Training Tutorial
Beyond the Basics: Advanced Considerations
While the core functionality of the Smudge tool is straightforward, mastering its application involves understanding its nuances and how it interacts with other Photoshop features.
Sample All Layers Functionality
In Photoshop Elements, and in certain contexts within Photoshop itself, there's an option to "Sample All Layers." When this checkbox is selected, the Smudge tool uses the combined color values from all visible layers. This can be particularly useful when working with complex compositions where you want to blend elements across different layers without explicitly merging them. It allows for a more integrated smudging effect that considers the overall image rather than just the active layer.
Brush Size, Pressure, and Jitter
As previously mentioned, the brush size and pressure settings are critical for controlling the intensity and extent of the smudge. A larger brush will affect a wider area, while higher pressure will result in a more pronounced smudge. Experimenting with these settings is essential to find the sweet spot for each specific task.
Furthermore, parameters like angle jitter, which can be adjusted in the brush settings, can introduce variability into the smudging process. This is especially useful when trying to avoid repetitive patterns and create more natural, organic-looking effects, as seen when mimicking the appearance of pastel chalk.
Reverting and Undoing
A crucial aspect of working with any powerful editing tool is understanding how to undo mistakes. Photoshop provides robust undo functionality, allowing users to step back through their actions. For instance, if a smudge effect is overdone or undesirable, the "Undo Smudge Tool" command (often found under the Edit menu) can be used to revert the change. For more drastic situations, the "Revert" command (also in the File menu) can reset the image to its last saved state, providing a safety net for experimentation.
Conclusion
The Smudge tool in Photoshop is far more than a simple blending instrument. It's a sophisticated tool that, when understood and applied correctly, can elevate digital artwork and photographic retouching to new levels. From softening hard edges in digital paintings to subtly reshaping features in portraits, its applications are diverse. By mastering its brush settings, understanding its relationship with the Blur and Sharpen tools, and utilizing features like "Finger Painting," users can unlock the full potential of this manipulative powerhouse, transforming their digital canvases with nuanced and artistic precision.