
Changing the background color of an image in Adobe Photoshop is a fundamental yet often surprisingly intricate task. While the desire is to achieve a clean, professional look that directs the viewer's eye towards the main subject, the process can easily become mired in the complexities of selection and masking. Many users encounter frustrating issues such as rough edges, unwanted white halos, particularly around fine details like hair, and time-consuming mask cleanup. However, by understanding and applying specific techniques, these challenges can be overcome, leading to crisp, polished results. This article will delve into effective methods for altering background colors, catering to a range of image complexities and user skill levels, from those new to Photoshop to seasoned professionals.
The Power of Selection: Isolating Your Subject
The cornerstone of any successful background color change lies in accurately isolating the subject from its original background. Photoshop offers a suite of tools designed for this purpose, each with its strengths depending on the image's characteristics.
For users of more recent Photoshop versions (CC 2019 and later), the Select Subject button, often found in the taskbar or under the Select menu, is a powerful starting point. This feature leverages Adobe Sensei, an artificial intelligence engine, to analyze the entire image and automatically identify and select the main subject. This AI-driven approach can significantly expedite the initial selection process, especially for images with clearly defined subjects.
Alternatively, the Quick Selection Tool remains a highly effective method. By clicking and dragging your cursor over the subject, you can quickly build a selection. If this tool inadvertently highlights an area outside the desired subject, Photoshop provides options to refine this selection. Within the tool's options, you can often find a "Subtract from Selection" mode, allowing you to "paint away" unwanted areas that have been incorrectly included.
For those working with older versions of Photoshop or when dealing with more intricate subjects, other selection tools like the Object Selection Tool, Magic Wand Tool, and various Lasso Tools (including the Magnetic Lasso Tool for its ability to intelligently snap to edges) can be employed. The Magnetic Lasso Tool, for instance, can be useful when you want to place a specific part of one photo into another, allowing you to select the desired portion with a degree of automatic edge detection.
Refining Your Selection: The Art of Masking
Once a preliminary selection is made, the critical phase of refinement begins. This is where the magic happens, ensuring that the transition between the subject and the new background is seamless.
A highly effective technique for refining selections is by utilizing Quick Mask Mode. To enter this mode, simply press the 'Q' key on your keyboard. In Quick Mask Mode, areas that are not selected appear with a translucent red overlay, while the selected areas remain clear. This visual cue makes it much easier to identify and correct any imperfections in your initial selection.
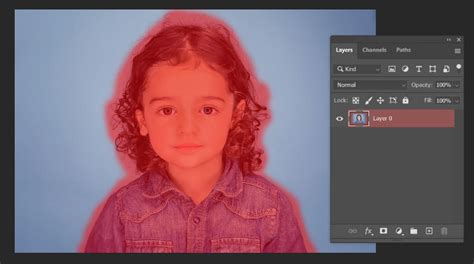
Within Quick Mask Mode, you can use the Brush Tool (activated by pressing 'B') with either black or white paint to meticulously refine the mask. Painting with black will add to the masked area (making it transparent), while painting with white will reveal the selected area (making it opaque). Zooming in (using the 'Z' key for the Zoom Tool) is crucial during this stage to ensure accuracy, especially around delicate edges like flyaway hair or intricate textures. By carefully painting over any missed areas or areas that have been incorrectly selected, you can achieve a highly precise mask. Once you are satisfied with the refinement, pressing 'Q' again will return you to the standard selection mode, displaying the "marching ants" around your now-perfected subject.
Another powerful method for refinement involves using Layer Masks. After making your initial selection, you can convert it into a layer mask by clicking the Layer Mask icon (a rectangle with a circle inside) at the bottom of the Layers panel. This mask determines the visibility of the layer it's attached to. If your subject is currently selected, the mask will initially hide everything else. To reveal the background instead, you need to invert the mask. This can be done by clicking on the masked layer in the Layers panel and then selecting the "Invert" option in the Properties Panel. This action effectively swaps the visibility, so your subject is now on top of a transparent background, ready for a new color.
Photoshop Layer Masks Explained in 7 Minutes!
Applying the New Background Color: Solid Fills and Beyond
With your subject perfectly isolated, you can now introduce a new background color. The most straightforward and non-destructive method involves using a Solid Color Fill Layer.
Navigate to the Layers panel, and at the bottom, you'll find the Adjustment Layer menu (often represented by a half-filled circle icon). Select "Solid Color" from this menu. This action will open the Color Picker window, allowing you to choose any color you desire for your new background. Once you select a color and press 'OK', a new Solid Color layer will be created, typically appearing above your image layer.
At this point, your subject might appear to be filled with the new color, obscuring the original image. This is because the Solid Color layer is simply covering everything. To rectify this, you need to ensure the Solid Color layer only affects the background. This is achieved by utilizing the layer mask you've already created or by creating a new one. If you've already masked your subject, you might need to invert the layer mask on your image layer (as described above) so that the background is what's being revealed. Then, ensure the Solid Color fill layer is positioned below your subject layer in the Layers panel.
Alternatively, if you've created a mask for your subject, you can apply the Solid Color fill layer and then, within the Properties panel of that fill layer, click the Invert icon. This will invert the mask of the fill layer, making it reveal the color only in the areas that were previously transparent (i.e., the background).
The beauty of using a Solid Color Fill Layer is its editability. You can double-click the Solid Color thumbnail at any time to reopen the Color Picker and easily select a different hue, saturation, or lightness, allowing for effortless experimentation.
For a more integrated look, especially when dealing with shadows or subtle color transitions, you can adjust the Blending Mode of the Solid Color layer. Selecting "Multiply" from the Blending Mode dropdown menu can help to blend the new color with the existing shadows and details of the original background, creating a more natural appearance.
Advanced Techniques and Considerations
While the Solid Color Fill Layer is highly effective, Photoshop offers other avenues for background manipulation.
For images with an existing white background that you wish to transform into a vibrant color, a specific workflow can be applied. After selecting your subject, you can create a new layer directly behind your subject layer. Then, select the Paint Bucket Tool and choose your desired color. Clicking on this new layer will fill it with the selected color, effectively placing it behind your subject.

If you're aiming for a more nuanced or gradient-like background, you can explore creating a Gradient Fill Layer instead of a Solid Color layer. This allows for smooth transitions between multiple colors.
For users looking to achieve a specific aesthetic, such as a flat, uniform color, the Solid Color fill method is excellent. However, if subtle blending is required, adjusting the Hue, Saturation, and Lightness of the new background color is possible after it's applied. This allows for fine-tuning the color to perfectly complement the subject.
The concept of nondestructive editing is paramount here. By using Layer Masks and Adjustment Layers like Solid Color fills, you are not permanently altering the original image pixels. This means you can always go back, make changes, or revert to the original state without losing any information. This flexibility is a hallmark of professional image editing.
Beyond Simple Color Changes
The techniques discussed are foundational for changing background colors, but Photoshop's capabilities extend much further. You can swap out one color for a different shade, create transparent backgrounds, introduce textures, or generate gradient effects for an ombre look.
Even complex scenarios, like changing the background color of a group of layers, are manageable. This typically involves creating a new layer above the group or grouping existing layers and then applying a Color Overlay layer style.
For those working with PDF files within Photoshop, changing the background color would alter how the PDF is displayed on the screen, but it's important to note that this might not affect the underlying PDF data itself in the same way as a raster image.
Ultimately, changing background colors in Photoshop is a skill that improves with practice. By mastering selection tools, understanding the power of layer masks, and leveraging adjustment layers, you can transform images efficiently and achieve professional-grade results, turning potentially frustrating tasks into a smooth and rewarding part of your creative workflow. The "Selections and Masking Mastery Course," for instance, offers in-depth, step-by-step lessons and practice files to help users hone these essential skills.
Jesús Ramirez, founder of the Photoshop Training Channel, emphasizes that a clean background is crucial for focusing viewer attention. His expertise, honed through years of digital graphics specialization and education, highlights the importance of these post-production techniques. By mastering these Photoshop tricks, you can elevate any image project, making the subject stand out and the overall visual impact far more compelling.