Creating a compelling 3D glossy effect in Adobe Photoshop is a sought-after skill for designers and artists looking to add depth, realism, and visual appeal to their projects. This tutorial will guide you through the intricate process, from setting up your document to applying advanced layer styles and textures, ensuring your text and designs pop with a professional, high-quality finish. Whether you're aiming for a sleek, modern look or a more stylized, artistic expression, understanding the fundamental techniques for achieving a glossy 3D appearance is crucial.
Setting the Stage: Document and Initial Text Setup
Before diving into the artistic elements, it's essential to establish the correct foundation within Photoshop. This involves creating a new document of appropriate dimensions and setting up the initial text layers that will form the basis of our 3D glossy effect.
- Document Creation: Begin by creating a new document. For this tutorial, a size of 900 pixels wide by 675 pixels high is recommended. This provides a good canvas for experimentation and ensures sufficient detail.
- Color Palette: Set your color palette strategically. The Foreground color should be a deep, dark shade like
#2c353c, and the Background color should be an even darker, near-black tone such as#191919. These dark backgrounds will help the glossy effect stand out dramatically. - Text Input: Now, it's time to add your text. Type your desired words or phrases in All Caps. For optimal results, use a bold, impactful font. The font "Intrepid ExtraBold" is suggested for its strong presence.
- Layer Duplication: To build the 3D depth, duplicating the text layer is a critical step. Duplicate the original text layer a total of four times. This will provide multiple layers to manipulate for creating shadows, highlights, and the extruded 3D form.
- Stroke Layer: Duplicate the original text layer once more and rename this new copy layer to "Stroke 1." This layer will be specifically used for applying a defined outline or stroke, which is a common element in achieving a polished glossy look.
Crafting the Glossy Illusion: Layer Styles and Contours
The heart of the glossy effect lies in the precise application of layer styles, particularly gradients and custom contours. These elements mimic the way light reflects off a smooth, curved surface.
- Styling the Inner Text: The first duplicated text layer will be styled to represent the core color of the glossy object. This step focuses on defining the base hue and reflectivity.
- Introducing the Contour: To create the characteristic curvature and highlights of a glossy surface, you'll need to define a contour.
- To load the necessary contours, navigate to
Edit > Presets > Preset Manager. - From the "Preset Type" drop-down menu, select "Contours."
- When the dialog box appears, click "Append" to load the default contours.
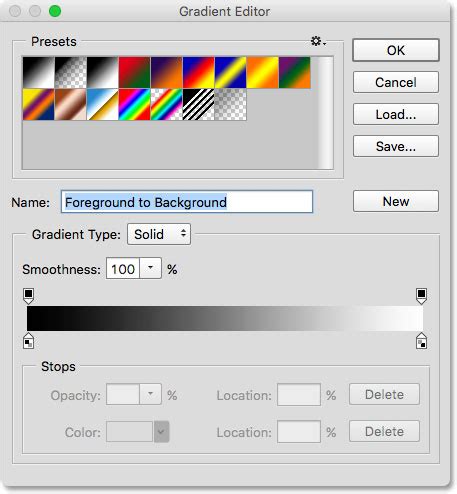
- You'll also need to load a default Photoshop gradient set. Go to
Edit > Presets > Preset Manager, and choose "Gradients" from the "Preset Type" drop-down menu. - Then, click the small arrow to the right of the "Preset Type" drop-down menu and select "Color Harmonies 1" from the pop-up menu.
- To load the necessary contours, navigate to
- Applying the Gloss Contour: Click the "Gloss Contour:" icon. This action allows you to create or select a custom contour. You will need to click along the line to add points, shaping the contour to define how light interacts with your text. This is where you sculpt the highlights and shadows that give the illusion of a rounded, glossy surface.
Building Depth and Dimension: 3D Text Creation
While layer styles provide a two-dimensional glossy appearance, true 3D depth requires more robust techniques. Photoshop's 3D capabilities, or integration with external 3D software, can be leveraged for this.
For a purely Photoshop-based approach, you can simulate 3D by carefully manipulating duplicated text layers, applying bevels, and extruding effects manually or through specific filters.
- Creating Text Layers: Create your text on two separate layers. For instance, if you are creating a year like "2015," one layer could hold "2015" and another could hold "Happy New Year!".
- Font and Size for Year Text: For the year text, a font like "Titania Regular" at a size of 250 pt is suggested to give it prominence.
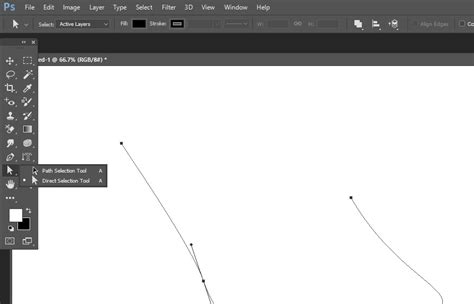
- Shape Layer and Direct Selection: Duplicate the shape layer (if you've created one to define the base of your 3D extrusion). Select the "Direct Selection Tool." You might notice sharp points sticking out from the shape. To rectify this, use the "Delete Anchor Point Tool." Zoom in to pinpoint the problematic anchor points and click them to remove them.
- Ground Layer: Create a new layer positioned on top of all existing layers and name it "Ground." Fill this layer with a light gray color. This layer will serve as a surface for your 3D text to rest upon, grounding the composition.
Advanced 3D Manipulation and Rendering
For more sophisticated 3D effects, especially when dealing with complex shapes or realistic lighting, Photoshop's extended features or integration with dedicated 3D software become invaluable.
- Merging 3D Layers: If you have multiple 3D layers, select them all and go to
3D > Merge 3D Layers. This consolidates all the 3D meshes into a single scene, making management easier. - The 3D Panel: The "3D panel" is your control center for the 3D scene. Clicking on any component's name within this panel will allow you to access and modify its settings in the "Properties panel."
- Move Tool and 3D Modes: Select the "Move Tool" and examine its Options bar. To the right of the bar, you'll find a set of "3D Modes" that dictate how the tool interacts with your 3D objects (e.g., moving, rotating, scaling).
- Ground Mesh Settings: Select the "Ground Mesh" tab in the 3D panel. In the "Properties panel," uncheck the "Cast Shadows" box. This prevents the ground plane from casting unwanted shadows.
- Moving Object to Ground Plane: With the "Ground Mesh" still selected, go to
3D > Move Object to Ground Plane. This action ensures that your 3D objects sit correctly on the ground plane. - Manipulating 3D Axes: The "3D Axis" (visible when the Move Tool is selected) provides intuitive controls for moving, rotating, and scaling your meshes. The arrows are for movement, the lower section for rotation, and the cubes for scaling. The central cube allows for uniform scaling of the entire object.
- Scaling Planes and Text Meshes: Scale the two planes uniformly to fill the scene. Then, select the "text" and "shape" meshes' tabs (using Cmd/Ctrl + click) and scale them down uniformly.
- Cap Settings: Select the lower text mesh tab again and click the "Cap" icon at the top of the "Properties panel." This allows you to adjust the depth and bevel of your text's edges.
- Material Settings: Expand the text mesh tab to access the "Material tabs." Select all expanded "Material tabs" and adjust their settings in the "Properties panel." This is where you define the surface properties like color, reflectivity, and texture.
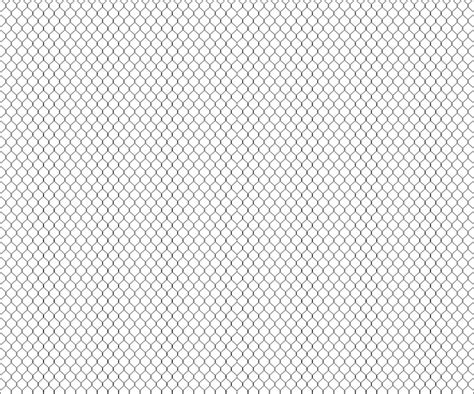
- Applying Textures: To add more dynamism, select the "Front Inflation Material" tab. Click the "Reflection" folder icon and choose "Load Texture." Select an image like "worn down metal." This will open the texture's document, allowing you to integrate it as a reflection map. You can always tweak these values to achieve your desired look.
- Color, Intensity, and Shadow Softness: Change the "Color" to (253, 251, 246), set the "Intensity" to 50%, and the "Shadow Softness" to 20%.
- Light Falloff: Check the "Light Falloff" box. Adjust the "Inner" value to 100 and the "Outer" value to 750. These settings control how light diminishes across the surface.
- Ground Mesh Coordinates: Click the "Ground Mesh" tab and then the "Coordinates" icon. Increase the "Y Position" to 0.1. This fine-tunes the ground plane's placement.
- Adding Texture Overlay: As an optional step, place an image like "Texture 42" on top of the 3D layer. Resize it as needed, change its "Blend Mode" to "Soft Light," and set its "Opacity" to 10%. This can add subtle surface detail.
Enhancing the Gloss: Brushes, Sparkles, and Final Touches
To elevate the glossy effect from good to great, adding subtle details like sparkles and atmospheric effects can make a significant difference.
- Brush Tool Selection: Pick the "Brush Tool" and select one of the "Water Splash Brushes" brush tips. These can be used to create organic, fluid-like highlights or subtle texture variations.
- Sparkle Layer: Create a new layer on top of all other layers and name it "Sparkles." Change its "Blend Mode" to "Vivid Light." This blend mode will make the white brush strokes appear bright and luminous.
- Adding Stars and Flares: Choose a brush from the "Stars and Flares Brush Set." Decrease its "Size" and carefully add a few sparkles at the edges of some of the letters. These small, bright points of light enhance the perception of extreme shininess.
- Gradient Fill and Blend Mode: Apply an "Orange, Blue, Magenta, Yellow" gradient fill to this layer. Then, change the adjustment layer's "Blend Mode" to "Multiply" and its "Opacity" to 3%. This subtle color overlay can add a sophisticated tint and depth to the overall glossy appearance.
How to Create a Realistic Chrome Text Effect in Adobe Photoshop
Exploring Further: Resources and Advanced Techniques
The techniques described above form the core of creating a 3D glossy effect in Photoshop. However, the software offers a vast array of tools and possibilities for further refinement and exploration.
- Photoshop CS6 Extended: Adobe Photoshop CS6 Extended, in particular, introduced an all-new 3D interface and numerous new features that significantly streamline the creation of 3D graphics and text effects.
- Filter Forge Integration: For advanced users, combining Photoshop with tools like Filter Forge can unlock even more sophisticated glowing 3D text effects.
- External 3D Software: For highly complex 3D models and scenes, integrating Photoshop with dedicated 3D applications like Xara 3D is a common workflow. Xara 3D, for instance, can transform 2D text into 3D models, which can then be rendered and imported into Photoshop for final touches, including the application of layer styles, gradients, and textures. This process often involves exporting the 3D model as a PNG file and then using Photoshop's tools to add highlights, shadows, and layer styles like "Gradient Overlay" and "Stroke Style" to achieve the desired glossy look.
- Pre-made Assets: For those seeking efficiency, numerous packs of Photoshop layer styles are available, offering pre-designed elegant text effects, realistic fabric finishes, glitch effects, and liquid or jelly-like textures. These can significantly speed up the design process and provide inspiration. Examples include packs offering 30 elegant text effects, 16 glitch text effects, high-quality glossy texture effects mimicking liquids, heroic retro comic looks, and fantastical epic text effects.
- Tutorial Collections: A wealth of Photoshop tutorials exists, covering everything from 3D product design and text effects to poster art. These resources often provide step-by-step instructions, tips, and techniques for both beginners and professionals. Collections often highlight how to create 3D typography, incorporate 3D text effects for lasting impact, and learn new techniques.
- Specific Effect Tutorials: Beyond general glossy effects, tutorials exist for creating specific visual styles such as:
- 3D letters on fire.
- Shiny letters and numbers.
- Pillows in the form of letters.
- Vivid signs with 3D effects.
- 3D logos using paper textures and ice cube effects.
- Vintage red and blue retro effects.
- 3D effects using red, green, and blue channels.
- 3D dispersion effects.
- 3D planet effects.
- Vintage 3D effects.
- Marquee bulb sign text.
- 3D effects using cork texture.
- Stunning typography with 3D effects.
- Realistic birthday candle effects.
The journey to mastering the 3D glossy effect in Photoshop is an ongoing one, with continuous learning and experimentation leading to increasingly sophisticated and visually impressive results. By understanding the core principles of light, reflection, and depth, and by leveraging the powerful tools within Photoshop, you can transform ordinary text into extraordinary 3D masterpieces.