The introduction of the HEIC (High Efficiency Image Container) format by Apple in 2017 brought with it significant advantages, primarily in storage efficiency. This format offers superior compression compared to the ubiquitous JPG, allowing for smaller file sizes without a noticeable compromise in image quality. Furthermore, HEIC supports advanced features like Live Photos and Apple's sophisticated image post-processing. However, for all its benefits, HEIC can present compatibility challenges, particularly when interacting with non-Apple devices and platforms, such as Windows computers or various online forms.
This incompatibility can be a source of frustration for users who need to share their photos widely or integrate them into workflows that do not natively support HEIC. Fortunately, several methods exist to convert HEIC images to the more universally accepted JPG format, both on the device where the photos are captured and on desktop computers. This guide explores various approaches to bulk converting HEIC files to JPG, ensuring your precious memories are accessible across all your devices and platforms.
Switching Your iPhone to JPG for Future Photos
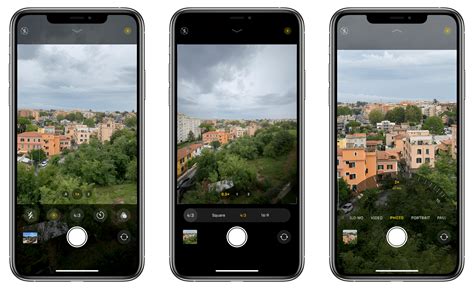
The simplest way to avoid HEIC compatibility issues moving forward is to change your iPhone's default camera setting to capture photos in JPG format. This proactive measure ensures that all new photos taken will be saved in a widely compatible format from the outset.
To adjust this setting, navigate to Settings > Camera > Formats. Within this menu, select the “Most Compatible” option. This will instruct your iPhone to save all newly captured images as JPG files. While this means you won't benefit from the storage savings of HEIC for new photos, it significantly simplifies sharing and compatibility with other devices and applications.
For users who wish to retain the storage benefits of HEIC on their iPhone while ensuring compatibility when sharing, there's a specialized setting. This mode automatically converts HEIC photos to JPG when they are transferred to Windows or Mac, while keeping them in the HEIC format on the iPhone itself. This offers a balanced approach, optimizing storage on the device while facilitating broader sharing.
Converting HEIC to JPG on Mac
macOS offers several built-in tools that make converting HEIC files to JPG a straightforward process, even in bulk.
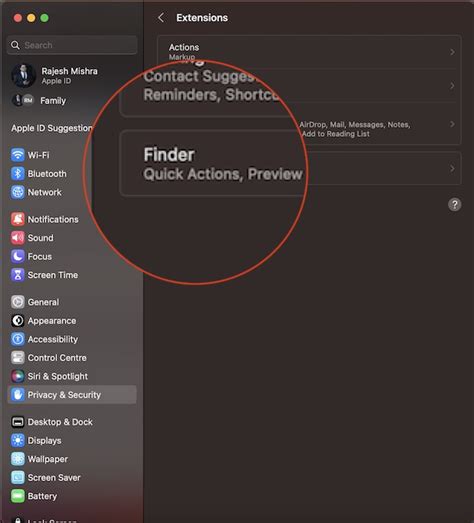
Using Finder's Quick Actions (macOS Monterey and later)
For users with a Mac running macOS Monterey or a newer version, the Finder application includes a convenient built-in image conversion tool that supports batch processing.
- Select HEIC Photos: Locate and select the HEIC photos you wish to convert within the Finder. You can select multiple files by holding down the Command key while clicking.
- Access Quick Actions: Right-click on the selected files.
- Choose Convert Image: From the contextual menu, navigate to Quick Actions > Convert Image.
- Select Format and Size: A dialog box will appear, allowing you to choose JPEG as the output format. You can also select the desired image size, with "Original size" being the recommended option to maintain fidelity.
- Convert: Click the Convert button, and Finder will create JPG versions of your HEIC files in the same location.
Using the Preview App (Older macOS Versions)
If you are using an older version of macOS that does not have the Quick Actions feature, the venerable Preview app can still be used for conversions, though it’s less streamlined for batch operations.
- Open in Preview: Open one or more HEIC images in the Preview app. If converting multiple files, you can open them all at once, and they will appear in a sidebar.
- Export: Go to File > Export.
- Choose Format and Save: In the export dialog, select JPEG as the format and choose a save location. Click Save.
While this method works, it requires repeating the export process for each file or group of files if you are not opening them all simultaneously.
Exporting from the Photos App
The Photos app on Mac seamlessly syncs images from your iPhone via iCloud. Even though these photos are stored in HEIC format, you can easily export them as JPGs.
- Select Photos: Open the Photos app and select all the HEIC images you want to convert.
- Export: Go to File > Export > Export [X] Photo(s) (where [X] is the number of selected photos).
- Choose JPEG Format: Ensure that JPEG is selected as the format.
- Export: Click the Export button to save the JPG versions.
Alternatively, a simple drag-and-drop gesture can also achieve conversion. Select the desired HEIC images from the Photos app and drag them to your Desktop or any folder within the Finder app. macOS will often prompt you to convert them to JPG during this process.
Converting HEIC to JPG on iPhone
For those who prefer to manage their conversions directly on their iPhone, there are also convenient methods available.
Using the Files App
The built-in Files app on your iPhone provides a quick way to convert HEIC photos to JPG.
- Select Photos: Open the Photos app and select the HEIC images you wish to convert.
- Save to Files: Tap the share icon and choose Save to Files. Select a location within the Files app to save these HEIC images.
- Convert in Files App: Open the Files app, navigate to the saved HEIC images, press and hold on an image, then select Quick Actions > Convert Image.
- Choose Format and Size: Select JPEG as the file format. You will also have options to choose the image size; sticking to Original size is generally recommended to preserve quality.
- Convert: The image will be instantly converted to JPEG. This process can be applied to both single images and batches.
How To Convert HEIC To JPG On iPhone
Converting HEIC to JPG on Windows
Windows users have historically faced more hurdles with HEIC compatibility. However, several solutions, both native and third-party, can address this.
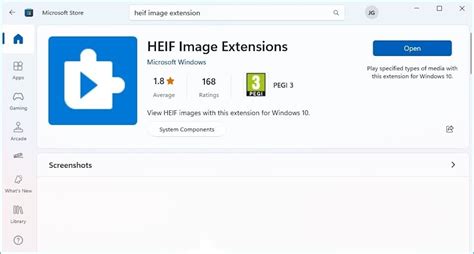
Installing Microsoft Store Extensions
Windows does allow you to view HEIC images within its Photos app, but this functionality is not enabled by default. You need to install specific extensions from the Microsoft Store.
- HEIF Image Extensions: Download and install the HEIF Image Extensions (free) from the Microsoft Store.
- HEVC Video Extensions: You will also likely need the HEVC Video Extensions ($0.99). While primarily for video, these extensions often help with HEIC image rendering.
Once these extensions are installed, you can open HEIC files directly in the Windows Photos app. To convert them to JPG:
- Open the HEIC File: Open the HEIC image in the Photos app.
- Save As: Navigate to the three dots menu (…) and select Save as.
- Choose JPG: In the "Save as type" dropdown, select JPG.
- Save: Click Save.
This method is suitable for individual files but becomes tedious for bulk conversions.
Third-Party Software for Windows
Several third-party applications offer more robust solutions for bulk HEIC to JPG conversion on Windows.
CopyTrans HEIC for Windows
CopyTrans is a popular application that integrates directly into Windows File Explorer, offering a convenient way to convert HEIC files.
- Install CopyTrans: Download and install CopyTrans for Windows. It is free for personal use.
- File Explorer Integration: After installation, you can often right-click on HEIC files within File Explorer and find an option to convert them to JPG. The specific steps may vary slightly depending on the version of CopyTrans.
XnView MP
XnView MP is a powerful, free, open-source image viewer, converter, and organizer that supports a vast array of formats, including HEIC. It excels at batch processing and crucially, can preserve EXIF data during conversion.
- Download and Install: Get XnView MP from its official website.
- Open HEIC Files: Open your HEIC files within XnView MP.
- Batch Convert: Go to Tools > Batch Convert.
- Configure Settings: Select your HEIC files as input, specify an output folder, choose JPG as the output format, and importantly, ensure that options to preserve EXIF data are selected.
- Start Conversion: Click Convert.
ImageMagick
For users comfortable with command-line interfaces, ImageMagick is a free, open-source, and cross-platform image manipulation suite. It's incredibly powerful for scripting and batch operations.
- Install ImageMagick: Download and install ImageMagick.
- Use Command Line: You can use commands like the following in your terminal or command prompt:
bashmagick mogrify -format jpg *.heicThis command will convert all.heicfiles in the current directory to.jpgformat. For more complex batch processing and preserving EXIF data, consult the ImageMagick documentation.
TuneBro HEIC Converter
Some users have reported positive experiences with dedicated HEIC converter software. TuneBro HEIC Converter is mentioned as an option that provides fast batch conversion with minimal quality loss.
Photoshop Elements
For those who own Adobe Photoshop Elements (versions like 2025 and likely earlier), there's a built-in batch processing feature:
- Open Photoshop Elements: Launch Photoshop Elements and select "Advanced" operating mode.
- Process Multiple Files: Go to File > Process Multiple Files.
- Set Source and Destination: In the dialog box, specify the folder containing your HEIC files as the "Source" and choose a "Destination" folder for the converted JPGs.
- Convert Files To: Check the "Convert Files To" box and select JPG as the format. You can also adjust the JPG quality.
- Execute: Click OK. Photoshop Elements will process all HEIC files in the source folder, converting them to JPGs in the destination folder. This process is generally efficient, with conversions happening at a rate of about one photo per second.

Online Converters
Numerous online tools claim to convert HEIC to JPG. While convenient for a few files, caution is advised.
CloudConvert
CloudConvert is a reputable online file conversion service that supports HEIC to JPG conversion.
- Visit CloudConvert: Go to the CloudConvert website and select HEIC to JPG conversion.
- Upload Files: Upload your HEIC files.
- Convert: Initiate the conversion process.
- Download: Download the converted JPG files.
Important Considerations for Online Converters:
- Privacy: Be mindful of uploading sensitive photos to online services. Always review their privacy policies.
- EXIF Data: Many free online converters strip EXIF data (metadata like date taken, camera model, GPS location) from the images. If preserving this information is crucial, look for services that explicitly state they maintain EXIF data, or opt for desktop software.
- File Size Limits: Free tiers often have limitations on file size or the number of conversions per day.
Other Online Options
While CloudConvert is a good example, many other online HEIC to JPG converters exist. Some common ones include:
- Online-Convert.com
- Convertio
- FreeConvert.com
Always research the reliability and privacy practices of any online tool before use.
Preserving Image Quality and EXIF Data
A common concern when converting HEIC to JPG is the potential loss of image quality and the metadata (EXIF data) embedded within the files. HEIC, with its more advanced compression algorithms, can sometimes offer a slight edge in detail preservation over JPG. However, the difference is often negligible for casual viewing, especially if high-quality JPG compression is used.
When converting, especially in bulk, prioritize methods that explicitly state they preserve EXIF data. Software like XnView MP and ImageMagick (with appropriate commands) are known for this capability. If using Photoshop Elements or similar professional tools, ensure that the batch conversion process is configured to retain metadata.
For most users, the goal is to achieve a balance between file size, compatibility, and quality. By understanding the various tools and techniques available, you can effectively manage your HEIC photo library and ensure your images are accessible wherever you need them.
Automation with Clop (Mac)
For Mac users seeking an automated solution, the utility app Clop can be beneficial. Once installed, Clop can automatically convert downloaded or imported images, including HEIC files, to JPG in the background.
- Install Clop: Download and install Clop. It offers a 14-day trial, after which a Pro version is available for purchase.
- Configure Watch Paths: In Clop's settings, go to Settings > Images > Watch Paths.
- Add Download Folder: Add
/Downloads(or any other folder where you typically receive Airdropped or downloaded HEIC files) as a watch path. - Automatic Conversion: Now, whenever HEIC files are transferred to your Mac and land in the specified watch path, Clop will automatically convert them to JPG without manual intervention. This is particularly useful for Airdropped files.
This level of automation streamlines the workflow significantly, especially for users who frequently receive HEIC files from iPhones.