Cricut Design Space offers a versatile set of tools for crafters, and one of the most sought-after features is the ability to curve text. This capability allows for the creation of dynamic and visually appealing designs, perfect for adding a professional touch to various crafting projects, from custom apparel to decorative home décor. Whether you're aiming to fit text around a circular object, create an arched banner, or simply add a unique flair to your lettering, understanding how to curve text in Cricut Design Space is an essential skill.
The process can be approached in several ways, catering to different user preferences and device availability. While Cricut Design Space for desktop offers a direct "Curve" tool, users on mobile devices or those seeking more intricate control might utilize alternative methods. This guide will explore these different avenues, ensuring you can achieve beautifully curved text regardless of your setup.
Understanding the "Curve" Tool in Desktop Design Space
For users working with the desktop version of Cricut Design Space (available for Windows and Mac PCs and laptops), a dedicated "Curve" tool streamlines the process significantly. This tool is intuitively located within the Text Edit bar at the top of the Canvas, positioned between the Alignment and Advanced tools.
Step-by-Step Guide to Using the Desktop Curve Tool
Initiate a New Project: Begin by opening Cricut Design Space and creating a new project. This provides a blank canvas to work on.
Insert Your Text: Select the Text Tool, typically found in the Design panel on the left side of the Canvas. A text box will appear, ready for your input.
Input and Format Your Text: Type the desired words or letters into the text box. Subsequently, choose your preferred font and font style from the dropdown menus. You can also utilize the "Letter Space" tool to fine-tune the spacing between individual characters for optimal readability and aesthetic appeal.
Address Multiple Lines of Text: If your design involves multiple lines of text that you intend to curve, it is crucial to handle them individually. Each line should be entered into a separate text box. Alternatively, you can use the "Ungroup to Lines" tool, which is accessible via the Advanced options, to separate your lines of text into distinct text boxes. This ensures that the "Curve" tool functions correctly for each line independently.
Activate the Curve Tool: With your text selected, click on the "Curve" tool. Design Space will then analyze the dimensions and spacing of your text to prepare it for curvature. This process might take a few moments, after which a slider and a numerical input field will be displayed.
Adjusting the Curve: The slider provides a visual and interactive way to manipulate the curvature of your text.
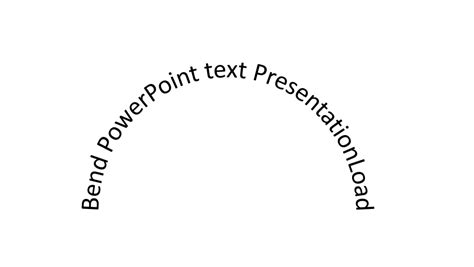
- Downward Curve: Dragging the slider to the right will cause the text to curve downwards, creating an arc that bends towards the bottom of the text box.
- Upward Curve: Conversely, dragging the slider to the left will result in an upward curve, bending the text towards the top of the text box.
As you manipulate the slider, the number in the "Curve" field will dynamically update, reflecting the degree of curvature. Design Space internally uses an imaginary circle to define the text's arc. The further you move the slider, the smaller this imaginary circle becomes, leading to a more pronounced curve. The minimum possible curve is influenced by the size, length, and spacing of your text.
Cricut Curve Tool
Maintaining Editability: A significant advantage of the "Curve" tool is that curved text remains fully editable. You can continue to adjust letter spacing, rotate the text box, modify the actual text content, and even change the font type and style after applying the curve. This flexibility allows for iterative design adjustments without losing your work.
Limitations of the Curve Tool: It is important to note that the "Curve" tool will not become active if there are multiple lines of text within a single text box. As mentioned earlier, each line must be in its own text box for the tool to function. Additionally, at the current time, projects containing curved text may not open correctly in the iOS or Android mobile applications of Cricut Design Space.
Alternative Method: Manual Text Curving with a Guide Shape
For those who primarily use the Cricut Design Space mobile app (iPhone, iPad, or Android devices) or prefer a more hands-on approach, manually curving text using a guide shape is an effective alternative. This method provides granular control over the placement and curve of each individual letter.
Step-by-Step Guide to Manual Text Curving
Start a New Project: Open Cricut Design Space and initiate a new project.
Create a Guide Shape: Locate the "Shapes" icon on the bottom left of your screen and insert a circle onto the canvas. Resize this circle to your desired dimensions. This circle will serve as a visual guide for creating your curved text.
Type Your Text: Select the Text tool (the big "T" icon) and type out your desired text. For this example, we will use vintage serif font called Black Rainbow by Vunira. Position this text directly above your guide circle.
Ungroup Letters: To enable individual manipulation of each letter, you must first ungroup them. Click on the "Action" icon, then navigate to "Advance," and select "Ungroup to Letters." This action separates each letter into its own distinct layer.
Disable Smart Guides: Before proceeding with manual adjustments, it is essential to turn off "Smart Guides." These guides, which normally assist with alignment, can interfere with the precise manual placement required for curving. To disable them, go to "Settings" on the right-hand side of your screen and toggle off "Smart Guides."
Manually Position and Rotate Letters: Now, you can begin the meticulous process of manually moving each letter to conform to the curve of your guide circle. Select individual letters and use the rotate button (typically found on the top-right of the selected item's bounding box) to adjust their angle. Continue rotating and repositioning each letter until they seamlessly follow the arc of the circle.
Delete the Guide: Once all letters are perfectly placed along the curve, select the guide circle and delete it. It has served its purpose and is no longer needed.
Weld the Letters: To combine all the individual letters into a single, cohesive text object, select all the letters by dragging your mouse over them. Then, click on the "Action" icon and select "Weld." This action merges the letters, preventing them from being cut individually.
This manual method, while more time-consuming, offers unparalleled control and is an excellent workaround for mobile users or when precise letter placement is paramount.
Leveraging Third-Party Applications for Curving Text
In situations where the built-in tools of Cricut Design Space may not fully meet your needs, or if you're working on a mobile device and prefer a dedicated app for text manipulation, third-party software can be a valuable resource. One such highly recommended free application is "Phonto," available on both the Apple App Store and Google Play Store. Phonto is a powerful tool that offers extensive text editing capabilities, including robust text curving features.
Using Phonto for Curved Text
Download and Install Phonto: Obtain the Phonto app from your device's app store.
Open Phonto and Select Canvas: Launch the app. You will be presented with various canvas options. Select a plain white canvas for a neutral workspace.
Add and Type Text: Tap anywhere on the canvas, and an "Add Text" option will appear. Type your desired text into the provided field.
Alignment and Font Selection: Adjust the text alignment to "Center" by tapping on the "Align: Left" option. Then, tap on "Font" to choose your preferred typeface. Phonto offers a wide array of fonts, and you can also add your own custom fonts.
Style and Color: To ensure your text is visible, you'll likely want to change its color. Tap on "Style" and then select the desired color from the palette. Phonto also offers options for stroke color, background color, and other stylistic enhancements, allowing for creative customization.
Adding Multiple Lines: If your design requires multiple lines of text, tap on an empty area of the canvas again to bring up the "Add Text" option, and repeat the process for each line.
Curving the Text: This is where Phonto truly shines. Tap on the text you wish to curve. A black options box will appear. Slide this box to the left to reveal the curve controls. You'll find a slider that allows you to adjust the curvature.
- Sliding Right: Curves the text downwards.
- Sliding Left: Curves the text upwards.As you move the slider, observe the immediate visual feedback on your text. Once you are satisfied with the curve of one line, you can repeat the process for any other lines of text.
Saving and Exporting: After achieving the desired curve, tap on the text again. You will see an option to save your work. Phonto will typically indicate that the design has been saved successfully.
Preparing for Cricut Design Space: The next crucial step is to "Clean Up" the image and prepare it for import into Cricut Design Space. This involves removing the background and making it transparent. Phonto provides tools for this purpose. Tap on the "wand" tool and then tap in the middle of your curved text sentiment to remove the background. You may need to repeat this process for individual letters or sections to ensure a clean, transparent background. Pay close attention to any small squares displaying letters (e.g., O O O P P P A) and ensure they appear perfectly formed after the background removal. Then, tap "Next" in the upper right-hand corner.
Importing into Design Space: You will then be prompted to name your project and select whether to use it as a "Cut Image" or a "Print then Cut." Choose the appropriate option. This action will import your curved text design directly onto your Cricut Design Space canvas.
Resizing and Finalizing: Imported designs from external apps often appear quite large. Edit the size of your design within Design Space to fit your project's requirements. You can then proceed with further designing, adding other elements, or preparing for cutting.
Using Phonto offers a powerful and accessible way to create complex curved text designs, which can then be seamlessly integrated into your Cricut projects. This method is particularly beneficial for achieving intricate curves that might be challenging with the direct "Curve" tool alone.
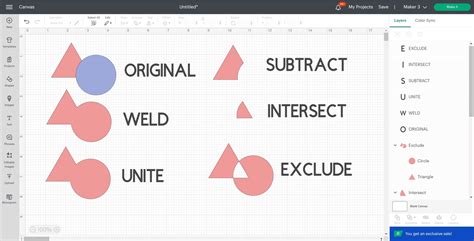
Advanced Text Manipulation in Design Space: Kerning and Letter Spacing
Beyond simply curving text, Cricut Design Space offers tools to refine the appearance and spacing of your letterforms, ensuring a polished and professional outcome. Two key features in this regard are "Letter Spacing" and "Kerning."
Understanding Letter Spacing
The "Letter Space" tool, accessible within the Text Edit bar, allows you to uniformly increase or decrease the distance between all characters in a selected text box. This is a global adjustment that affects the overall density of your text.
- Increasing Letter Space: Moves letters further apart, creating a more open and airy feel.
- Decreasing Letter Space: Moves letters closer together, resulting in a more compact and condensed appearance.
This tool is invaluable for improving readability, especially with certain fonts, or for achieving a specific aesthetic.
The Concept of Kerning
Kerning refers to the adjustment of space between specific pairs of letters to improve visual appeal and readability. Some letter combinations, like "AV" or "WA," have natural gaps that can look awkward if left unadjusted. Kerning strategically reduces or increases the space between these pairs to create a more visually pleasing and uniform flow.
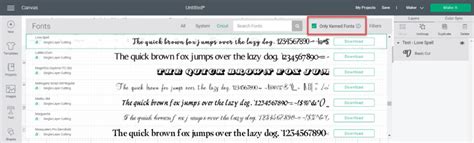
Cricut Design Space identifies certain fonts as "kerned," meaning they have been pre-optimized with more natural spacing between letters and characters. You can filter your font list to display only these kerned fonts, making it easier to select typefaces that offer superior visual harmony right from the start.
Applying Kerning Adjustments: To make minor edits that might trigger kerning adjustments or to manually tweak spacing, you can often double-click within the text box to open it for editing. Making a small change, such as adding and then deleting a character or space, can sometimes prompt the font's kerning features to re-engage.
By mastering both the "Curve" tool and the nuances of letter spacing and kerning, you can elevate your text-based designs in Cricut Design Space from basic to breathtaking. Whether you're using the direct "Curve" tool, manually positioning letters, or employing external applications, the goal is to achieve text that flows beautifully and complements your overall project.
Font Management and Selection in Design Space
The selection of the right font is paramount to the success of any text-based design, especially when incorporating curved text. Cricut Design Space provides a comprehensive font library and robust filtering options to help you find the perfect typeface for your project.
Navigating the Font Picker
When you select the Text tool, a font picker interface appears. This interface is designed for efficient font discovery and selection:
- Font List: Displays all available fonts installed on your system and those available through Cricut Access.
- Search Field: Allows you to quickly find a specific font by typing its name.
- Keyword Buttons and Filters: Provide categorized options to narrow down your search based on style (e.g., Script, Serif, Sans Serif), characteristics, or project type.
- "Kerned" Filter: As discussed previously, this filter is invaluable for finding fonts that have been professionally spaced for optimal visual appeal.
Understanding Font Compatibility and Installation
Cricut Design Space allows you to use fonts that are installed on your computer. When you download and install a font on your operating system, it typically becomes available within Design Space. However, it's important to ensure that the font is compatible and properly installed.
Considerations for Curved Text Fonts
When choosing a font for curving, consider the following:
- Stroke Thickness: Thicker strokes can sometimes make curves appear more solid and less prone to distortion.
- Letterform Shape: Fonts with more rounded or flowing letterforms tend to curve more gracefully than those with sharp, angular designs.
- Spacing: Fonts with naturally open spacing might require less adjustment after curving.
Experimentation is key. Try curving a few different fonts to see how they react and which ones best suit your desired aesthetic.
Design Integration and Project Examples
The ability to curve text opens up a world of creative possibilities for various Cricut projects. Here are a few examples of how curved text can be effectively utilized:
Decorative Home Décor
- Welcome Mats: Curving "Welcome" or "Home" in an arc to fit the shape of a doormat.
- Wall Art: Creating arched phrases or quotes for framed art or vinyl decals.
- Ornaments: Bending text to fit around circular or oval ornaments.
- Coasters and Plates: Using the manual method or the desktop "Curve" tool to fit text around the edges of decorative plates or custom coasters. The "Welcome To Our Home SVG Design which is part of the December 2019 Bundle" is a great example of a design where curved text can be incorporated.
Apparel and Accessories
- T-shirts: Adding arched slogans or names to the chest or sleeves of t-shirts.
- Tote Bags: Creating curved designs that wrap around the bag.
- Hats: Fitting text around the curved brim of a baseball cap.
Personalized Gifts
- Mugs: Bending text to follow the cylindrical shape of a mug.
- Tumblers: Similar to mugs, curved text can add a personalized touch to tumblers.
- Gift Tags: Creating elegantly curved sentiments for custom gift tags.
Advanced Design Techniques with Curved Text
- Combining Curved and Straight Text: For more complex designs, you might curve one line of text and keep another straight, creating visual contrast and depth.
- Layering Curved Text: Overlapping multiple lines of curved text can produce interesting shadow effects or layered sentiments.
- Using Curved Text with Shapes: Integrating curved text around or within other shapes, like circles, stars, or custom SVG elements, can lead to highly dynamic compositions. For instance, if you have a design with a laurel branch, you could place text like "EST. 2011" with elements of the laurel branch flanking the numbers, creating a balanced and attractive layout. This involves duplicating elements, flipping them horizontally, and aligning them precisely.
By understanding the various methods for curving text and considering how it can be integrated into different project types, crafters can significantly enhance the visual appeal and professionalism of their creations. The evolution of features within Cricut Design Space, such as improvements to text handling in recent versions (e.g., v7.11, v5.10, v5.14), indicates a continuous effort to make these advanced design techniques more accessible and user-friendly.