Photoshop, a powerhouse for image manipulation, offers a variety of methods to copy and paste elements, from simple duplication to intricate placement within selections. Understanding these techniques is fundamental for any user, whether you're a beginner looking to learn the basics or an experienced professional seeking to refine your workflow. This guide will delve into the nuances of copying and pasting, focusing on specific commands and their applications, including the powerful "Paste Into" feature and the essential steps for correcting perspective.
Selecting and Isolating Areas for Copying
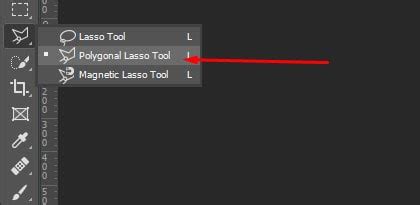
Before any copying can occur, the first crucial step is to define the area you wish to replicate. Photoshop provides an array of selection tools, each suited for different shapes and precision requirements. For irregular shapes or when precise points are needed, the Polygonal Lasso Tool is an excellent choice.
To employ the Polygonal Lasso Tool, you simply click around the area you want to select, adding points to define the boundaries. Photoshop then connects these points with straight lines. The key is to click in the spots where the line needs to change direction, effectively tracing the contours of your desired selection. For instance, to select the screen area of a television in an image, you would start by clicking in the upper left corner to establish a starting point. Moving clockwise, you would click in the upper right corner to add a second point, and continue this process until the entire screen area is outlined. It's important to remember that with the Polygonal Lasso Tool, you click to add a point and then release your mouse button; you do not click and drag. To finalize the selection, you click back on your initial starting point, closing the loop.
The "Paste Into" Command: Precision Placement
Once a selection is made, the "Paste Into" command offers a highly controlled method for inserting copied content. This command is particularly useful when you want to place an image or element directly within a pre-defined area of another image, ensuring it adheres to the selected boundaries.
The process begins with making a selection in your target image, as described above. Then, you open the image you intend to paste. To prepare this source image for pasting, you need to select the entire image. This is achieved by navigating to the "Select" menu in the Menu Bar and choosing "All." With both the selection in the target image and the entirety of the source image selected, you can then execute the "Paste Into" command.
When you use "Paste Into," the copied image is not merely placed on top of the target image. Instead, it is inserted directly into the active selection. A significant consequence of using "Paste Into" is that Photoshop automatically converts the selection into a layer mask. In the Layers panel, this mask will be visible as a thumbnail next to the image layer. The white areas of the mask represent the portion of the image that remains visible, corresponding precisely to the area you originally selected.
Understanding Layer Masks and Linking
The automatic creation of a layer mask when using "Paste Into" is a powerful feature that allows for non-destructive editing. It means the original pixels of the pasted image are preserved, and you can easily modify the visibility of the pasted content by editing the mask.
A crucial aspect to understand about layers and their masks is the concept of linking. Normally, an image layer and its associated layer mask are linked together. This linkage ensures that when you transform the layer (e.g., resize, rotate), the mask moves and scales along with it, maintaining their relationship. However, after using "Paste Into," you might notice that the selection outline disappears. This is a visual cue that the mask is now active.
In the Layers panel, you will observe that the area between the image thumbnail and the mask thumbnail is empty. This is the indicator that the image and its layer mask are linked. If you need to transform the pasted image independently of its mask, you can unlink them by clicking on the chain icon that typically appears between the image thumbnail and the mask thumbnail in the Layers panel. This unlinking allows you to resize or transform the image content without affecting the mask's boundaries, or vice versa.
Addressing Perspective Issues After Pasting
A common challenge when pasting images into selections, especially within objects that have a defined perspective like a television screen, is that the pasted image might appear flat while the target area is angled. This discrepancy creates a noticeable perspective issue.
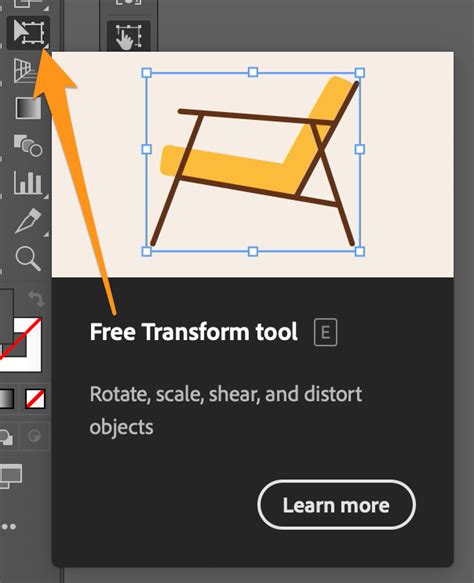
After pasting an image into a selection using "Paste Into," the selection outline itself disappears because it has been converted into a layer mask. However, you can still transform the pasted image to correct perspective. To do this, you'll typically use Photoshop's Free Transform tool (Ctrl+T or Command+T).
When the Free Transform bounding box appears around your pasted image, you can manipulate its corners and edges. If your pasted image is flat but the TV screen is on an angle, you'll need to adjust the pasted image to match that angle. Dragging a corner handle up or down can help align the angles of the pasted image with those of the television screen.
Photoshop offers different modes within Free Transform to assist with perspective correction. "Perspective" mode allows you to adjust the corners independently to create a sense of depth. In "Distort" mode, each corner handle can be moved independently, offering granular control. For example, you can drag the bottom right handle upward to align the bottom angles of the pasted image with the TV screen without affecting the top angles. This iterative adjustment of the corner handles allows you to make the pasted image conform to the perspective of the target area, making it look much more natural and integrated.
The goal is to make the angles of the pasted image align with the angles of the TV screen, ensuring a seamless integration. Sometimes, simply adjusting the overall size and position is sufficient, while other times, detailed perspective manipulation is required.
Duplicating Layers and Objects: Efficiency in Photoshop
Beyond the specific "Paste Into" command, Photoshop offers several straightforward methods for duplicating layers and objects, which are fundamental operations for many editing tasks.
The Classic Copy and Paste Shortcut
The most universally recognized shortcut for duplicating an object or layer is the classic Copy and Paste method. This involves selecting the desired content or layer and then using the keyboard shortcuts:
- Copy: Ctrl + C (Windows) or Command + C (Mac)
- Paste: Ctrl + V (Windows) or Command + V (Mac)
When you copy and paste a selection, the copied portion is typically placed on a new layer directly above the area it was copied from. This means you won't immediately see a visual change unless you examine the Layers panel or move the newly created layer.
The One-Step Duplicate Shortcut
For those who prefer to streamline their workflow, Photoshop offers a one-step shortcut that combines copying and pasting into a single action:
- Duplicate Layer: Ctrl + J (Windows) or Command + J (Mac)
This shortcut is incredibly efficient as it directly duplicates the active layer or selection onto a new layer without the intermediate step of copying to the clipboard. This shortcut is not always prominently listed in Photoshop's dropdown menus, making it a valuable tip for users seeking greater efficiency.
Duplicating Multiple Layers
When working with complex projects that involve numerous layers, the ability to duplicate multiple layers simultaneously is essential.
Using the Layers Panel:
- Open the Layers panel.
- Select the layers you wish to duplicate. You can select contiguous layers by clicking the first layer, holding down the Shift key, and then clicking the last layer. For non-contiguous layers, hold down the Ctrl key (Windows) or Command key (Mac) while clicking on each individual layer.
- Once selected, you can use the Copy and Paste shortcuts (Ctrl+C, Ctrl+V or Cmd+C, Cmd+V) or the Duplicate Layer shortcut (Ctrl+J or Cmd+J). The duplicated layers will appear above the original selected layers.
Image Duplication:While the term "image duplication" might sound broad, in the context of layers, it often refers to creating a duplicate of the entire canvas, which can then be used to isolate or further manipulate specific elements. However, for duplicating specific layers or groups of layers, the Layers Panel method is more direct.
Merging Layers After Duplication
After duplicating and potentially modifying layers, you might reach a point where you want to combine them into a single layer for easier management or to apply certain effects.
- Merge Layers: Ctrl + E (Windows) or Command + E (Mac)
This shortcut is extremely useful after you have duplicated the multiple layers you wish to duplicate and have made your adjustments. To use it, select the layers you wish to merge in the Layers panel by holding Shift and clicking. Then, press Ctrl+E or Command+E. The selected layers will be merged into a single layer.
Cloning: Direct Pixel Copying
Another powerful technique for copying and integrating elements within an image is cloning. Cloning allows you to sample pixels from one area of an image and paint them onto another area. This is particularly useful for removing blemishes, extending backgrounds, or seamlessly replicating textures.
The Clone Stamp Tool
The Clone Stamp Tool (shortcut 'S') is the primary tool for this operation. Here's how it works:
- Select the Clone Stamp Tool from the toolbar.
- To sample pixels, hold down the Option key (Mac) or Alt key (Windows) and click on the part of the image you wish to clone. This sets the source point.
- Release the Option/Alt key.
- Now, click and paint on the area where you want to place the cloned pixels. The tool will paint pixels from the source point onto your brush's path.
The effectiveness of cloning relies on carefully selecting source points and painting with a consistent brush size and opacity to ensure a natural blend.
When To Use Clone Stamp Vs Healing Brush (#Photoshop)
Considerations for Layered Files and Blend Modes
When working with files that have multiple layers, the behavior of copying and pasting can become more complex, especially when blend modes are involved.
If you make a selection on a specific layer and then use a copy-paste command, the pasted selection will not just be a part of that layer; it will include the blend mode that was set on that layer. For example, if you were on Layer 1 and applied an "Overlay" blend mode to it, then selected a portion of that layer and used Ctrl+J, the duplicated section would retain the "Overlay" blend mode.
This means that if you then turn off the original two layers, the pasted section will look different because it's still inheriting the blend mode's effect. The "old dog learned a new trick" anecdote in the provided text suggests that understanding how blend modes interact with selections and duplication is key to achieving the desired visual outcome. When you paste, the pasted part will look just like what you saw on the monitor if you've accounted for the blend mode's influence or if the paste operation inherently captures that visual appearance.
The best way to copy and paste is ultimately whichever method you remember and can execute efficiently. For beginners, starting with the fundamental Copy and Paste (Ctrl+C, Ctrl+V) and the Duplicate Layer shortcut (Ctrl+J) is recommended. As you become more proficient, exploring "Paste Into" and understanding the nuances of layer masks and blend modes will unlock more advanced possibilities for image manipulation.