Adding depth and dynamism to your graphic designs is crucial for creating visually compelling content. One of the most effective ways to achieve this is by applying perspective to text, making it appear as if it's receding into the scene or standing out with a three-dimensional quality. This tutorial will guide you through the process of transforming standard text into perspective-rich elements within Adobe Photoshop, ensuring your designs have that extra layer of polish and impact. We will explore various techniques, from basic transformations to more advanced methods, all while emphasizing non-destructive workflows that preserve editability and image quality.
The Challenge of Direct Text Transformation
When you first add text to an image in Photoshop using the Type Tool, you'll notice that many of the transformative options, particularly "Perspective" and "Distort," are greyed out. This is a deliberate design choice by Adobe. Photoshop treats Type Layers differently from pixel-based layers. Directly applying perspective or distortion to a Type Layer would fundamentally alter its vector-based nature, leading to potential quality degradation or the complete loss of text editability.
One might consider rasterizing the text, which converts it into pixels. While this would unlock the Transform options, it comes with significant drawbacks. Rasterizing means losing the ability to edit the text content or its properties later. Furthermore, applying transformations to pixel data can result in a loss of quality, especially when scaling or warping extensively. Similarly, converting text to a shape layer allows for more transformation freedom without quality loss, but it still severs the link to editable text.
The Power of Smart Objects: A Non-Destructive Solution
The key to applying perspective and other advanced transformations to text without sacrificing editability or quality lies in leveraging Photoshop's Smart Objects. A Smart Object is a container that preserves the original content of a layer, whether it's an image, vector art, or text. Transformations applied to a Smart Object are stored as separate, non-destructive edits, meaning you can always go back and modify or remove them without affecting the original content.
Here's the fundamental workflow for applying perspective to text using Smart Objects:
- Add Your Text: Begin by opening your desired background image in Photoshop. Select the Type Tool (T) and click on your canvas to add your text. You can type out your desired words, for example, "SPACE" or "ALIEN," and style it with different fonts, sizes, and colors as needed.
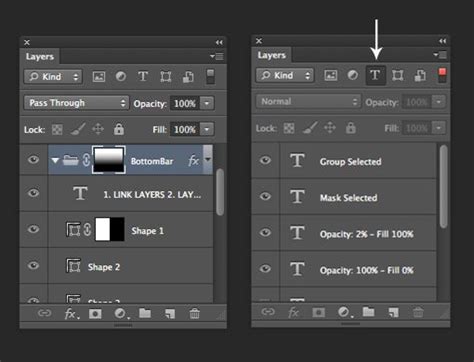
- Convert to Smart Object: Navigate to the Layers panel. Right-click on your active text layer. From the context menu, choose "Convert to Smart Object." You will notice that the layer icon changes, indicating its new Smart Object status.
- Access Transform Options: With the Smart Object layer selected, go to the Menu Bar and choose "Edit" > "Transform." Here, you will find various transformation commands, including "Perspective" and "Distort," which are now active.
Applying Perspective Transformation
Once your text is a Smart Object, you can effectively apply perspective. The "Perspective" transform is ideal for making text appear to recede into the distance, much like the iconic scrolling text seen at the beginning of the Star Wars movies.
- Select Perspective: Go to "Edit" > "Transform" > "Perspective." A bounding box with corner handles will appear around your text.
- Manipulate Perspective: Click and drag one of the corner handles. As you drag, you'll notice that the opposite corner handle moves in conjunction, creating a perspective effect. To achieve a "tilting back" look, you would typically drag an upper corner handle inward towards the center of the text. For instance, clicking the top-left handle and dragging it inwards towards the right will make the left side of the text appear closer and the right side recede.
- Combine with Scaling: Often, applying perspective alone might not yield the desired result. You might need to adjust the scale of the text simultaneously. For example, to make the text appear to stretch vertically as it recedes, you might need to switch to the "Scale" command. You can quickly switch between different transform modes by right-clicking (Windows) or Control-clicking (Mac) anywhere inside the document while the transform bounding box is active and selecting another option from the pop-up menu.
- Confirm Transformation: Once you are satisfied with the perspective and any associated scaling, press Enter or Return on your keyboard, or click the checkmark icon in the Options bar to commit the changes.
Perspective Text In Photoshop - Quick & Simple!
Exploring the Distort Command
While "Perspective" is excellent for uniform receding effects, the "Distort" command offers more granular control, allowing you to manipulate each corner handle independently.
- Select Distort: Go to "Edit" > "Transform" > "Distort." Again, a bounding box with corner handles will appear.
- Independent Manipulation: Unlike "Perspective," with "Distort," you can click and drag each corner handle in any direction, and they will move independently of each other. This is useful for more complex warping or for creating asymmetrical perspective effects.
- Cancelling or Committing: If you make changes with "Distort" but decide you don't like them, you can press the Esc key on your keyboard to cancel the transformation without committing. To commit, press Enter/Return or click the checkmark.
It's important to understand the difference: "Perspective" creates a symmetrical, vanishing-point-driven effect, while "Distort" allows for complete freedom in manipulating the corners. Often, a combination of these tools, along with scaling, is used to achieve the most realistic and impactful results.
Editing Smart Objects: The Non-Destructive Advantage
The true power of using Smart Objects becomes apparent when you need to edit your text. Because the text is embedded within the Smart Object, you can easily modify it at any stage.
- Open the Smart Object: In the Layers panel, double-click the Smart Object's thumbnail (the icon representing the layer, not the layer name). This will open the Smart Object in a new Photoshop tab.
- Edit Your Text: Your original text layer will be visible within this new document. Use the Type Tool to select and edit the text. For instance, you can change "SPACE" to "ALIEN."
- Save and Close: Once you have made your desired text edits, save the Smart Object document ("File" > "Save" or Ctrl+S/Cmd+S) and then close it ("File" > "Close" or Ctrl+W/Cmd+W).
- See Changes Reflected: Return to your main document. You will see that the text has been updated with your changes, and importantly, the perspective and any other transformations you applied are still intact. This non-destructive workflow means you can iterate on your text content and design choices without redoing complex transformations.
Advanced Techniques: Vanishing Point Filter and Blending
For even more sophisticated perspective matching, Photoshop offers the Vanishing Point filter. This tool is particularly useful when you need to place text onto a surface that has a complex perspective, such as a wall, a road, or a slanted floor.
- Prepare Your Text and Background: Add your text and convert it to a Smart Object as described earlier. You might also want to create a selection of your background image where you intend to place the text.
- Access Vanishing Point: Go to "Filter" > "Vanishing Point."
- Create a Perspective Plane: Within the Vanishing Point dialog box, use the Perspective Grid Tool to draw a plane that matches the perspective of your target surface in the background image. Photoshop will analyze the perspective lines you draw.
- Paste and Transform Text: Copy your text layer (or the Smart Object). Back in the Vanishing Point dialog, use Ctrl+V (Windows) or Cmd+V (Mac) to paste your text. Photoshop will attempt to align the pasted text to the perspective plane you created. You can further adjust its size and angle using Ctrl+T (Windows) or Cmd+T (Mac) directly within the Vanishing Point filter.
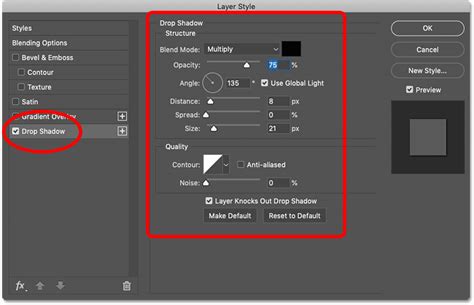
- Apply and Refine: Click "OK" to apply the transformation. You can then use layer blending modes and the "Blend If" option in the Layer Style panel to seamlessly integrate the text with the background, making it appear as if it's truly part of the scene.
Using Blend If for Integration:
The "Blend If" feature in the Layer Style panel is a powerful tool for making text (or any layer) blend more naturally with the layers beneath it.
- Open Layer Styles: Double-click your text layer to open the Layer Style dialog box.
- Access Blend If: Scroll down to the "Blend If" section at the bottom of the panel.
- Adjust Underlying Layer Toggles: You'll see two sliders: "This Layer" and "Underlying Layer." By adjusting the "Underlying Layer" sliders, you can control which tones of the underlying image are visible through your text layer. For instance, dragging the black slider of the "Underlying Layer" to the right can make the darker parts of the background show through your text, effectively "eating away" at the text where the background is dark, creating a more integrated look. You can hold Alt (Windows) or Option (Mac) and drag to split the slider for a smoother transition.
Perspective Warp for Finer Control
Another valuable tool for manipulating perspective is the "Perspective Warp" feature. This allows for more organic and precise adjustments to perspective, especially on complex shapes or when you need to bend and shape text in unusual ways.
- Create a Selection: Select your text layer. Hold Control (Windows) or Command (Mac) and click the layer's thumbnail in the Layers panel. This will create a selection in the exact shape of your text. Copy this selection (Ctrl+C / Cmd+C).
- Create a New Layer: Create a new, blank layer above your background image.
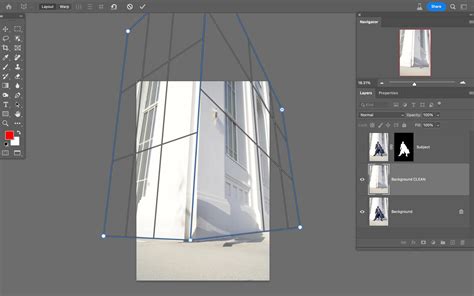
- Apply Perspective Warp: Go to "Edit" > "Perspective Warp."
- Define Planes: Click and drag to create perspective planes that match the desired angle or surface. You can create multiple planes to define complex perspectives.
- Warp the Text: Once your planes are set, switch to the "Warp" mode within the Perspective Warp tool. Now, you can drag the handles of your defined planes to warp the selected text content, making it conform to the perspective you've established.
- Paste and Commit: After warping, you can paste your copied text into the warped selection on the new layer. Commit the changes by pressing Enter/Return or clicking the checkmark.
Beyond Text: Applying Perspective to Other Elements
It's important to note that the techniques discussed hereâSmart Objects, Transform commands, and the Vanishing Point filterâare not limited to text. These methods can be applied to any layer in Photoshop, including logos, graphics, shapes, and even rasterized images. This versatility makes understanding perspective transformation a fundamental skill for any graphic designer. By mastering these tools, you can add a professional and engaging sense of depth and realism to a wide range of design projects, from posters and web banners to complex digital compositions.
The ability to create perspective text in Photoshop is a powerful technique that can elevate your designs from flat to dynamic. By understanding the limitations of Type Layers and embracing the non-destructive power of Smart Objects, you unlock a world of creative possibilities. Whether you're aiming for subtle depth or dramatic 3D effects, these Photoshop tools provide the control and flexibility needed to achieve stunning results.
tags: #photoshop #perspective #text