Adobe Lightroom Classic is a powerful tool for photographers, offering robust features for organizing, editing, and managing vast libraries of images. At the heart of this system lies the catalog, a database that acts as a central hub for all your photographic endeavors. Understanding how to create and manage new catalogs, while preserving your existing settings and workflows, is crucial for maintaining an efficient and organized digital darkroom. This guide will walk you through the process, from the fundamental creation of a new catalog to the strategic use of template catalogs for a seamless experience.
The Foundation: What is a Lightroom Catalog?
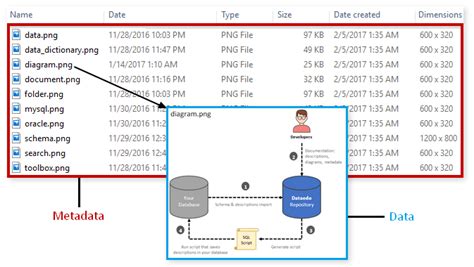
Before diving into the creation of new catalogs, it's essential to grasp what a catalog truly is. A catalog in Lightroom Classic is a database that stores a record for each of your photos. When you import photos into Lightroom Classic, you create a link between the actual photo file and the record of that photo within the catalog. Any work you perform on a photo-such as adding keywords, adjusting colors, or removing red-eye-is stored in that photo's record in the catalog as additional metadata. Crucially, Lightroom Classic never alters the original image files captured by your camera. This fundamental principle ensures that editing in Lightroom Classic is nondestructive, preserving your original images in their pristine state.
Lightroom Classic operates differently from a simple file browser like Adobe Bridge. File browsers require direct, physical access to the files they display. Your image files must be present on your hard drive, or your computer must be connected to storage media containing those files, for Adobe Bridge to show them. In contrast, because Lightroom Classic utilizes a catalog to keep track of photos, you can preview all imported photos even if the original source files are not immediately accessible by your computer. This is because the catalog stores a preview of each photo. This allows you to work with your photos in Lightroom Classic and see your editing changes in real-time as you work, regardless of where the original files are stored.
Lightroom Classic offers significant flexibility in managing, organizing, and editing photos. Your photos can reside anywhere-on the same computer as the Lightroom Classic application, on an external hard drive, or even on a network drive. However, it is important to note that you cannot store your catalog itself on a network.
Strategic Catalog Creation: The "File Menu > New Catalog" Approach
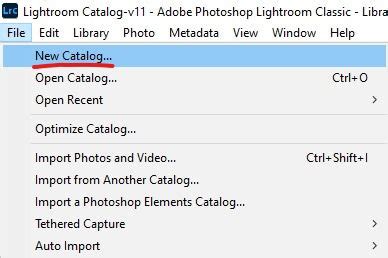
The most straightforward method for creating a new Lightroom Classic catalog is through the application's interface. This is accessible via the "File" menu, where you'll find the "New Catalog" option. When you initiate this process, Lightroom Classic will prompt you to name your new catalog and choose a location to save it. It's important to understand that when you create a catalog, a dedicated folder is also created for it. The name of this folder will be identical to the name of your catalog, minus the ".lrcat" file extension. For instance, if you name your catalog "Wedding Photos," the catalog file will be named "Wedding Photos.lrcat," and it will reside within a folder also named "Wedding Photos."
When you create a new catalog, Lightroom Classic will also prompt you to decide on its initial settings. These settings encompass various aspects of how Lightroom Classic will manage previews, metadata, and other operational parameters. For example, you can specify the frequency with which the current catalog is backed up, determine how Lightroom Classic renders different types of image previews, and set the maximum pixel dimensions for full-size rendered previews. It is advisable to choose a preview size that is equal to or larger than your screen resolution to ensure optimal display quality. For instance, if your screen resolution is 1920 x 1200 pixels, selecting a preview size of 2048 Pixels is a good practice.
You can also configure settings related to thumbnail previews, the discarding of 1:1 previews based on their last access, and the management of the preview cache. Limiting the preview cache size is a valuable feature that allows users to allocate a specific amount of disk space for previews. Once this limit is reached, Lightroom Classic will automatically begin purging older previews in the background to maintain the set limit, thus ensuring efficient disk space management and optimal application performance. Previews that are 30 days or newer are never automatically deleted. When the cache usage reaches 90% of the allocated limit, a notification will be displayed, alerting the user to the impending purge and offering an option to increase the cache size. The appropriate size for the preview cache is subjective and depends on the amount of disk space you are willing to allocate for previews. If you have ample space and are comfortable with Lightroom consuming it, you can set a higher limit.
Furthermore, you can configure settings for Smart Previews, which indicate how much disk space is being used by them. You can also specify starting sequence numbers for photos as they are imported into the catalog, including settings for "Import Number" (the first number in a series that identifies how many import operations are performed) and "Photos Imported" (the first number in a series that identifies how many photos have been imported into the catalog).
Preserving Your Workflow: The Power of a Template Catalog
A common concern when creating new catalogs is the desire to maintain specific "Catalog Settings," "Identity Plate," and "keywords." The concept of a "Template Catalog" is highly effective for this purpose. The fundamental idea is to create a catalog that is pre-configured with your preferred settings, saved "somewhere safe," and then used as a foundation for new catalogs.
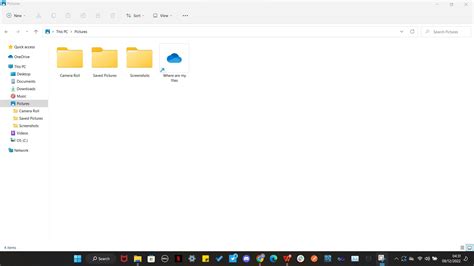
One method to achieve this involves using your current, master catalog as the source. If your current catalog contains all the Identity Plates and templates you desire, with Lightroom Classic closed, you can use your system's File Manager (Windows) or Finder (Mac OS) to create a copy of your existing catalog file (the one ending in ".lrcat"). Rename this copied file to something descriptive, such as "Catalog Template."
Once you have created this copy, open it in Lightroom Classic. Within this newly opened template catalog, you should then "remove" all images and folders. It is crucial to understand that "remove" in this context means to un-link them from the catalog, not to delete the actual image files from your disk. You can do this by selecting all photos and folders and choosing the option to remove them from the catalog. After this step, close Lightroom Classic. You will then have a ".lrcat" file that serves as your template, containing your desired settings but no images. You can then safely discard any associated files and folders that start with the name you used for your template catalog (e.g., "Catalog Template.lrcat.lock", "Catalog Template Previews.lrdata" if you don't intend to use them for the template itself).
When you need to create a new catalog with these pre-set configurations, you would simply duplicate this "Catalog Template" file, rename the duplicate to your new project's name, and then open this new catalog in Lightroom Classic. You can then proceed to import your images into this pre-configured catalog.
Alternative Template Catalog Strategy: Dynamic Template Creation
Another approach, particularly if your master catalog is constantly evolving with new keywords, collections, and settings, is to create a new catalog and then configure it to your preferences. This new catalog, even if initially empty of images, can serve as your template. You can then export your keywords as a text file from your master catalog and import them into this new, empty template catalog. This ensures that your keyword hierarchy and existing keywords are readily available in your new catalog from the outset. You can also save the template with keywords already imported.
This method offers a more dynamic way to manage your templates, especially when dealing with frequently updated keyword lists or specific project requirements. The key is to establish a process that suits your workflow and ensures consistency across your catalog structure.
Managing Metadata and Settings Across Catalogs
When creating a new catalog, preserving your existing metadata, such as keywords and potentially custom settings like Identity Plates, is a significant consideration. As mentioned, keywords can be exported and imported between catalogs. This is a vital feature for maintaining a consistent tagging system across different projects or organizational structures.
Importing and Exporting Keywords
To export keywords from your current catalog, navigate to "Edit" > "Keywords" (or "Lightroom Classic" > "Keywords" on macOS) and select the "Keywords" panel. Within this panel, you'll find options to export your keyword list. Typically, this is done by clicking on the small arrow or gear icon within the Keywords panel and choosing "Export Keywords." This will save your keywords as a text file, usually in a .txt format.
To import these keywords into a new catalog, open the new catalog, go to the same "Keywords" panel, and select the option to "Import Keywords." You can then select the text file you previously exported. This process ensures that your established keyword taxonomy is seamlessly transferred to your new catalog.
Identity Plates and Other Settings
Identity Plates are visual identifiers that can be customized within Lightroom Classic. If you have a specific Identity Plate set up in your master catalog that you wish to use in a new catalog, the template catalog method described earlier is the most effective way to achieve this. By copying a catalog that already contains your desired Identity Plate and then removing the images, you essentially preserve that setting within the template.
Other general preferences, such as the frequency of catalog backups, preview rendering settings, and cache management, can be configured when you first create a new catalog or adjusted later via the "Edit" > "Catalog Settings" (or "Lightroom Classic" > "Catalog Settings" on macOS) menu.
Considerations for Catalog Management and Organization
Approaching your work in Lightroom Classic with forethought is highly recommended. While it is possible to move catalogs and photos, place photos in multiple catalogs, and even combine or merge catalogs, these operations can lead to confusion and potentially break the links between your catalog and your photos. Therefore, it's wise to decide in advance where you intend to store your Lightroom Classic catalog and your photo files.
Where to Store Your Catalog and Photos
As previously stated, you cannot store your Lightroom Classic catalog on a network. Determine clearly where you want to keep your photo files. Consider the available disk space on your hard drive. Will it be sufficient for your current needs and future growth? If you work on multiple computers, keeping both your catalog and your photos on an external drive that can be plugged into either system can be a practical solution.
The "One Catalog" Philosophy
Although Lightroom Classic supports multiple catalogs, it is generally advisable to work with just one primary catalog. There is no upper limit to the number of photos you can house within a single catalog, and Lightroom Classic provides a myriad of ways to sort, filter, and otherwise organize and locate photos within that catalog. These methods include the use of folders, collections, keywords, labels, and ratings.
Moving and Renaming Photos: The Lightroom Way
After you begin working with your photos in Lightroom Classic, if you need to move or rename them-perhaps your hard drive fills up, and you need to switch to an external drive-it is imperative to perform these tasks from within Lightroom Classic itself. Do not use your operating system's Explorer (Windows) or Finder (Mac OS) to move or rename photos that are managed by Lightroom Classic. Performing these actions outside of Lightroom can break the links between your catalog and your image files, leading to "missing file" errors. Always use Lightroom Classic's built-in tools for managing the location and names of your photo files.
Understanding Catalog Settings and Previews
Lightroom Classic's Catalog Settings offer a range of options that significantly impact performance and organization. These settings provide information such as the location, filename, and creation date of the catalog. They also allow you to specify the frequency of catalog backups, which is a critical step in safeguarding your work.
Preview Cache Management
The management of image previews is a key aspect of catalog performance. Lightroom Classic renders three types of image previews: standard previews, 1:1 previews, and Smart Previews. Standard previews are generated during import and are used for general viewing. 1:1 previews are full-resolution previews that match the pixel dimensions of your original photos. They are particularly useful for detailed inspection and fine-tuning edits, as they display sharpening and noise reduction effects accurately. Smart Previews are smaller, optimized previews that allow you to edit your photos even when the original files are offline or inaccessible.
The "Limit preview cache size" option is a powerful tool for managing disk space. By allocating a specific size for the preview cache, you ensure that Lightroom Classic doesn't consume excessive disk space. Once the allocated limit is reached, older previews are automatically purged to maintain the set limit, contributing to efficient disk space management and optimal application performance. Previews that are newer than 30 days are protected from automatic deletion.
Metadata Handling
Another important setting relates to how metadata changes are saved. You can choose to "Save metadata changes to XMP sidecar files." When this option is selected, any metadata changes you make in Lightroom Classic are directly written to accompanying XMP sidecar files. This makes those changes visible and usable in other applications that can read XMP data. If this option is deselected, metadata changes are saved only within the Lightroom catalog itself.
Additionally, there's a setting that controls whether Lightroom Classic writes a new date and time to proprietary raw files when you use the "Metadata > Edit Capture Time" command to alter a photo's capture time metadata. This is important for maintaining accurate chronological records of your images.
The Evolution of Catalogs: Upgrading and Compatibility
Lightroom Classic catalogs are not backward compatible. This means that a catalog created or upgraded in a newer version of Lightroom Classic cannot be opened in an older version. When you open a catalog from an earlier version of Lightroom Classic (including beta versions) in a more recent version, Lightroom Classic will automatically upgrade it to the new format.
Be aware that after upgrading to a newer version of Lightroom Classic (e.g., version 14), if you then downgrade to a lower version and subsequently upgrade again to a higher version (e.g., version 11), Lightroom Classic might not automatically recognize the already upgraded catalog. In such scenarios, manual intervention or re-importing may be necessary.
You can rename an open catalog by navigating to "File > Rename Catalog" and typing the new name. This renames the catalog file and its associated folder.
Conclusion: A Well-Managed Catalog is a Productive Workflow
Creating and managing Lightroom Classic catalogs is a fundamental skill for any serious photographer. By understanding the role of the catalog, employing strategic template creation, and carefully managing metadata and preview settings, you can build a robust and efficient workflow. Whether you're starting fresh with a new catalog or migrating existing work, the principles outlined here will help you maintain organization, preserve your creative work, and ensure that Lightroom Classic remains a powerful ally in your photographic journey.