Adobe Photoshop stands as a titan in the digital design industry, recognized globally as one of the most powerful and valuable editing software. For aspiring designers and seasoned professionals alike, a foundational understanding of its tools is paramount. Among these, the concept of layers is not just essential; it's the very cornerstone of effective and organized image manipulation. Learning to create and manage new layers in Photoshop unlocks a new dimension of creative control, allowing for the construction of stunning images with unparalleled precision and minimal hassle. This guide will delve deep into the intricacies of layer creation, management, and their profound impact on your Photoshop workflow, from beginner to advanced levels.
The Indispensable Power of Layers in Photoshop
At its core, Photoshop's layer functionality is what distinguishes it as a premier graphics and photo editing software. Layers act as transparent sheets stacked upon one another, each capable of holding distinct elements of an image - be it photographs, text, shapes, or adjustments. This stacking mechanism is the key to non-destructive editing, a crucial paradigm in modern digital art.
Non-destructive editing, facilitated by layers, means you can make alterations to a specific part of your image without permanently affecting the original pixels. This is achieved by applying changes to a separate layer, which can then be modified, hidden, or deleted without impacting other elements. This approach offers immense flexibility, allowing for experimentation and easy correction of mistakes.
Organizing Your Creative Workflow
The inherent transparency of each layer allows you to build complex compositions by viewing various aspects of the image simultaneously. This organized approach is invaluable for intricate projects. Layering ensures your work remains well-structured, enabling you to backtrack through image adjustments with ease. Imagine having multiple versions of a design element on separate layers; you can toggle their visibility, tweak their properties, or even revert to an earlier iteration without compromising the entire project. This is particularly useful when working on detailed retouching, compositing multiple images, or applying complex special effects.
Isolating and Editing Image Elements
Furthermore, layering provides the ability to isolate specific portions of a digital image. Need to adjust the color of a particular object without affecting the background? Create a new layer, isolate that object, and make your adjustments there. This granular control ensures that edits to one part of the image do not inadvertently disrupt other areas, maintaining the integrity of your original photograph or design.
Creating Your First New Layer in Photoshop
The journey into mastering Photoshop layers begins with the simple yet crucial act of creating a new one. While the process is straightforward, understanding the options available can significantly enhance your workflow from the outset.
Step-by-Step Layer Creation
Open an Editable Image: The first prerequisite is to have an image open in Photoshop that you intend to edit. This could be a photograph, a scanned document, or a blank canvas.
Locate the Layers Panel: The central hub for all layer-related activities is the Layers panel. Typically, this panel is situated in the bottom-right corner of your Photoshop workspace. If it's not visible, you can access it by navigating to
Window > Layersfrom the top menu bar.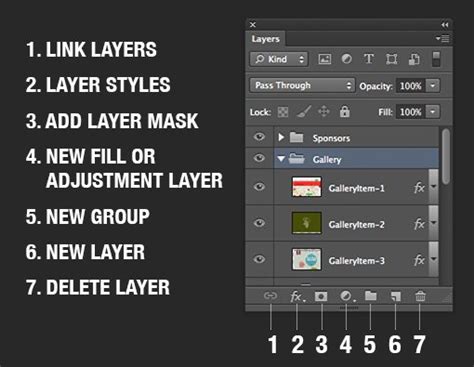
Initiate New Layer Creation: Within the Layers panel, you'll find a prominent icon that looks like a plus sign or a folded piece of paper, often labeled "Create New Layer" when hovered over. Clicking this icon will either immediately create a new, blank layer above your currently selected layer, or, depending on your Photoshop preferences, it may open a dialog box.
The New Layer Dialog Box (Optional but Recommended): If a dialog box appears, it presents crucial options for your new layer:
- Name: This is arguably the most important field. Avoid accepting default names like "Layer 1," "Layer 2," and so on. As you create more layers, a cascade of default names will quickly lead to confusion and a disorganized project. Instead, assign a descriptive name that clearly indicates the layer's purpose (e.g., "Subject Eyes," "Background Clouds," "Text Headline"). You can also rename a layer later by double-clicking its name in the Layers panel.
- Color: Photoshop allows you to assign a color label to each layer. This is a visual aid that helps you quickly identify and group related layers in the Layers panel.
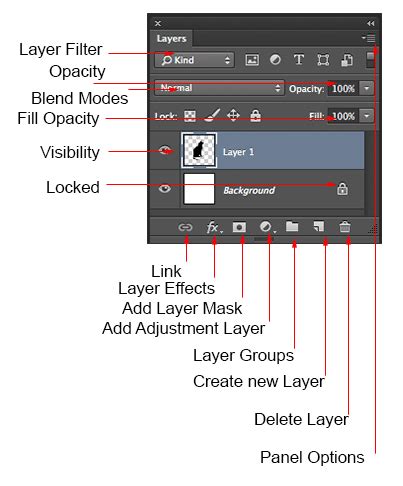
- Mode (Blending Mode): This setting determines how the pixels of your new layer interact with the pixels of the layers below it. Default is "Normal." Advanced users can experiment with modes like Multiply, Screen, Overlay, etc., to achieve various blending effects.
- Opacity: This slider controls the transparency of the layer. An opacity of 100% means the layer is completely opaque, while 0% makes it entirely invisible. Adjusting opacity allows for subtle blending and transparency effects.
Confirm and Create: Once you have configured the desired settings in the dialog box, click "OK." A new layer will be created in your Layers panel, positioned above the layer that was active when you initiated the process. Your original background layer remains untouched, preserving your source image.
Keyboard Shortcuts: The Swift Path to New Layers
For those who prioritize speed and efficiency, keyboard shortcuts are the most effective method for creating new layers.
- On Windows: Press
Ctrl + Shift + N. - On macOS: Press
Cmd + Shift + N.
This shortcut directly opens the "New Layer" dialog box, allowing you to configure its properties immediately. If you wish to create a new layer without the dialog box popping up (useful for quickly adding blank layers), you can use:
- On Windows:
Ctrl + Alt + Shift + N. - On macOS:
Cmd + Option + Shift + N.
This shortcut creates a new, blank layer with default settings directly above the current layer.
Understanding Different Layer Types
Photoshop offers a variety of layer types, each serving a distinct purpose within the creative process. These can broadly be categorized into two main groups:
Content Layers
These layers are the building blocks of your composition, containing the actual visual elements. This includes:
- Pixel-based (Image) Layers: These are your standard layers that hold rasterized image data, such as photographs or parts of photographs.
- Type Layers: Created when you use the Type tool, these layers contain editable text. They maintain their crispness regardless of scaling.
- Shape Layers: Generated using Photoshop's shape tools, these layers contain vector-based paths for geometric shapes. Like type layers, they are resolution-independent.
- Smart Object Layers: When you place an embedded image or convert a regular layer into a Smart Object, it becomes a special type of layer. Smart Objects preserve the original image data, allowing for non-destructive scaling, rotation, and filtering. Any edit applied to a Smart Object can be modified or reverted without degrading the image quality. However, to use features like blend modes or apply certain filters directly, you might need to rasterize the Smart Object, which converts it into a standard pixel layer.
Adjustment Layers
Adjustment layers are a powerful feature for non-destructive color and tonal corrections. Instead of directly altering the pixels of your image layers, you apply adjustments like brightness, contrast, saturation, hue, or levels to an adjustment layer. This layer then affects all the layers beneath it (or only specific layers if clipping masks are used). The key advantage is that you can modify, disable, or delete the adjustment layer at any time without damaging the underlying image data. This provides unparalleled flexibility for fine-tuning the look and feel of your artwork.
Managing Your Layers Effectively
As your projects grow in complexity, so will the number of layers. Efficient management of these layers is crucial for maintaining order and productivity. The Layers panel is your command center for all layer-related tasks.
The Layers Panel: Your Control Center
The Layers panel provides a comprehensive overview of your image's structure. Here, you can:
- View Layers: See all layers, layer groups, and their order.
- Identify Active Layer: The currently selected layer is highlighted, indicating where your edits will be applied. Always ensure you're working on the correct layer.
- Control Visibility: The eye icon next to each layer toggles its visibility. Clicking it hides or shows the layer. This is invaluable for comparing different versions or isolating elements.
- Link Layers: You can link multiple layers together. When linked, moving or transforming one layer will affect all linked layers simultaneously, ensuring they stay in their relative positions.
- Lock Layers: Layers can be locked to prevent accidental modifications. You can lock transparency, image pixels, position, or all of them.
- Delete Layers: Unnecessary layers can be removed by selecting them and clicking the trash can icon or pressing the delete key.
- Group Layers: To combat clutter, you can group related layers into folders. Select the layers you want to group, then click the folder icon at the bottom of the Layers panel. This helps organize complex compositions and allows you to manage multiple layers as a single unit. Color-coding layers and groups further enhances organization.
Merging Layers: Streamlining Your File
As you finish editing specific sets of layers, you can merge them to reduce the overall file size of your document and simplify the Layers panel. To merge selected layers, go to Layer > Merge Layers or use the keyboard shortcut Ctrl + E (Windows) or Cmd + E (macOS). Merging creates a single, new layer from the selected ones. Be aware that merging is a destructive process for the individual layers, so it's often best to duplicate layers before merging if you might need to revert to them later.
Smart Objects and Non-Destructive Operations
Smart Objects are a cornerstone of non-destructive editing. When you place an image into Photoshop as an embedded object or convert a layer to a Smart Object, it becomes a container for the original data. This means you can freely transform it (scale, rotate, skew) any number of times without losing quality. Filters applied to Smart Objects are "Smart Filters," which can be re-edited or removed at any time. However, certain operations, like direct pixel manipulation with brushes or applying certain blend modes without rasterizing, are not possible on Smart Objects. Rasterizing a Smart Object converts it into a regular pixel layer, making it editable but also subject to quality degradation with transformations.
Layer Masks: The Art of Concealment
Layer masks are a sophisticated tool for selectively hiding or revealing parts of a layer without permanently deleting pixels. They are grayscale images that work in conjunction with the layer they are attached to.
- White on a mask: Reveals the corresponding part of the layer.
- Black on a mask: Hides the corresponding part of the layer.
- Grays: Create semi-transparent areas.
When using the Brush tool with a layer mask active, painting with white will reveal the layer's content, while painting with black will conceal it. This allows for seamless blending, advanced compositing, and the ability to return to any point in your editing process to refine the mask.
Advanced Layer Techniques and Their Applications
Beyond basic creation and management, understanding more advanced layer functionalities opens up a world of creative possibilities.
Copying and Pasting Layers
You can copy layers between documents in several ways:
- Standard Copy/Paste (
Edit > CopyorCtrl/Cmd + C, thenEdit > PasteorCtrl/Cmd + V): This pastes the copied layer(s) into the center of the target document. - Paste Special > Paste In Place (
Edit > Paste Special > Paste In PlaceorCtrl/Cmd + Shift + V): This is incredibly useful for maintaining the relative positioning of elements. If you copy a layer from the bottom-right corner of a large document, "Paste In Place" will put it in the bottom-right corner of the new document, preserving its context. - Copying Selections to New Layers: You can select a portion of an image and then create a new layer from that selection using
Layer > New > Layer Via Copy(Ctrl/Cmd + J) orLayer > New > Layer Via Cut(Ctrl/Cmd + Shift + J). "Layer Via Copy" duplicates the selected pixels onto a new layer, leaving the original intact. "Layer Via Cut" moves the selected pixels to a new layer, deleting them from the original.
Important Note on Smart Objects: When copying and pasting Smart Object layers between documents, each pasted Smart Object becomes an independent instance. Edits to one will not affect the other.
Resolution Differences
Be mindful when copying and pasting layers between documents that have different resolutions. The pasted layer will retain its original pixel dimensions. This can lead to the pasted element appearing disproportionately large or small relative to the new image, requiring scaling adjustments.
Layer Groups and Organization
As mentioned, layer groups are essential for managing complex projects. They allow you to bundle related layers, collapse them for a cleaner view, and apply transformations or adjustments to the entire group. Color-coding within groups further enhances visual organization.
Creating Vector-Based Content
While most layers are pixel-based, Type layers and Shape layers are vector-based. This means they are defined by mathematical equations rather than pixels, allowing them to be scaled infinitely without any loss of quality. These are ideal for logos, text elements, and graphic shapes that may need to be resized frequently.
5 Pro Photoshop Masking Tricks You Don't Know (Probably)
Photoshop as a Marketable Skill
Proficiency in Photoshop, particularly in mastering its layer system, is a highly sought-after skill in the modern job market. The design industry, marketing, photography, and many other fields rely heavily on skilled Photoshop users. In the US, Photoshop artists can expect to earn an average annual salary of $62,052, reflecting the value placed on these digital competencies.
Enhancing Your Photoshop Expertise
To deepen your understanding and practical application of Photoshop layers and other features:
- Partake in Photoshop Tutorials: Numerous online resources offer tutorials for all skill levels, covering everything from basic tools to advanced photo effects, editing, and retouching.
- Enroll in Photoshop Courses and Internships: Formal education through online courses or hands-on experience via internships can provide structured learning and valuable insights.
- Consider Photoshop Bootcamps: For rapid skill acquisition, bootcamps offer intensive training programs designed to get you proficient quickly.
By thoroughly understanding and implementing the principles of layer creation and management in Photoshop, you are not just learning a software feature; you are acquiring a fundamental skill that empowers you to manipulate digital imagery with precision, creativity, and professional efficiency. The ability to work non-destructively, organize complex projects, and achieve sophisticated visual effects all stem from a solid grasp of Photoshop's indispensable layer system.