Figma, a powerhouse in the design world, is celebrated for its versatility and user-friendly interface. While it doesn't possess a native "curve text" feature, achieving this dynamic typographic effect is readily attainable through various workarounds. Curved text, where typography follows a path or curve instead of remaining straight, is a popular design technique that can significantly enhance the visual appeal of a project. This effect is frequently employed to craft engaging and creative visual designs, allowing text to bend or wrap around shapes, logos, banners, or decorative elements. Designers often utilize curved text for modern logos, badges, and circular layouts, adding a touch of style and creativity to their design projects.
Leveraging Plugins for Text Manipulation
While Figma lacks a built-in text-on-path functionality, the vibrant plugin ecosystem offers powerful solutions. These plugins automate the process, allowing designers to achieve curved text effects efficiently, especially when working under tight deadlines or on extensive projects.
The "ARC - Bend your type!" Plugin: A Popular Choice
One of the most frequently recommended plugins for curving text in Figma is "ARC - Bend your type!". This intuitive tool provides a straightforward method to bend your text upwards, downwards, or even into a complete circle.
To begin using "ARC - Bend your type!", follow these steps:
- Open your Figma project: Navigate to the Figma file where you intend to apply the curved text effect.
- Select the text: Click on the specific text element you wish to curve. This action ensures that all subsequent modifications will be applied to this selected text.
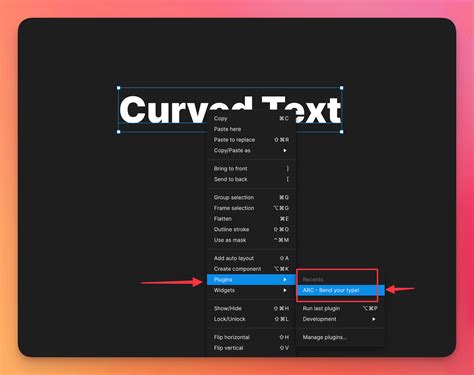
- Access Resources: Locate and click on the "Resources" icon within Figma's toolbar. This action will open a panel displaying available plugins and assets.
- Find and Install "ARC - Bend your type!": In the Resources panel, search for "ARC - Bend your type!". Once found, click on it to launch the plugin. If you haven't installed it previously, you'll see an "Install" or "Add" option.
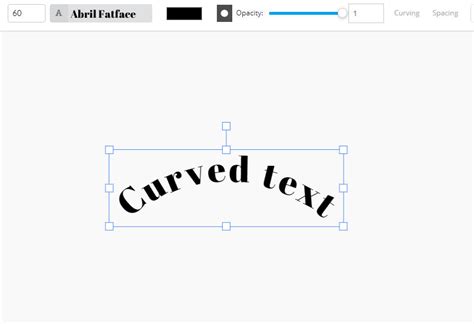
- Adjust Curve Settings: Upon launching the plugin, you will be presented with controls for "Bend Strength" and "Preview Zoom." The "Bend Strength" slider allows you to dictate the intensity of the curve, while "Preview Zoom" enables you to zoom in or out for a clearer view of the effect. Experiment with these settings until you achieve the desired curvature.
- Apply the Effect: Once you are satisfied with the appearance of your curved text, confirm your adjustments by clicking the "Apply" button. This action finalizes the effect on your selected text, transforming it into a curved element within your design.
Congratulations! Your text is now successfully curved in Figma, adding a dynamic and creative flair to your design.
How to Curve Text in Figma
Exploring Other Plugin Options
Beyond "ARC - Bend your type!", other plugins can assist in curving text. The "Circular Text" plugin, as its name suggests, is specifically designed to help you create circular text by wrapping your text around a circular path. Additionally, plugins like "Text on Path" offer the capability to create custom paths and align text along them, providing greater flexibility for more intricate curves.
Manual Workarounds and Advanced Control
For those seeking more granular control or a deeper understanding of the underlying principles, manual methods can also be employed.
Utilizing the Pen Tool for Custom Paths
While plugins offer convenience, you can also manually create curved text by drawing a custom path using Figma's Pen tool (shortcut 'P'). Once the path is created, you can then align your text to this path. This method offers maximum control over the shape and flow of your text.
Outlining Text for Precision
If you're looking to achieve a precise curve that might be difficult with plugins alone, or if you need to transfer curved text to Figma from another application like Adobe Illustrator, a crucial step involves outlining your text.
To outline text and preserve its appearance when transferring it to Figma:
- Duplicate your original text: Before making any modifications, create a duplicate of your editable text layer. This ensures you retain the original text for any future edits.
- Outline the text: With the text layer selected, use the shortcut Command + Shift + O on Mac or Control + Shift + O on PC. This action converts the text into vector paths, essentially turning each character into a shape.
- Copy and Paste: Now, copy the outlined text and paste it into your Figma project. This method prevents the text from becoming pixelated upon transfer and allows you to manipulate the vector shapes directly.
This technique is particularly useful if you're planning to create a circular logo using type on a path, and it provides a solid foundation for further manipulation within Figma.
Understanding Curved Text and Its Applications
Curved text is a typographic effect where text deviates from a straight line, following a predefined path or curve. This stylistic choice is prevalent in various design contexts:
- Logos and Branding: Curved text can lend a unique and memorable quality to logos, especially for brands seeking a dynamic or circular identity.
- Badges and Emblems: It's a common element in the design of badges, seals, and emblems, often forming the outer rim of the design.
- Circular Layouts: In web or UI design, curved text can be used to create engaging circular layouts for navigation elements, timelines, or decorative accents.
- Banners and Signage: For promotional materials or physical signage, curved text can add visual interest and guide the viewer's eye.
- Artistic and Decorative Elements: Beyond functional applications, curved text is a powerful tool for artistic expression, adding a sophisticated or playful touch to illustrations and graphic designs.
Frequently Asked Questions About Curving Text in Figma
To further clarify the process and address common queries, here are some frequently asked questions:
What is the easiest way to curve text in Figma?The most straightforward method is by using a plugin like "ARC - Bend your type!", accessible via the Resources panel. It simplifies the process by offering adjustable bend strength and a preview function before applying the effect.
Does Figma have a native text curving tool?No, Figma does not have a built-in tool specifically for curving text. Designers typically rely on plugins or manual workarounds involving vector paths.
How do I install a plugin in Figma?To install a plugin, click the "Resources" icon in the toolbar, search for the desired plugin by name, and then click "Install" or "Add." Once installed, it can be accessed from the plugins menu.
Can I edit curved text after applying the plugin?Generally, once a plugin applies the curve, the text is converted into vector paths and is no longer editable as standard text. It's advisable to finalize your text content before applying the curve effect. If you need to edit, you'll need to revert to the original text or recreate the curved shape.
What settings affect the curve of my text?The primary settings to adjust are "Bend Strength," which controls the degree of curvature, and "Preview Zoom," which aids in viewing the effect in detail before finalization.
Is the "ARC" plugin free to use in Figma?Yes, the "ARC - Bend your type!" plugin is available for free within Figma's plugin library, making it accessible to all users.
Can I curve text in any font using the "ARC" plugin?While most fonts can be curved successfully, highly decorative or complex fonts might render differently. It's always recommended to test the plugin with your specific font choice.
How do I remove the curve effect if I donât like it?Since the plugin converts text to paths, the most effective way to "remove" the curve is to delete the curved shape and revert to a saved copy of your original, editable text or recreate it. Always keep a backup of your original text before applying such effects.
Can I curve multiple lines of text with the "ARC" plugin?The "ARC - Bend your type!" plugin is typically designed to work best with single-line text elements. For multi-line text, you might need to apply the effect to each line individually or explore other plugins that offer more advanced capabilities.
Enhancing Your Design Workflow
For those looking to delve deeper into Figma and master its various features, resources like BYOL offer comprehensive courses. These courses cover essential UI/UX design principles, advanced Figma tutorials, and supplementary content on other design software. Engaging with such platforms can provide personalized support, certificates, and opportunities to participate in community challenges, further refining your design skills.
While Figma may not have a built-in feature for text curving, the combination of powerful plugins and manual techniques provides ample opportunities to achieve this dynamic effect. By understanding these methods and experimenting with different tools, you can effectively elevate your designs, making your text more engaging and visually striking.