Creating a professional-looking booklet, whether for a school project, a business presentation, or a personal publication, often begins with the desire to achieve a magazine-like finish. Adobe InDesign offers a robust platform for laying out your content, and understanding its printing capabilities is key to transforming your digital design into a tangible booklet. This guide will walk you through the essential steps, from initial document setup to the final print, ensuring a hassle-free and high-quality outcome. Whether you opt for a do-it-yourself printing approach or leverage professional services, the principles of booklet creation remain consistent.
Phase 1: Setting Up Your InDesign Document for Booklet Printing
The foundation of a successful booklet lies in its proper setup within InDesign. This involves establishing the correct document properties, ensuring consistent formatting, and preparing your content with printing in mind.
Creating a New Document and Page Count Requirements
When initiating a new project, or working with an existing document, it's crucial to consider the specific requirements for booklet printing. A fundamental rule for saddle-stitched booklets is that the total page count must be a multiple of four. This is because each physical sheet of paper, when folded and bound, accommodates four pages of content: two on the front side and two on the back. Therefore, pages like 8, 12, 16, 20, 32, and so on, are ideal.
To begin, navigate to File > New > Document. Here, you will specify the number of pages, page orientation (portrait or landscape), and other initial settings. For booklet layouts, it is highly recommended to select the 'Facing Pages' option. This setting displays your document pages in spreads, mirroring how they will appear when printed and bound, with a left-hand and a right-hand page side-by-side. This visual representation greatly aids in designing your booklet's flow and layout.
Defining Page Size, Margins, and Bleed
The 'Document Setup' dialog box, accessible via File > Document Setup, is where you define the dimensions of your booklet. The page size should correspond to the final trim size of your booklet after printing and binding. For instance, if your final booklet is to be A5 size, you would set your document pages to A5.
Margins are essential for providing visual breathing room around your content and ensuring that critical elements are not accidentally trimmed during the binding process. It is a common best practice to keep important content, such as text and key image elements, at least ¼ inch (or 6mm) away from the edge of each page. This safe zone prevents vital information from being cut off.

Bleed is an additional area of your document that extends beyond the trim edge. This is crucial for any design elements, such as images or background colours, that are intended to extend all the way to the edge of the finished page. When the booklet is trimmed, the bleed area ensures there are no white unprinted gaps. For bleed, it is recommended to include at least ⅛ inch (or 3mm) of bleed on all sides of your document. This extra area allows for slight variations in the trimming process.
Leveraging Master Pages and Styles for Consistency
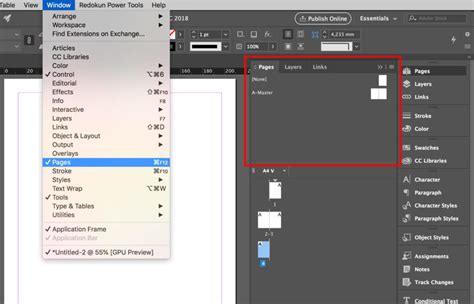
Master Pages in InDesign act as templates for your document. They are invaluable for maintaining consistency across multiple pages. Elements placed on a Master Page, such as page numbers, headers, footers, or consistent background graphics, will automatically appear on all document pages to which that Master Page is applied. You can access and manage Master Pages through the 'Pages' panel (Window > Pages). Dragging a Master Page onto a document page applies its layout.
Similarly, Paragraph Styles and Character Styles are powerful tools for ensuring uniform typography throughout your booklet. By defining styles for different text elements (e.g., body text, headings, subheadings), you can apply formatting consistently with a single click. This not only saves time but also makes it easy to make global changes if needed. Styles can be managed via the 'Paragraph Styles' and 'Character Styles' panels (Window > Styles).
Phase 2: Preparing Your Content for Print
Once your document is structurally set up, the next critical phase involves refining your content to ensure it's print-ready and free from common errors.
Adjusting Text Frames and Images
The placement and sizing of your text frames and images directly impact the readability and aesthetic appeal of your booklet. Use the Selection Tool to resize images and text frames by dragging their bounding box corners. When resizing images, it's vital to hold down the 'Shift' key while dragging the corners to maintain their original proportions and avoid distortion. Ensure adequate spacing between text and images for a clean and uncluttered layout.
For text, ensure that text frames are large enough to accommodate all your content without overset text (indicated by a small red plus sign in the text frame). If text is overflowing, you can either resize the frame or adjust the text formatting.
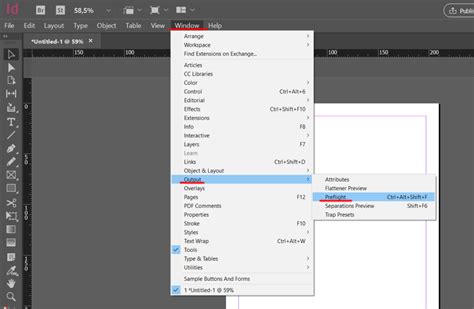
Utilizing the Preflight Tool for Error Detection
Before you even consider printing, InDesign's Preflight tool is your best friend for catching potential print errors. This powerful feature automatically checks your document for issues that could lead to printing problems. You can find the Preflight status indicator at the bottom of your InDesign window. A green dot signifies that there are no errors, while a red dot indicates that issues have been detected.
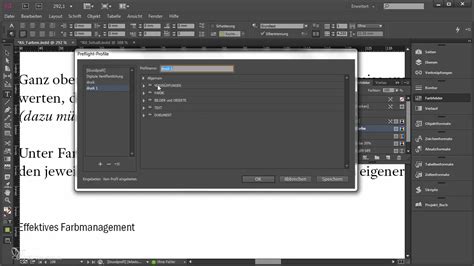
Clicking on the Preflight indicator will open the 'Preflight' dialog box, providing a detailed report of any problems found. Common issues include missing fonts, overset text, images with insufficient resolution (low-res images), or incorrect colour profiles. Addressing these issues proactively will save you significant time and potential frustration during the printing process.
Phase 3: Configuring Print Settings for Booklet Imposition
This phase focuses on telling InDesign how to arrange your pages for printing in a booklet format, a process known as imposition.
Selecting 'Print Booklet' and Imposition Options
To initiate the booklet printing process, navigate to File > Print Booklet. This opens the 'Print Booklet' dialog box, which is specifically designed for creating print-ready spreads for binding.
Within this dialog box, you'll encounter various options for booklet types. For standard saddle-stitched booklets, the '2-up Saddle Stitch' option is typically the most suitable. This setting arranges two pages side-by-side on each sheet of paper, ready for folding and stapling. Other options, like '2-up Consecutive' or '4-up N-up', might be used for different binding methods or more complex layouts.
Customizing Print Settings and Printer Choice
After selecting your booklet type, click on the 'Print Settings' button. This will open the standard InDesign print dialog window. Here, under the 'Printer' dropdown, you will select the specific printer you intend to use. It is crucial to select the correct printer, as each printer model has different capabilities, paper handling, and margin settings, which can significantly affect the front-to-back alignment of your printed pages.
In the 'Setup' tab, you can define the paper size that your printer will use and set the page orientation. If your printer supports duplexing (double-sided printing), you will need to configure this setting. For most public laser printers, this option is found under 'Finishing' (often within a 'Layout' or 'Options' section of the printer driver settings) where you can select 'Two-Sided' and choose 'Short-Edge binding'. Short-edge binding is essential for booklets, as it ensures the pages flip correctly when bound along the short edge of the paper.
Adding Marks and Bleeds, and Previewing the Layout
Under the 'Marks and Bleed' section of the print dialog, you can opt to include 'Crop Marks' and 'Bleed Marks'. Crop marks indicate where the paper should be trimmed to achieve the final page size. Bleed marks visually confirm that the bleed area has been correctly set up.
Crucially, before committing to printing, always utilize the 'Preview' tab within the 'Print Booklet' dialog box. This feature generates a visual representation of how your pages will be imposed onto each sheet of paper. You can scroll through the preview to ensure that the front cover and back cover appear on the first spread, and that the interior pages are correctly ordered and paired. This preview is your final opportunity to catch any layout errors before printing begins.
Phase 4: Printing the Booklet
With all settings configured, it's time to send your document to the printer.
Final Review and Confirmation of Print Settings
Before clicking the 'Print' button, take a moment to review all your selected settings. Double-check the printer selection, paper size, orientation, duplexing settings, and any marks you've chosen to include. If you're printing on specific paper stock, ensure your printer is loaded with the correct paper and that the printer settings reflect this. Confirming these details now can prevent costly mistakes and wasted paper.
Initiating the Printing Process
Once you are confident that all settings are correct, click 'Print' in the 'Print Booklet' dialog box. Your InDesign document will then be sent to the selected printer, and the printing process will commence. The time required will depend on the number of pages in your booklet and the speed of your printer.
Phase 5: Troubleshooting Common Printing Issues
Even with careful preparation, printing can sometimes present challenges. Knowing how to address common problems can save your project.
Addressing Paper Jams or Misalignment
Paper jams are a frequent annoyance. If a jam occurs, carefully follow your printer's instructions to remove the jammed paper without damaging the printer's internal mechanisms. For issues with paper misalignment, ensure that the paper is loaded correctly in the tray and that the paper guides are snug against the paper stack. Also, re-verify that the paper size and type settings in both InDesign and your printer's driver match the paper you are using. Consulting your printer's manual can often provide specific troubleshooting steps.
Resolving Colour and Font Issues
Colour discrepancies can occur if the document's colour mode doesn't match the printer's capabilities, or if the screen calibration is inaccurate. For professional printing, ensure your document is set to CMYK colour mode. Also, check your printer's colour settings, as they can sometimes be adjusted to compensate for perceived differences.
Font issues, such as missing characters or incorrect rendering, typically arise when the fonts used in your InDesign document are not available on the printer's system or are not embedded in the file. Ensure all necessary fonts are installed on the computer you are printing from. If you are exporting to PDF for printing elsewhere, embedding fonts within the PDF is a crucial step.
Alternative: Exporting as a PDF for Professional Printing
For a more professional outcome or if you are using a printing service, it is often recommended to export your InDesign document as a high-resolution PDF. This can be done via File > Export and choosing Adobe PDF (Print). When exporting, ensure you select a preset like 'Press Quality' and that your bleed settings are correctly applied in the export dialog under the 'Marks and Bleed' section. This ensures that all your design elements, including bleed and crops, are included in the file. Many printing services prefer to receive a PDF, as it is a universal format that preserves your layout and can be easily processed by their professional printing equipment.
Export a Print-Ready PDF from InDesign (2025 Tutorial)
Full-Service Booklet Orders
For those who prefer a hands-off approach to booklet production, many printing services offer full-service options. This typically involves submitting your InDesign file or a high-resolution PDF along with specific instructions.
Design and Submission Requirements
When ordering full-service booklets, adhere strictly to the designer's specifications. As noted, booklets require a page count that is a multiple of 4. The first page serves as the front cover, and the last page as the back cover. Using a template provided by the service can be highly beneficial.
For InDesign users, packaging your file using File > Package is essential. This command gathers your InDesign document, linked images, and fonts into a single folder, ensuring the printer has all necessary components. If using another application, exporting a high-quality PDF is the standard procedure.
It's also critical to keep important content within a safe margin, typically ¼ inch from the trim edge, and to include at least ⅛ inch of bleed for elements extending to the page edge. Proofing your document thoroughly on-screen or through a black and white printout is a vital step to catch errors before submission.
The Printing Service's Workflow
Upon receiving your order, the printing service will typically confirm the details and provide an estimate. They will then meticulously check your files for completeness and correct setup. The printing process itself involves ensuring precise front-to-back alignment and registration. Following printing, the booklets are bound, and if requested, trimmed to their final size. Your account will then be charged, and your completed booklet will be ready for pickup or delivery.
Making an appointment to discuss your project with a printing service is often recommended, especially for complex or large-volume orders. Most services require booklet orders to be submitted at least 24 hours in advance to ensure timely production.