Unwanted elements can detract from an otherwise perfect photograph, pulling focus away from your intended subject and disrupting the overall aesthetic. Whether it's a distracting tourist, unsightly power lines, or stray text, the ability to effectively remove these objects is a crucial skill for any photographer or digital artist. Adobe Photoshop, with its evolving suite of tools, offers powerful solutions for object removal, ranging from traditional techniques to cutting-edge AI-driven features. This guide will explore these methods, providing a detailed understanding of how to achieve clean, natural-looking results.
The Evolution of Object Removal in Photoshop
Historically, removing unwanted objects from images in Photoshop involved meticulous manual techniques. Tools like the Clone Stamp Tool and the Healing Brush Tool required users to carefully sample pixels from surrounding areas and paint them over the unwanted object. While these methods can yield excellent results, they are often time-consuming and demand a high level of skill and patience, especially for complex backgrounds or intricate details.
The advent of Content-Aware Fill marked a significant leap forward. This feature analyzes the surrounding pixels and intelligently fills the selected area with content that seamlessly blends with the background. It was a game-changer, reducing the manual effort required for many object removal tasks.
More recently, Adobe has integrated Artificial Intelligence (AI) into its creative tools, revolutionizing object removal with features like Generative Fill and Generative Remove. These AI-powered tools leverage sophisticated algorithms to understand image content and generate realistic replacements for removed objects, often in mere seconds.
Leveraging Generative Remove for Effortless Object Deletion
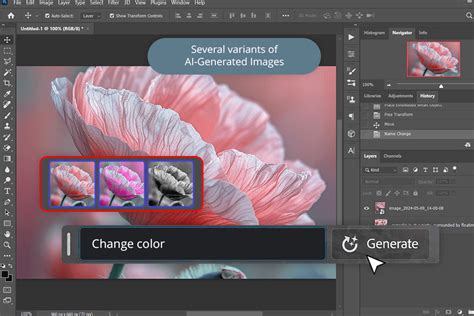
Generative Remove, a feature powered by Adobe Firefly's generative AI models, offers an incredibly intuitive and efficient way to eliminate unwanted elements from your photos. This technology is designed to be commercially safe, as the AI models were trained on licensed content, such as Adobe Stock, and public domain content where copyright has expired. This ensures that creators can use the tool with confidence.
The process with Generative Remove is remarkably straightforward, requiring no prior design skills. Here's how it works:
- Access the Firefly Image Editor: Log in to Adobe Firefly with your Adobe ID, or create a free account if you don't have one.
- Select Generative Remove: From the Quick Actions Menu, choose Generative Remove.
- Brush Over the Unwanted Object: Use the provided brush tool to paint over the area or object you wish to remove. You can adjust the brush size and hardness using the toolbar to precisely target your selection.
- Generate and Refine: Click the "Generate" button. Firefly's AI will analyze the surrounding pixels and automatically fill the area with natural-looking results, effectively eliminating the unwanted object while preserving the authenticity of the image.
- Review and Save: Once you are satisfied with the generated result, you can download the edited image, copy it to your clipboard, or share it directly with others.
Generative Remove excels at handling a wide array of distractions, from unsightly trash cans in landscape settings to inconvenient tourists photobombing your shots. It can also eliminate power lines, wires, street signs, random logos, watermarks, or stray text that might otherwise ruin an otherwise perfect photo. The AI's ability to mimic human intelligence in filling these gaps ensures that the visuals remain clean, polished, and true to their original creative intent.
Advanced Techniques for Precision Removal
While Generative Remove offers unparalleled ease of use, Photoshop provides a range of more granular tools for situations requiring absolute precision or when dealing with particularly challenging edits.
Content-Aware Fill
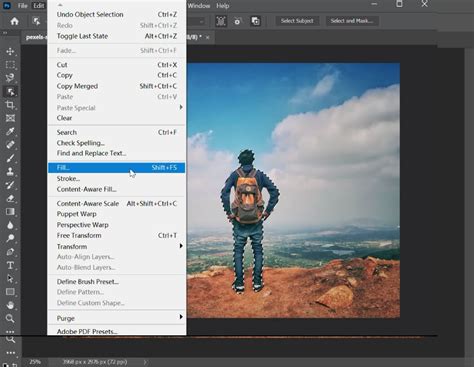
Content-Aware Fill remains a powerful option for removing objects, especially when Generative Remove might not produce the desired outcome or when you need more control over the sampling area.
- Select the Object: Use selection tools like the Lasso Tool, Quick Selection Tool, or Pen Tool to carefully select the object you want to remove.
- Access Content-Aware Fill: Go to
Edit > Content-Aware Fill. - Refine the Sampling Area: A dedicated workspace will appear, showing a preview of the result. The green overlay indicates the areas Photoshop will sample from. You can use the brush tool within this workspace to add or subtract from the sampling area, guiding Photoshop to use the most appropriate pixels for filling.
- Adjust Settings and Output: Experiment with the "Color Adaptation" and "Rotation Adaptation" settings for better blending. Choose where you want the output to go (e.g., new layer, current layer).
- Apply: Click "OK" to apply the fill.
The Clone Stamp Tool
For highly detailed areas or when you need to precisely replicate textures and patterns, the Clone Stamp Tool is indispensable. It requires manual sampling and painting, offering complete control.
- Select the Clone Stamp Tool: (Shortcut:
S) - Choose a Brush: Select an appropriate brush tip, adjusting size, hardness, and opacity as needed.
- Define the Source Point: Hold down
Alt(Windows) orOption(Mac) and click on an area of the image that you want to copy. This is your source point. - Paint Over the Object: Release the
Alt/Optionkey and paint over the unwanted object. Photoshop will copy pixels from your source point to the area you are painting. - Resample Frequently: For realistic results, it's crucial to redefine your source point frequently by re-sampling from different areas of the background.
The Healing Brush Tool and Spot Healing Brush Tool
These tools are excellent for removing blemishes, small imperfections, and even larger objects by blending sampled textures with the color and luminosity of the surrounding area.
- Spot Healing Brush Tool: (Shortcut:
J) This tool works similarly to Content-Aware Fill. Simply brush over the imperfection, and Photoshop will automatically sample and blend. It's ideal for quick fixes. - Healing Brush Tool: This tool requires you to manually define a source point, similar to the Clone Stamp Tool. You then paint over the unwanted area, and Photoshop blends the texture from the source with the color and tone of the destination.
Removing Text from Images
Removing text from photos is a common requirement, whether it's a watermark, a sign, or an accidental inscription. Both Generative Remove and traditional Photoshop tools can handle this effectively.
Using Generative Remove, as described earlier, is the quickest method. Simply brush over the text, click "Generate," and the AI will intelligently fill the space.
For more control, Content-Aware Fill or the Clone Stamp Tool can be employed. When using these tools, pay close attention to the background texture behind the text. If it's a complex pattern or a detailed surface, you'll need to carefully sample and blend to ensure a seamless result.
How to Edit Document and Certificate in Photoshop - Document or Certificate ko edit kaise karen 2022
Considerations for Achieving Realistic Results
Regardless of the tool you choose, several principles will help you achieve the most realistic and professional-looking results when removing objects:
- Understand the Background: The complexity of the background is the most significant factor. A simple, uniform background is much easier to work with than a busy, textured, or patterned one.
- Work on Separate Layers: Whenever possible, perform your object removal on a new, empty layer. This non-destructive workflow allows you to easily make adjustments or undo mistakes without affecting the original image data.
- Use Appropriate Brush Settings: For Content-Aware Fill and the Healing Brush tools, experiment with opacity and flow to achieve subtle blending. For the Clone Stamp Tool, hardness and spacing are critical for matching textures.
- Pay Attention to Light and Shadow: When filling an area, consider the direction of light and the presence of shadows. The AI tools are generally good at this, but manual techniques require you to consciously replicate these elements.
- Zoom In and Inspect: Always zoom in to 100% or more to inspect your work for any artifacts, repeating patterns, or unnatural-looking transitions.
- Combine Techniques: For challenging removals, you may need to combine multiple tools. For instance, you might use Generative Remove for the bulk of the object and then refine the edges with the Clone Stamp Tool.
Avoiding Common Pitfalls
- Over-reliance on a Single Tool: While AI tools are powerful, they are not infallible. Understand the strengths and weaknesses of each tool and use them judiciously.
- Ignoring the Surrounding Area: Don't just focus on removing the object; consider how the removal impacts the surrounding pixels. Look for unnatural edges or inconsistencies.
- Creating Repeating Patterns: A common mistake with manual tools is creating an obvious, repeating pattern. Constantly vary your source points and brush strokes to avoid this.
- Failing to Consider Perspective: When removing objects from images with strong perspective, ensure that the filled area maintains the correct lines and angles.
By understanding the capabilities of Photoshop's diverse toolset, from the AI-driven efficiency of Generative Remove to the precise control offered by traditional methods, you can confidently tackle any object removal challenge. The key lies in practice, careful observation, and a willingness to experiment with different approaches to achieve the cleanest, most natural-looking results.